Exercise-007 Implementing ALARM_SETTING state
In the previous article, I give you a task to complete this Alarm Setting state. Let me explain that in this article. I have done a couple of changes here, and let me explain that.
First of all, in the Clock_setting state, whenever we are in the cs_format state, and when the OK signal arrives (cs_format state handles the OK signal), and if this is_time_set error function if it returns false, that means everything is fine, but this guard condition fails.
When that guard condition fails, this OK is propagated to the superstate, and the superstate of this Clock_Setting is the Setting state. From Setting state, we take a transition. And while taking a transition, we also update the current time variable.
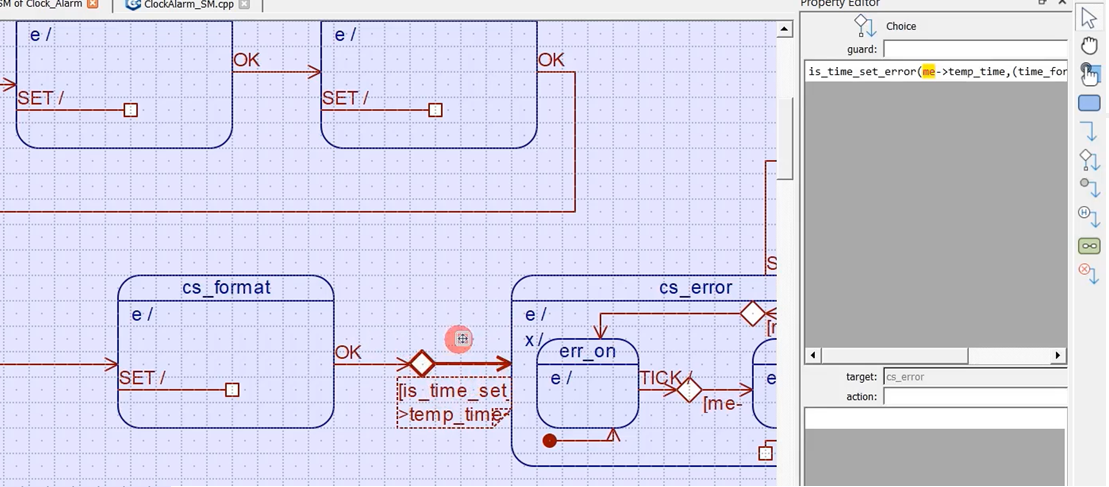
But that’s not the correct way. Because the action to take when the final OK signal arrives in this Clock_setting state is different, and in this Alarm_Setting state, it is different.
For the final OK signal, there is a unique action to take here in Clock_Setting, and there is a separate action to take here in Alarm_Setting.
The change I did was I just created a new internal transition for the OK signal in the Clock_Setting state. And the code whatever there is in this OK transition, I just moved that inside this Clock_Setting state OK signal. (Figure 2)
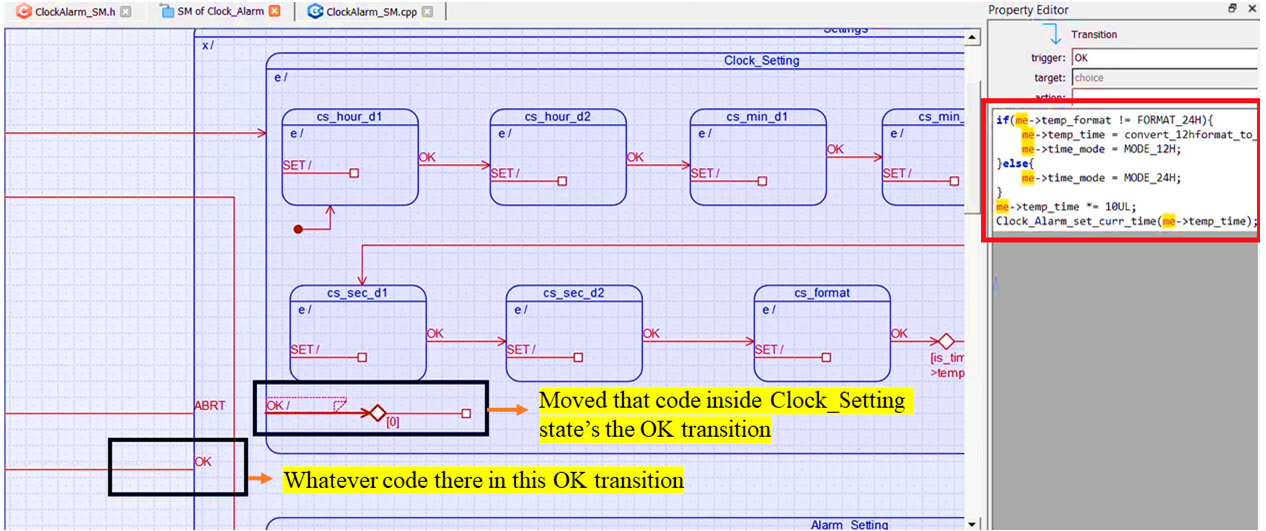
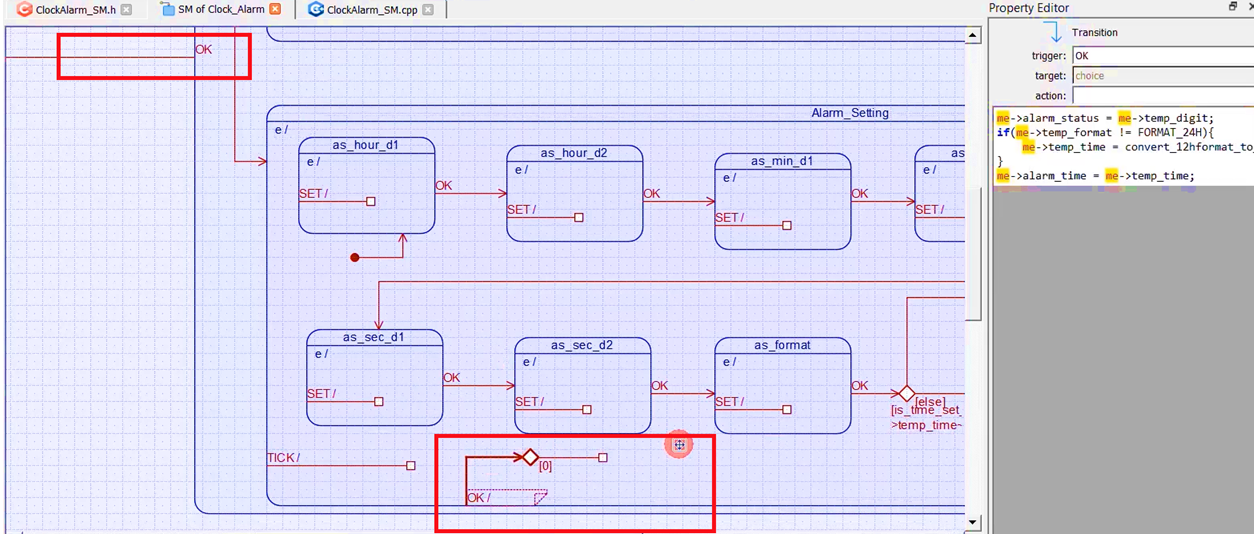
Because when the final OK signal arrives, we have to take one action here, which is different from the action what you’re going to take in the Alarm_Setting state when the final OK signal arrives. That’s why there are two different actions to take. You cannot manage those two actions in this OK transition. So, create a separate OK signal in both the Clock_Setting state and the Alarm_Setting state.
After that, I just used one dummy guard state here, which is always false. The guard is 0, as shown in Figure 4.
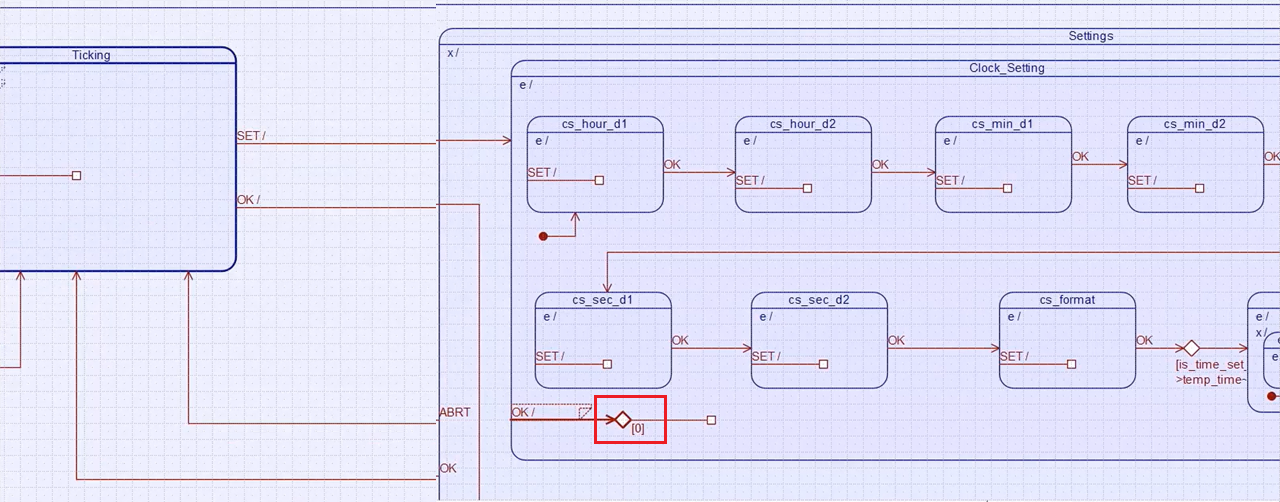
How to analyze this?
Whenever you are in Clock_Setting and whenever you are in cs_format state and when the OK arrives and if this is_time_set guard condition fails, then OK is propagated to the superstate, that is Clock_Setting state.
And this superstate handles OK here. There is already one action defined, that is, this action updating the current time variable, and then this guard will be evaluated, and this guard is always false. That’s why this guard always fails. That’s why this OK is propagated to the next superstate, i.e., Settings. And Settings handles that signal OK, and we will take a transition to the Ticking state. That’s a change you have to notice in the Clock_Setting state.
Now let’s go to the Alarm_Setting state. I copy-paste all the states here from Clock_Setting. These are exactly the same as before but change the state name. As you can see here(Figure 5), I have changed the state name; don’t give the same state name. Otherwise, there will be conflicts in naming the state handler functions. All these are the same.
Here we come to the format, what happens? as_error state is again the same as before. If is_time_set_error is true, then we display the error. Everything is the same as before. The only difference here is this transition(Figure 5). I’ll delete this transition. I will show you how to draw that.

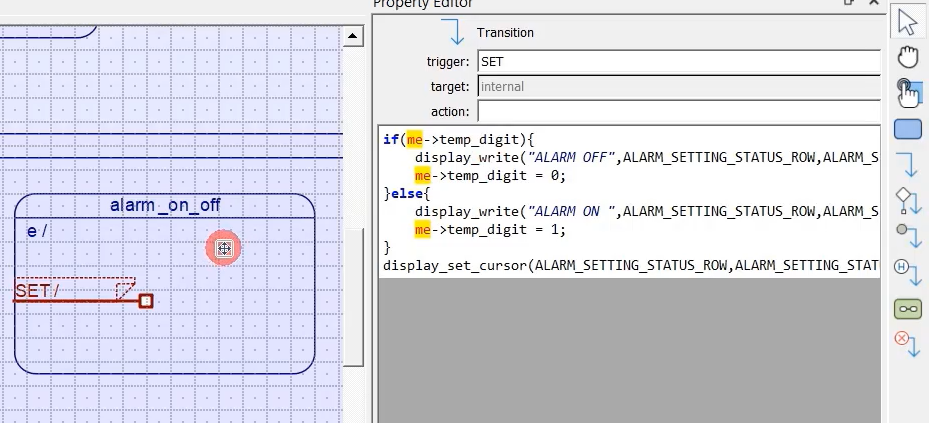
In this alarm_on_off state, you can select whether the Alarm should be turned ON or OFF. So, the user does all the Alarm_Settings and finally, the user has to select whether he wants to turn the Alarm ON or turn the Alarm OFF. That is taken care of in alarm_on_off state.
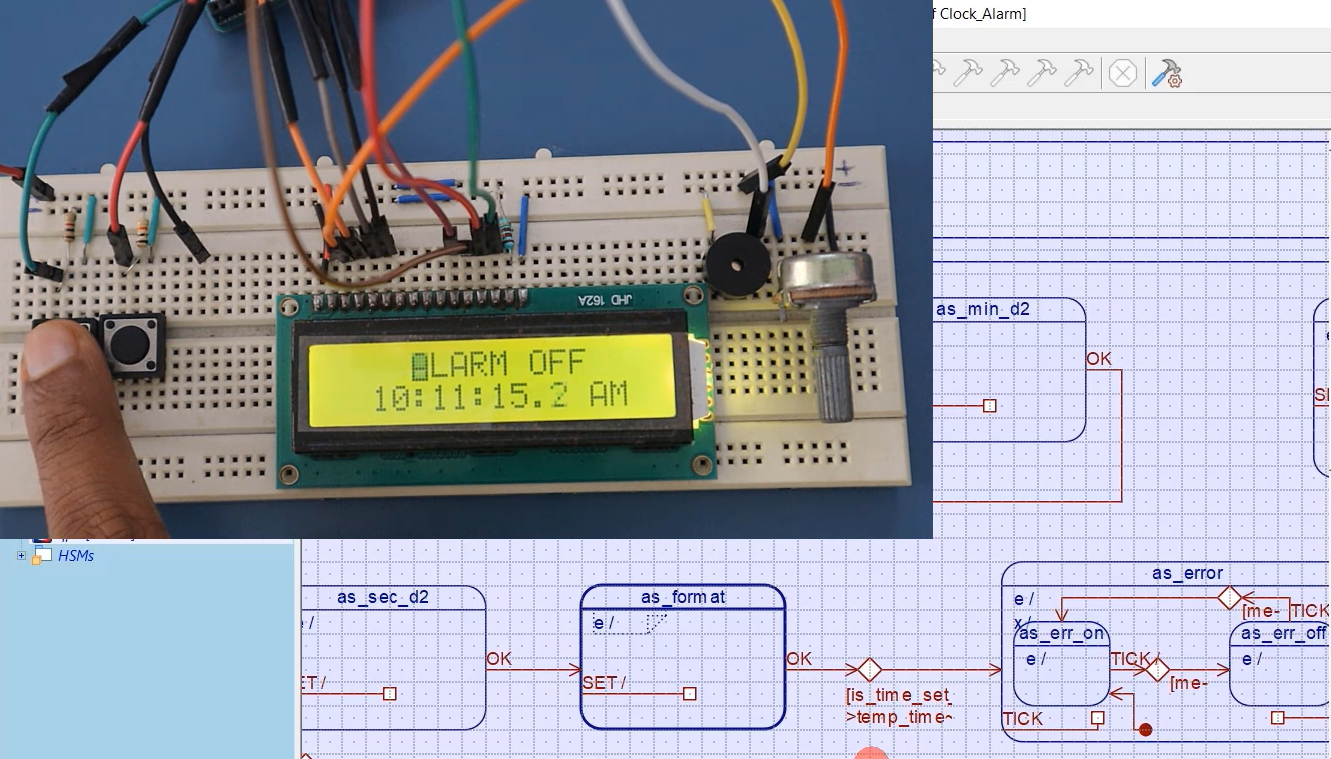
As you can see, whenever the SET signal arrives here, I use one temporary variable, which is there in the ‘me’ pointer, some temporary variable, or you can use one special variable for this. But, I just reused the previous variable temp_digit, which is initially 0. If it is 0, then I display “ALARM OFF” and make temp_digit 0.
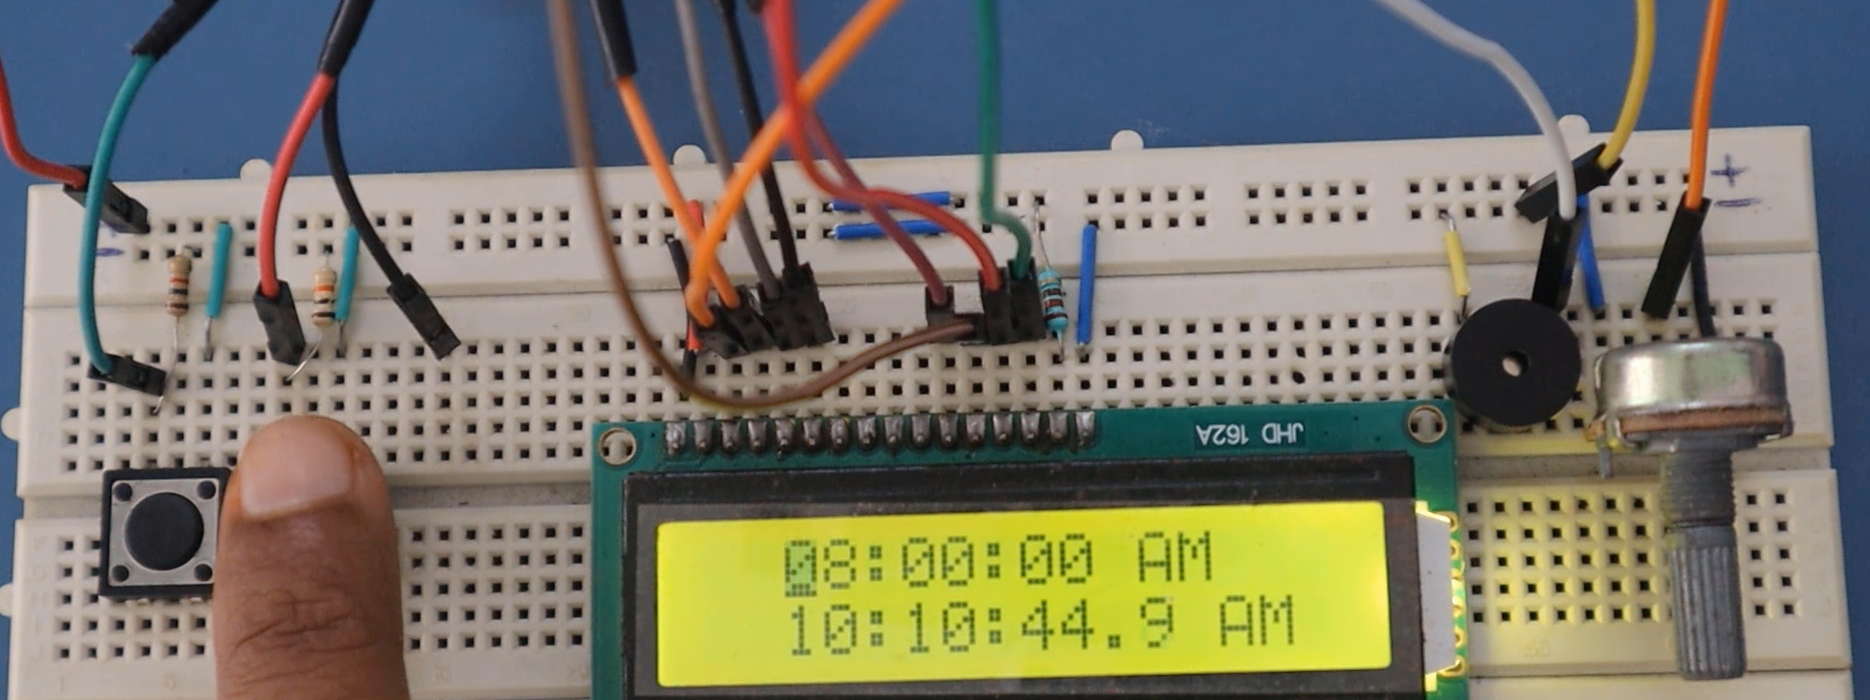
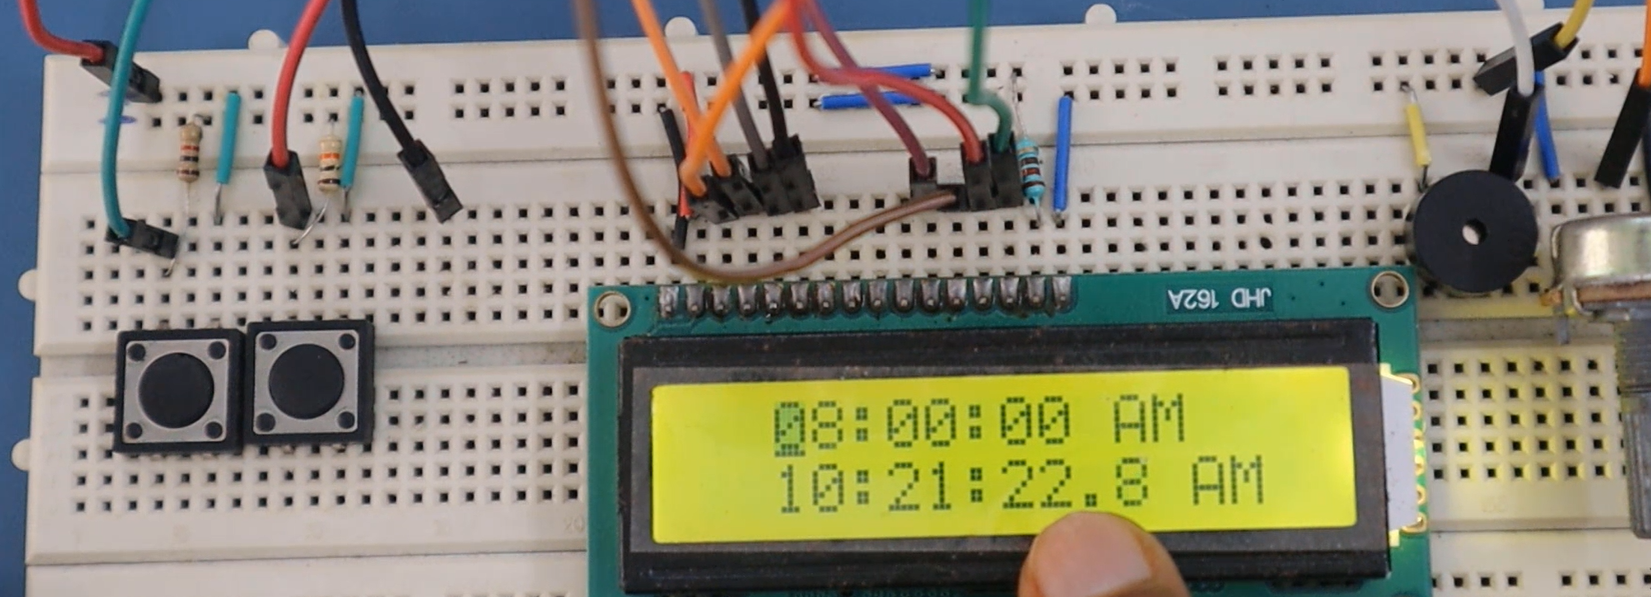
I go to the Alarm_Setting mode, as shown in Figure 7. You can see that at the first line or first row, that is for the alarm setting.
You can set some values and change the format. Now it is in the format selection (Figure 8). In the model, it is in the as_format state.
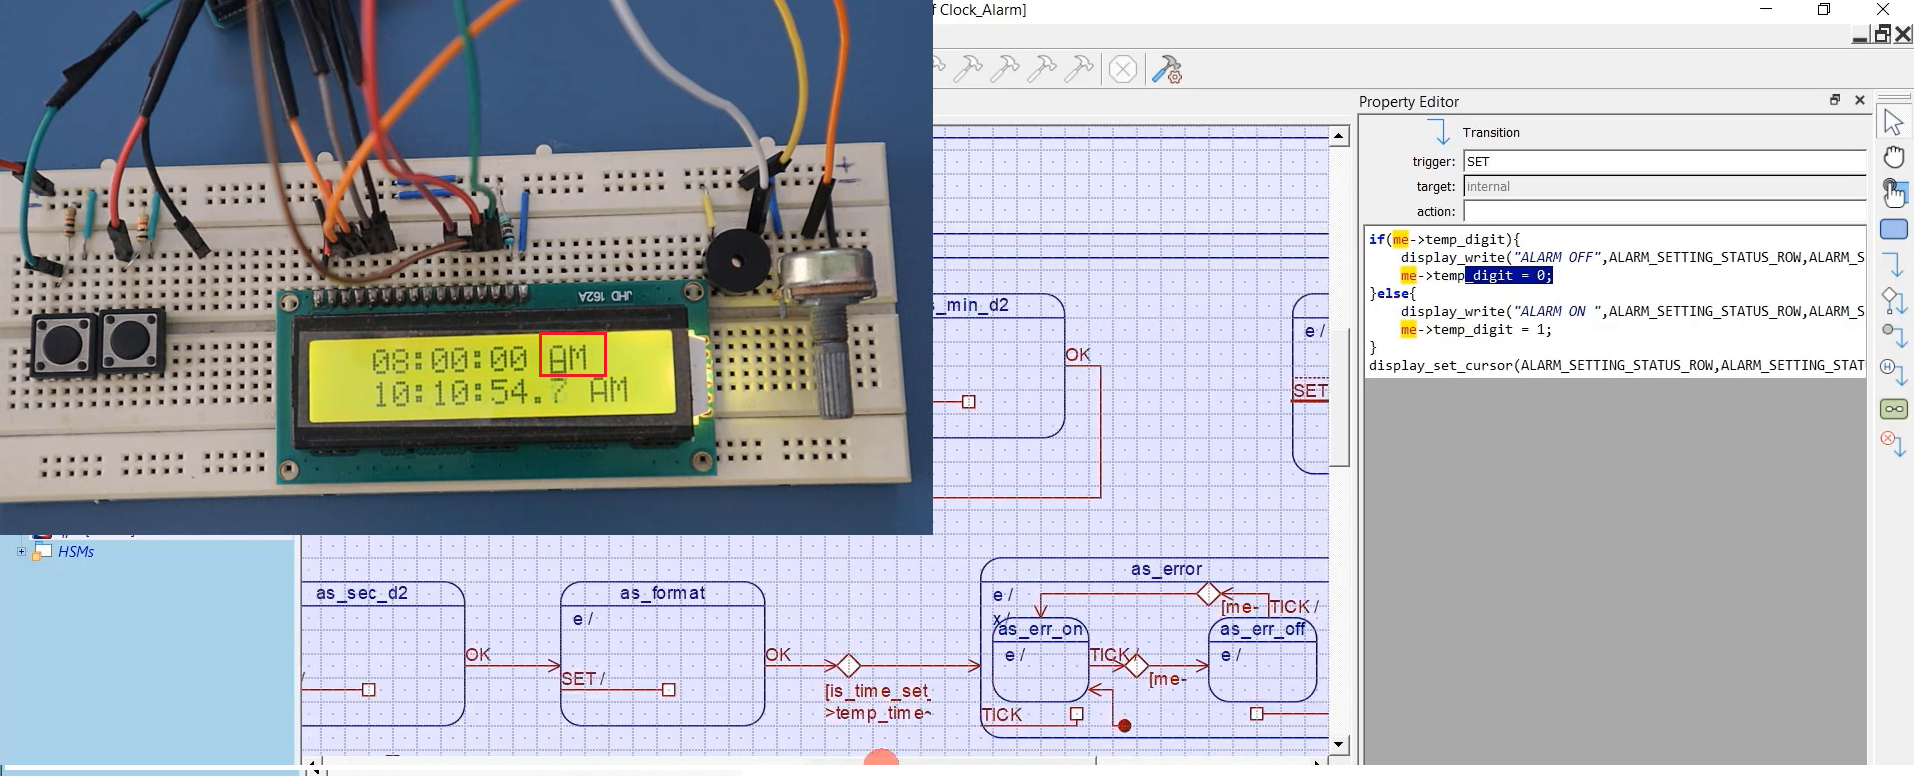
And now I press OK. When I press OK, you can see that it asks whether I want to turn the Alarm OFF or Alarm ON. I can use this SET button to switch between ON and OFF. That is handled here at alarm_on_off state.
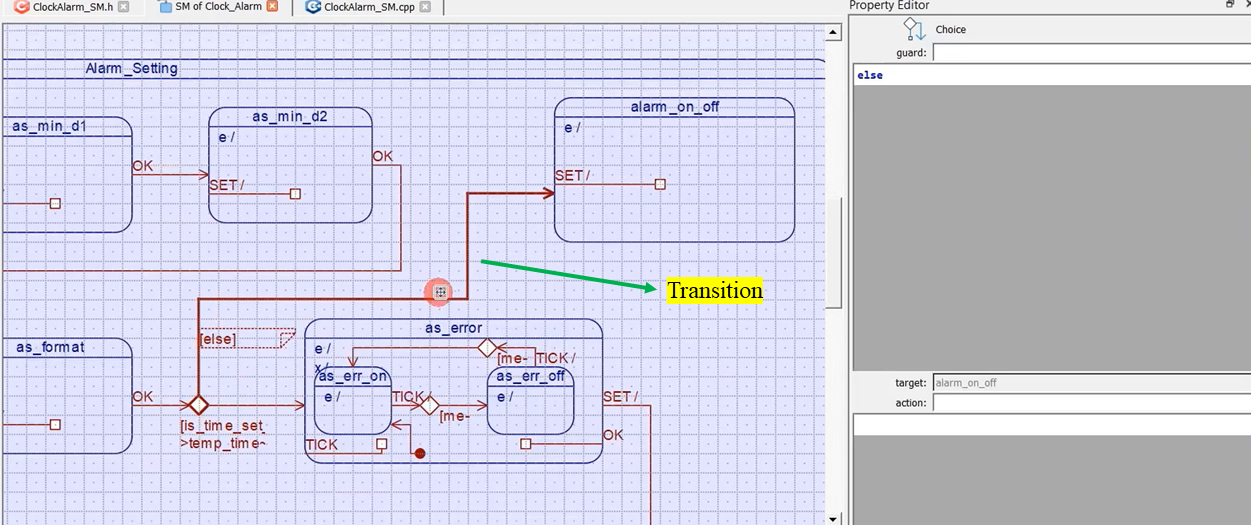
If this time_set_error is false, then take one more transition here. That you can do by using another choice segment or choice node. What you do is, for the ‘else,’ you cannot draw any transition from here itself from this choice node; you cannot do that.
For example, if I select the transition, I cannot draw any transition from here to create the ‘else’ branch. What you need to do is you have to use the choice segment again and place it on this choice segment and draw one more transition(Figure 10).
It selects that entire choice segment, when you select this, and you can now write the guard and action. The guard is ‘else .’ Use the ‘else’ keyword here. And you can define any action for this branch. There is no action defined; this ‘else’ branch goes here.
Whenever you are in an alarm_on_off state, when the OK signal arrives, the OK is not handled by this state. That’s why it is propagated to the Alarm_Setting state. In the Alarm_Setting state, we handle that here. I will show you that.
In the Alarm_Setting, we handle that here(Figure 11). And what do we do? We copy that user’s ON/Off status selection to the alarm_status variable.
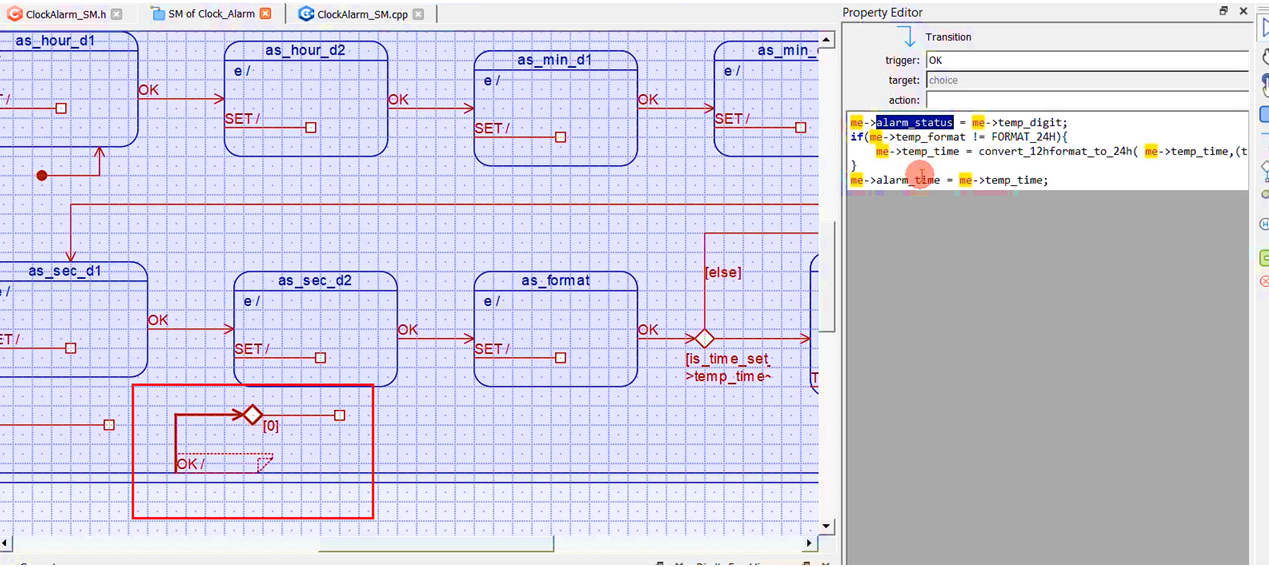
After that, if the time_format, I mean, the whatever the format you selected here in this state, if it is not is equal to 24-hour format, we will convert the time into a 24-hour format, and we’ll save it in the temporary time variable, and then the temporary time variable is copied to the main alarm_time variable.
The alarm_time variable is updated here. And then we want this OK to be propagated to the next superstate; that’s why I use a dummy guard here, and I force that guard to fail by using 0 here. That’s why this OK becomes unhandled here, and OK propagates to the next superstate, that is Settings. And this Settings state handles OK here, and we take a transition to the ticking state. That’s how it works.
You also see that, whenever we get into the Alarm_Setting state, the current time is displayed in the second line, and in the first line, the cursor is blinking at the first digit of the hour field. Let’s see how this is done in the code.
Now, let’s get into the model first. In the model, Alarm_Setting also handles the TICK event here. Whenever the TICK event arrives, this is the code to do that, as shown in Figure 13.
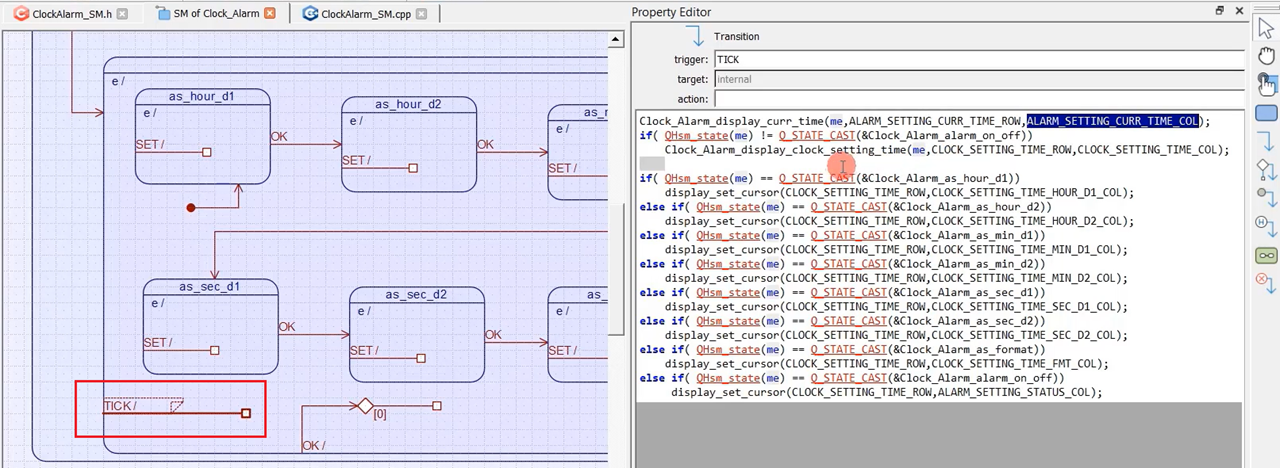
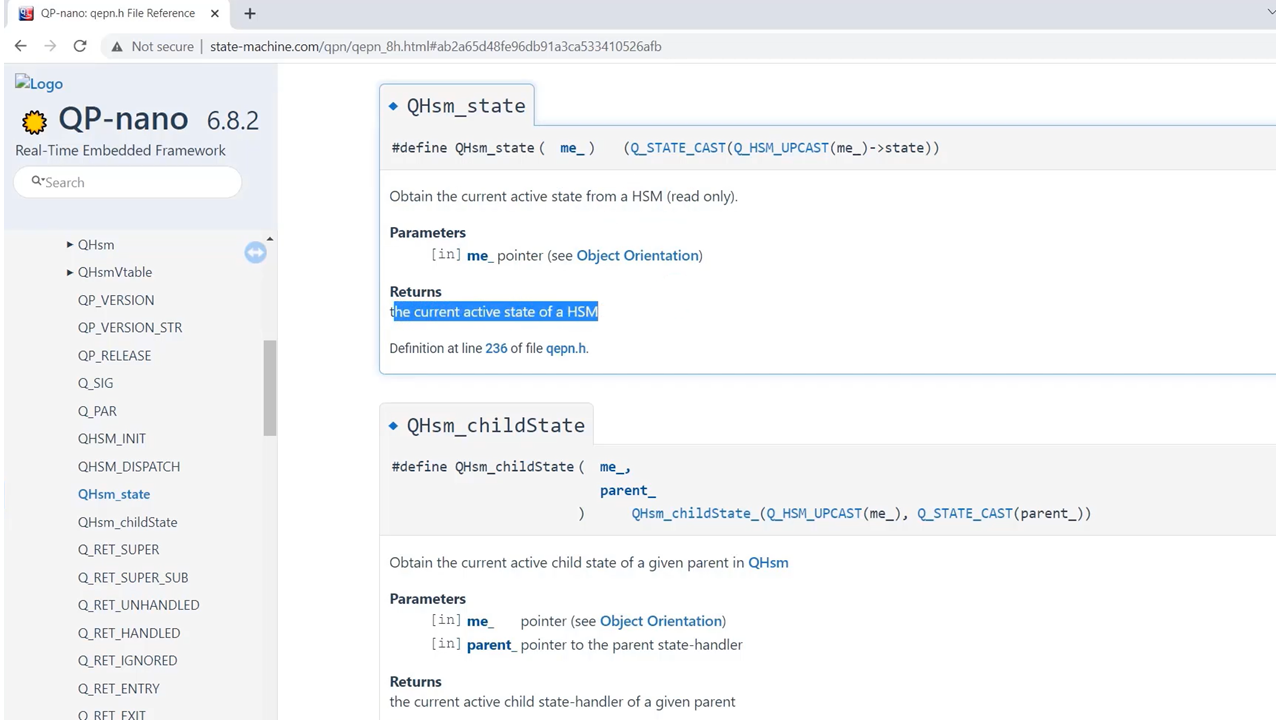
First, we display the current time with the desired row and column number. And after that, after displaying the message, we push the cursor back to the desired location by using the logic. Here, I would have just compared the current state handlers address by using this macro, which is given by the QHsm framework. The QHsm framework gives this macro QHsm_state.
More on that, you can learn in this API reference document. Nano API reference, and here is a QHsm_state, that’s a macro. This gives you the current active state of HSM.
That current active state, which is nothing but a function pointer, is compared with another function pointer. I compare that with all the different state handler addresses of the Alarm_Setting state. If there is any match, then I use the display_set_cursor function to set the cursor at the desired location on the LCD.
I suggest you go through this logic(Figure 13); you will understand that better. If you have not implemented the Alarm_Setting state, then please implement. In the following article, we will explore how to implement this Alarm_Notify State.
FastBit Embedded Brain Academy Courses
Click here: https://fastbitlab.com/course1

