Exercise: Testing via debugger Part-2
In this article, let’s understand the concept of FreeRTOS task schedule.
We already created two tasks. Now we have to schedule them because otherwise, the tasks will not be running on your microcontroller. The creation of a task means an allocation of some memory.
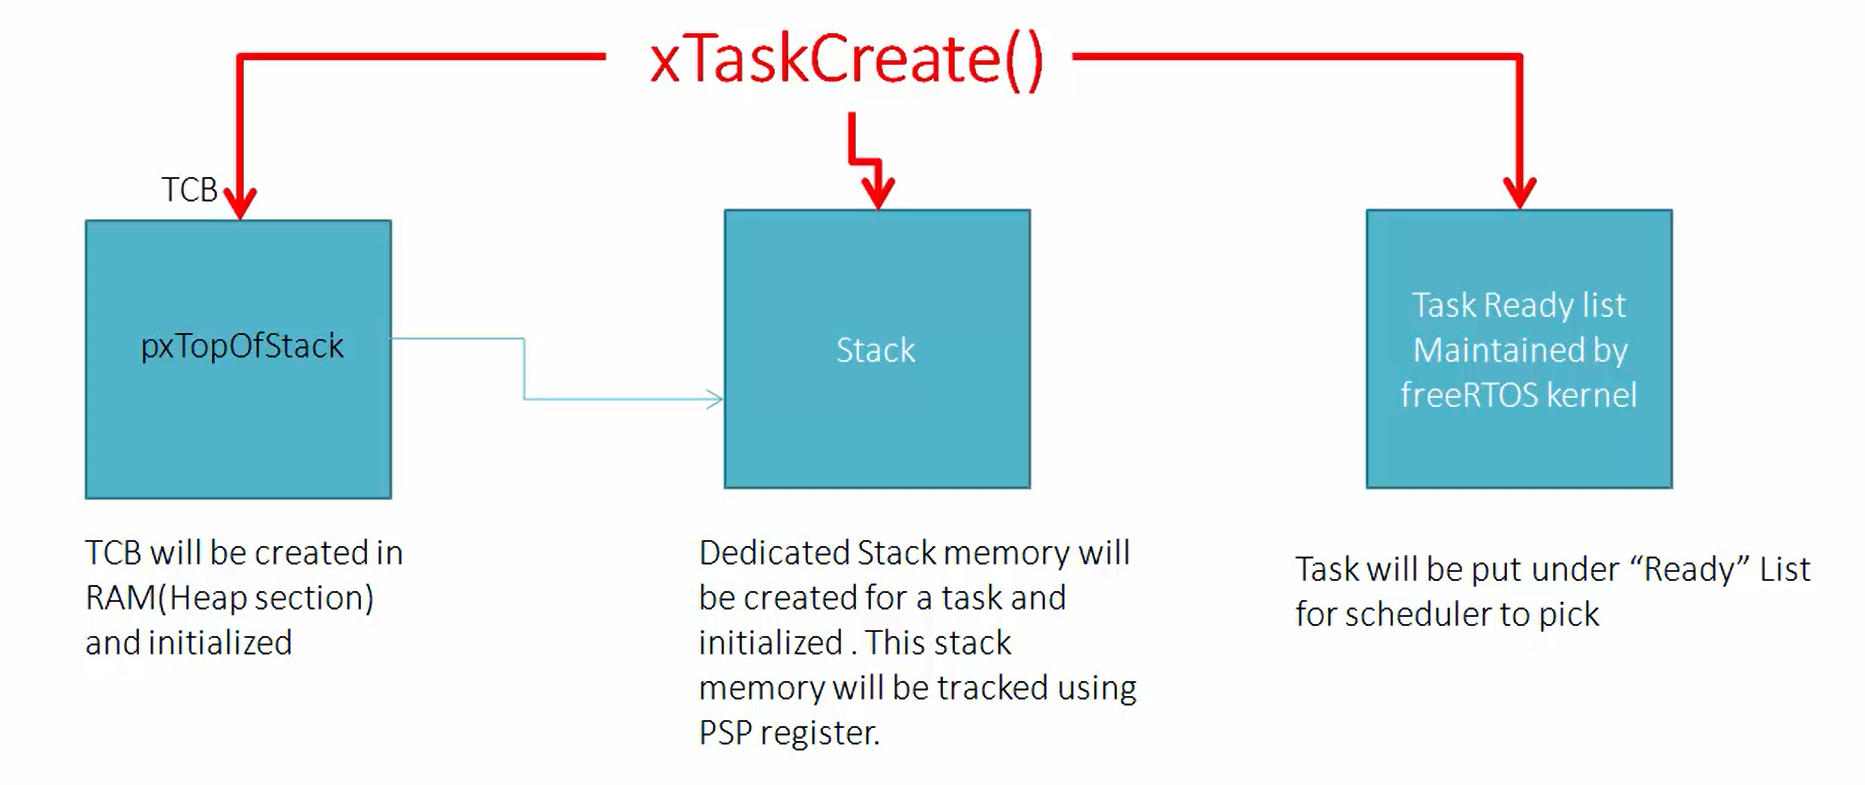
Task creation process(Figure 1) :
The task creation process is creating a task control block for a particular task, allocating memory for it, allocating stack memory for a task, initializing the stack memory for a task, and various other things that are related to the task creation process, which will be taken care of by the task services of the FreeRTOS.

In our project, we have created the project and allocated the memory for it. But we never scheduled it. Now you have to use FreeRTOS scheduling APIs in order to schedule these tasks. vTaskStartScheduler() API is used to schedule the tasks. This API basically means that start the scheduler.
int main(void)
{
    //1. Reset the RCC clock configuration to the default reset state.
    //HSI ON, PLL OFF, HSE OFF, system clock = 16MHz, cpu_clock = 16MHz
    RCC_DeInit();

   //2. update the SystemCoreClock variable
   SystemCoreClockUpdate();

   //3. lets create 2 tasks , task-1 and task-2
   xTaskCreate( vTask1_handler,"Task-1", configMINIMAL_STACK_SIZE,NULL,2,&xTaskHandle1 );
   xTaskCreate( vTask2_handler,"Task-2", configMINIMAL_STACK_SIZE,NULL,2,&xTaskHandle2 );

   //4. Start the scheduler.
   vTaskStartScheduler();

  for(;;);

}
Statement to start the scheduler
vTaskStartScheduler() API is implemented in the task.c file, as shown in Figure 2.

Once you start the scheduler, according to the scheduling policies of the scheduler, the scheduler will be executing the task functions. There are two task functions with the same priority, i.e., 2. That’s why according to the scheduling policy of the scheduler, it will be executing the task function. If it is preemptive scheduling, then the round-robin scheduling will happen since both the tasks have got equal priorities. That means task 1 handler will run for some time, and then task 2 will run for some time. A definite time quanta will be allocated to each task.
vTaskStartScheduler() function will never return because this function will give control to the task. Since the task will be running continuously, the scheduling function will never return. Therefore, the control will never come to the infinite loop shown in Figure 3 unless and until there is an error while executing the scheduler function.

Now let’s test this code. First, let’s build this project (Figure 4). Now the code is compiled successfully without any errors.

After compilation, download the code into the target hardware. For that, first, connect your hardware. After that, just right-click on your project, go to target and click on the program chip option, as shown in Figure 6. Then a pop-up will appear, tick the reset after program checkbox, select the elf format of your project generated by building the project and then click ok (Figure 5).


Now let’s keep a couple of breakpoints in the task 1 handler and task 2 handler (Figure 8) in order to see whether those breakpoints really hit or not. First, let’s keep a breakpoint in vTask1_handler and then keep a breakpoint in vTask2_handler, as shown in Figure 7.

After that, before starting the scheduler, keep another breakpoint, as shown in Figure 8.

Now let’s get into the debug mode. Right-click on the project, click on debug as, and then select the Ac6 STM32 C/C++ application option (Figure 9). While entering into the debug mode, you will find a pop-up window, as shown in Figure 11. Just click yes.


For debug mode, we have already set the breakpoints. Now the code is not running, and it is actually halted at line 28 of the main function. Let’s hit run (Figure 11).

In Figure 12, you can see that we are about to start the scheduler. Tasks are created, and the task handle is populated (Figure 13) with some address. In the beginning, the task handle was NULL. Now it is populated with some address. That means tasks are created successfully.


Now let’s hit run again and see whether task handlers in Figure 8 executes or not. In Figure 14, you can see that the control first came into vTask1_handler. It will execute for some time depending upon the time quanta allocated for this task by the FreeRTOS kernel.

Let’s hit run once again. It is still executing the task 1 handler, and at some time, it may come to the task 2 handler. But the control is not at all coming to the task 2 handler. It looks like there is some problem. Just remove the breakpoint in task 1 handler and try to rerun the code. Now you can see that the control is transferred into the vTask2_handler (Figure 15). This is because of the debugging things because they execute very quickly. That’s why the debugger may not be tracing those events related to the task 2 handler execution.

If you remove the breakpoint in task 2 handler and keep it in task 1 handler, now if you execute the code, then the task 1 handler executes, and task 2 handler also executes. That means the context switching or scheduling is taking place. But how the tasks are synchronized, what is the time quanta, who triggers all these things, and so many other things we have to understand. That we will see as we make progress. But our simple goal here is to create 2 tasks and schedule them, which we have done already.
FastBit Embedded Brain Academy Courses
Click here: https://fastbitlab.com/course1


