Understanding read method
In this article, let’s understand our driver’s read method implementation.
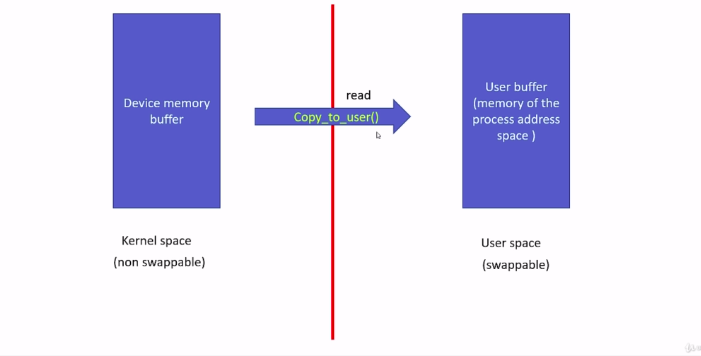
What is read?
The user-level process executes a read system call to read from a file. In our case, the file is not a regular file but a device file, which handles our pseudo character device.
In our project, the pseudo character device is nothing but a memory array. A contiguous memory location an array. So, I will call it as a device memory buffer. Whenever a user program issues read system call on our device file, we should transfer data from our device memory buffer to the user buffer. So, the data copy happens from kernel side to user side. That is read.
The write is in reverse direction, write means user program wants to write some data into the device memory buffer of our device.
Purpose of the Read Method:
- The read method is used to read data from a file or device.
- In the context of a character device driver, it is responsible for reading data from a pseudo-character device, which could represent various devices like sensors, input devices, or other peripherals.
Parameters of the Read Method:
- The read method typically takes the following parameters:
- File Descriptor: A reference to the file or device being read.
- Buffer: A pointer to a memory buffer in which the read data will be stored.
- Count: The number of bytes requested to be read
How the Read Method Works?
When a user program (or any process) invokes the read system call on a file descriptor associated with a character device, the read method in the corresponding device driver is triggered.
Steps to Implement the Read Method
Let’s understand how to implement the read method, what are the steps we are going to take in our driver.
These are the steps below you should be taking to implement read method, as shown in Figure 2.
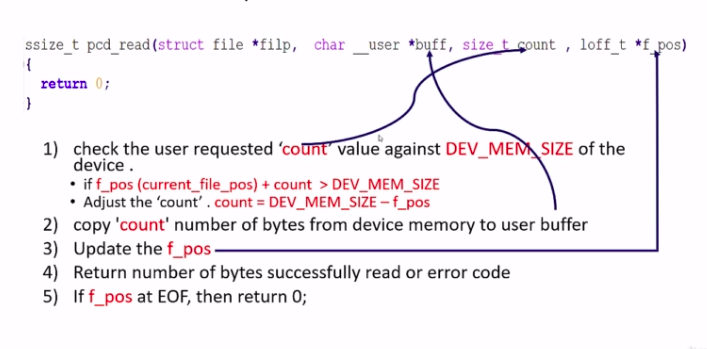
First, you have to check the user requested count value, because the user cannot request some random amount of data. Because, so our device memory buffer is limited. It is only 512 bytes. That means, the user cannot request more than 512 bytes.
That’s why in your driver’s read method, you should check the user requested a count value against the max size, that is DEV_MEM_SIZE. This macro we have in our driver’s source code, which points to 512 bytes.
You have to check this count value against the DEV_MEM_SIZE of the device. If the current file position that is tracked by this field f_pos, that’s a current file position. If the current file position + count if it is greater than DEV_MEM_SIZE, then you have to adjust the ‘count’. This ‘count’ needs to be adjusted.
This is how we adjust. count = DEV_MEM_SIZE – the current file position.
For example, let’s say ‘count’ requested is a 513 bytes. The initial value of the file position when the device is initially opened is 0 actually.
That’s why you have to check like this. Current file position let’s assume 0, 0+count. Count is, let’s say 513. Whether it is greater than 512 or not? (0+513 > 512) Yes. In this case, it is greater than 512. That’s why you have to adjust count. Count = max_size 512 minus the current file position. Let’s say, if it is 0, then you actually truncate the count value to 512 bytes, like that.
I hope you get the idea why this check is required. Because user cannot ask a random amount of data. It should be a within a 512 bytes. The ‘count’ value should be less than 512 bytes.
After that, once you adjust the correct value of count, you can copy ‘count’ number of bytes from device memory to user buffer. So, user buffer pointer you can get from this(char __user *buff) field. After that, you have to update the current file position, that is f_pos. And return the number of bytes successfully read, or you can also return error code if there is any error during copying of data from device memory to the user buffer.
If the file position at the end of file(EOF), then there is nothing to read. In that case, you can return 0.
Understanding Current File Position
Let’s explain the concept of current file position, which is denoted by f_pos.
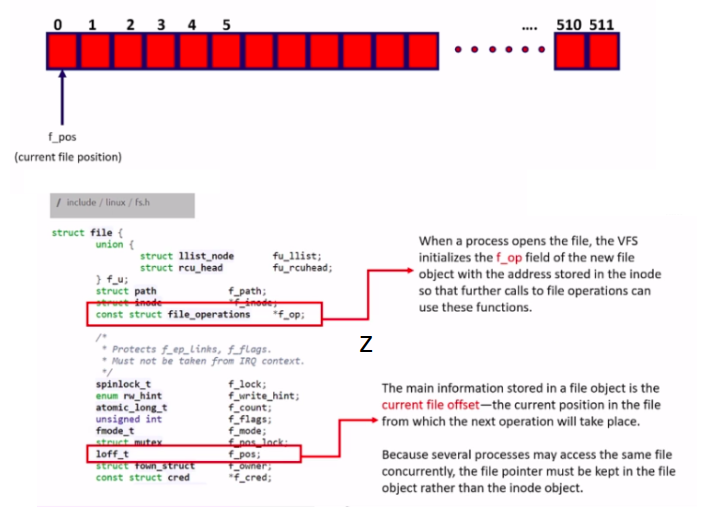
First of all, f_pos is a member element of the struct file. Remember this structure. This structure gets created whenever you open a file. For every open, one file object will be created. f_pos is nothing but one of the member element of this struct file. So, the pointer to this field is actually passed loff_t *f_pos by the VFS, whenever VFS calls the read or write method of the driver.
The pointer what you’re seeing *f_pos, this is nothing but a pointer to file objects f_pos member element.
What is the use of this current file position variable?
This actually tracks the file access. Since we are dealing with a device file, we can use this current file position to track our pseudo character device memory access. When you open a device file, this file object will be created, and VFS sets loff_t f_pos field to 0.
Initially, this field will be 0 whenever a file is opened. That’s why in our driver, we can use this a current file position variable to track our pseudo character device memory area.
Now, let’s say there is a read of 6 bytes. Let’s say user wants to read 6 bytes from our pseudo character device(shown in Figure 4).
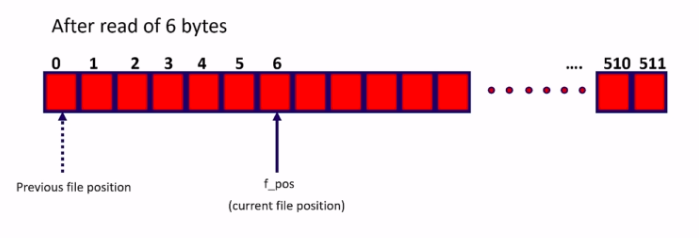
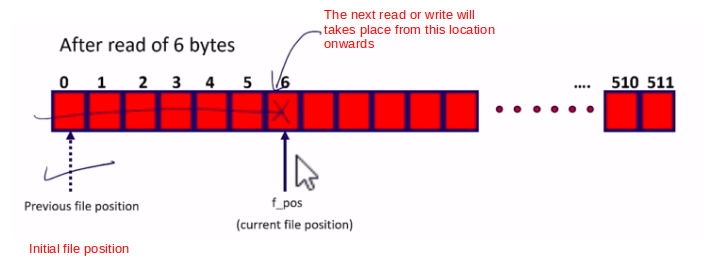
So, this was the initial position of a f_pos variable, and after that, it will be incremented by 6. So, now this will be the current position in the file for file access. The next read or write will takes place from this location onwards, as shown in Figure 5.
Let’s say there is a request for 2 bytes write Figure 6.
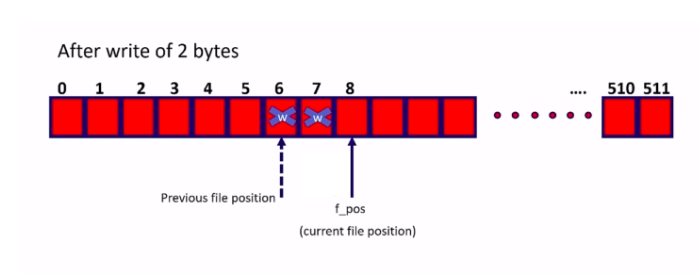
The user program wants to write 2 bytes. This was the previous file location. So, the first write happens here, the second write happens here, and now the file position will point to the next free location. This is a current file position from which the next read or write can happen, as shown in Figure 6.
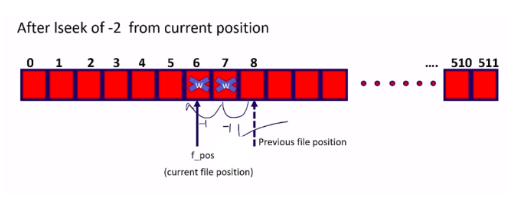
Let’s say there is a request for lseek of -2 from the current file position. This was the previous file position, that is this one. And from there -2. -1 and -1, so -2. That’s lseek. The lseek changes the position of the f_pos variable. It moves the file position pointer forward or backward. I hope you get the idea of lseek.
Now, let’s discuss the end of file(EOF) scenarios. In our case, what is the end of file scenario? We have got 512 bytes of device memory, that is from here to here. This was the last byte of our device memory. If the file position is pointing beyond that, then that’s a EOF scenario. It is pointing to the next memory location, which is free, but that is not a valid memory because our device memory is of only 512 bytes.

Let’s say the current file position is f_pos, and there is a request for 2 bytes read.
What happens?
Current file position is 512 + the requester is 2, it is greater than 512(512+2 > 512) that maximum device size. 514 is. This is 514 greater than 512. In that case, what you should do is, you should truncate the count.
Count = the maximum size is 512 – the current file position, that is 512. Count will be 0.
In this case, you can’t read anything. That’s why count is 0 in this case. You should return 0. When you return 0 to the user program, the user program understands that there is nothing to read. That’s why this is how you should manage your device access.
The end of scenario is when the current file position is pointing one byte beyond the maximum size. That’s a end of file(EOF) scenario. I hope you get the idea of a write, after that, we should discuss about copying data from kernel space to the userspace.
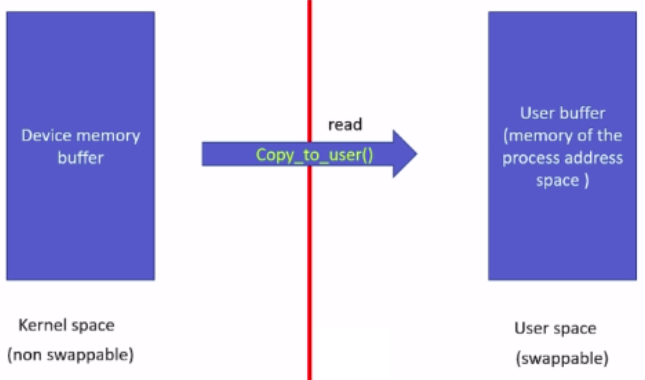
Userspace pointers you cannot trust just like that. Because sometimes the user address space may not be valid, sometimes the virtual memory space of the user process may not be valid because the virtual memory manager can swap out those memory locations, and the user-level memory pointers can’t be directly dereferenced by the kernel-level code. For that purpose, you should use the kernel data copying utility, such as copy_to_user and copy_from_user.
In the case of read, you should use the copy_to_user function, which is given by the kernel.
Data Copying from Kernel to User Space
Let’s discuss about data copying between kernel space and user space, you have got two functions
- copy_to_user and
- copy_from_user.
Let’s understand role of these two functions.
- These functions are used for copying data between user space and kernel space.
- So, these functions check whether the userspace pointer is valid or not.
- If the pointer is invalid, no copy is performed.
- If an invalid address is encountered during the copy, only part of the data is copied. In both cases, the return value is the amount of memory still to be copied.
These functions check whether the user-level memory pointer is valid or not and if these functions detect any invalid memory during data copy. So, the data copy will be stopped, and the amount of data which is still to be copied will be returned by this functions.
So, now let’s understand the syntax of using copy_to_user and copy_from_user. Let’s understand copy_to_user(shown in Figure 10).
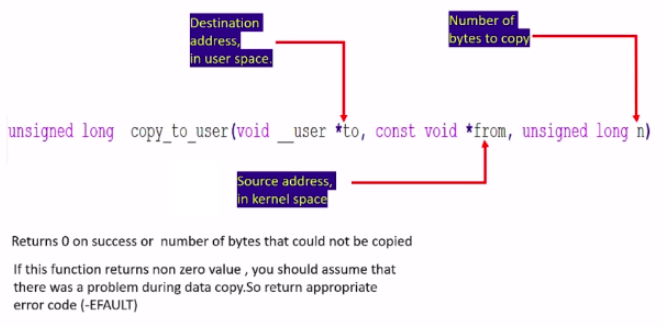
Because we will be using this in our read method. It takes 3 arguments here. The first argument is a destination address in userspace, and here const void *from you should mention the source address. That is the kernel space address. The data will be copied from here to here(const void *from to void __user *to). And this unsigned long n is a number of bytes to copy. The return value is very important. Returns zero on success or number of bytes that could not be copied.
If this function returns the non-zero value, you should assume that there was a problem during data copy. So, you have to return the appropriate error code. In this case, error code will be EFAULT.
But, if this copy_to_user doesn’t return 0, then you should return EFAULT.
Let’s explore copy_from_user(shown in Figure 11).
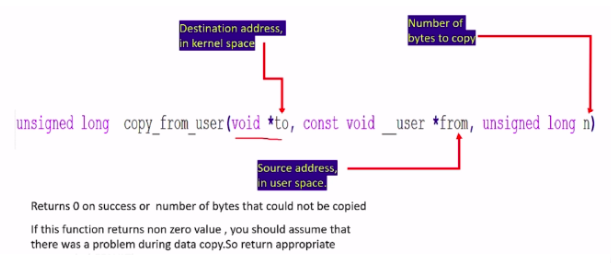
Copy_from_user means copy from a user-level program to the kernel, that is, we use this during write. So, the parameters this void *to is a destination address in kernel space, and this const void __user *from is source address in userspace. Data copy happens from here to here(const void __user *from to void *to). In both the functions, the first argument is destination remember that. The first argument is always destination. The same thing returns 0 on success or a number of bytes that could not be copied.
In the following article, let’s get back to coding and let’s code our read method of the driver. I will see you in the following article.
Get the Full Course on Linux Device Driver Here
FastBit Embedded Brain Academy Courses
Click here: https://fastbitlab.com/course1

