Exercise-007 Implementing CLOCK_SETTING state part-3
In this article, let’s code for a Clock Setting format and error states.
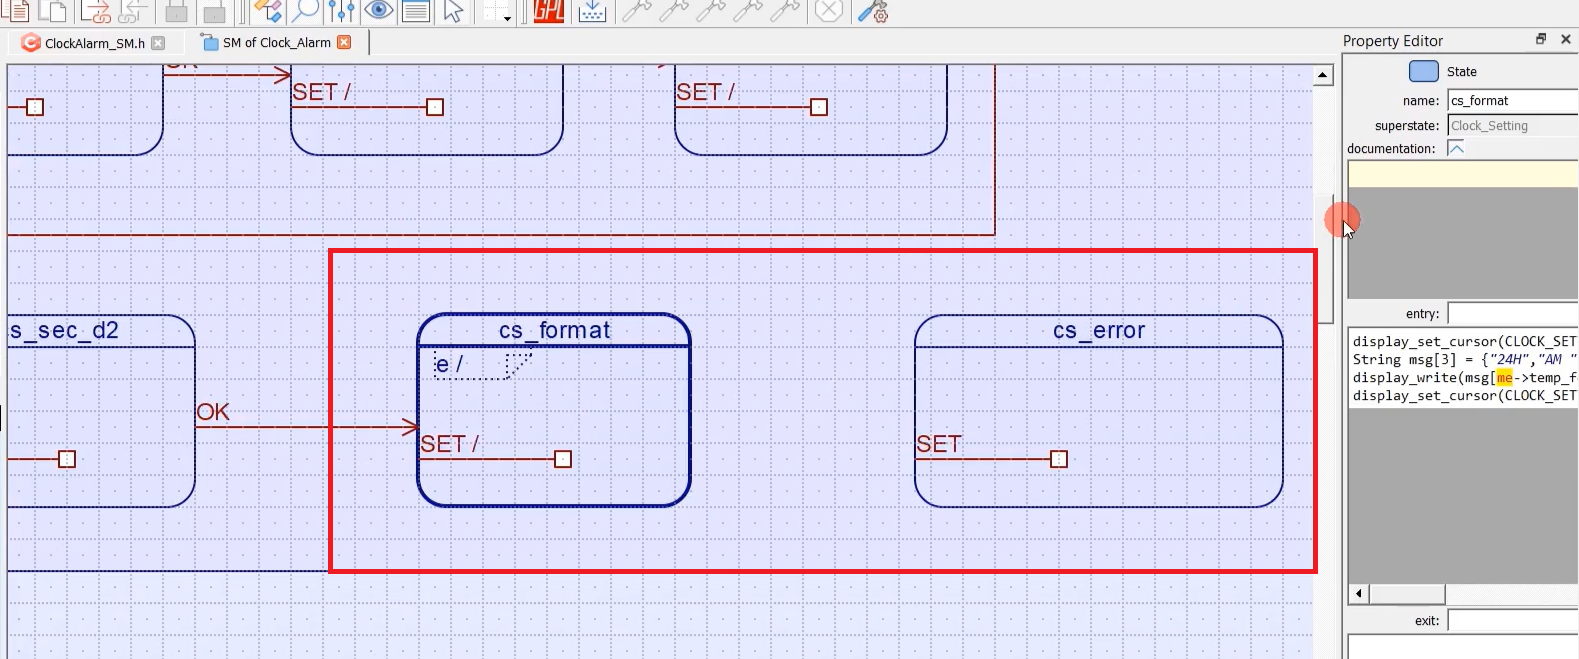
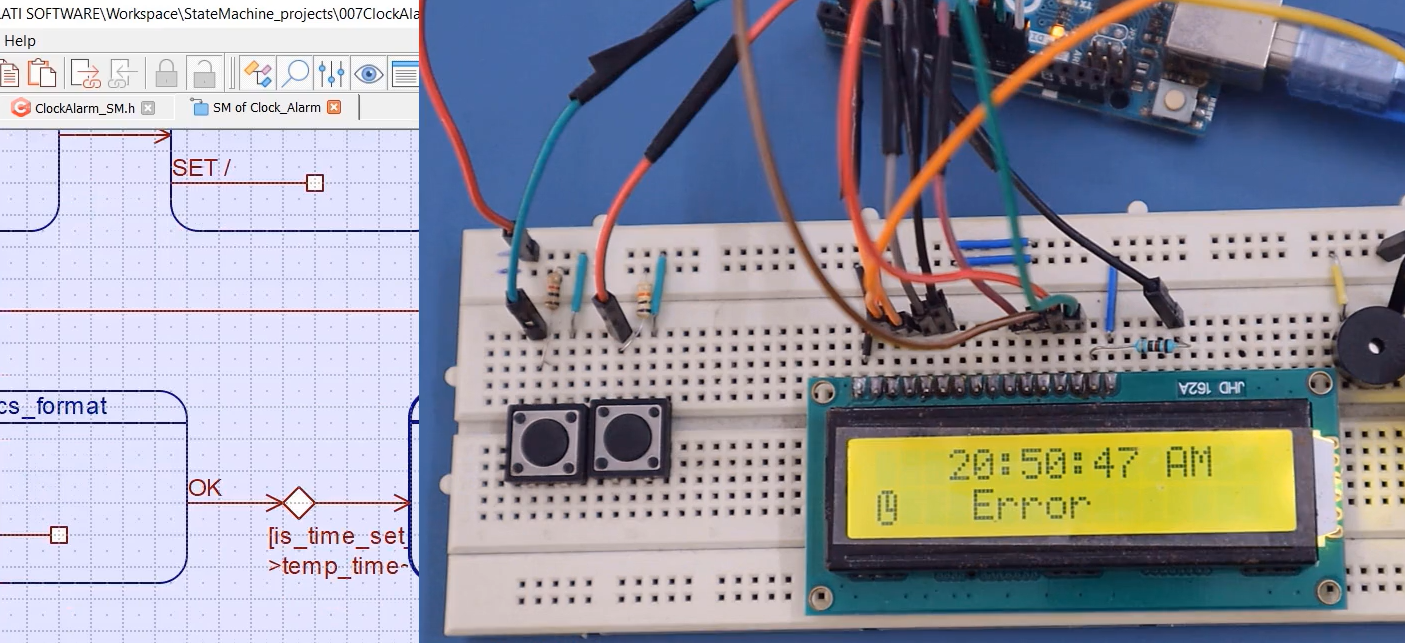
As you see in this demo (cs_format), we should present different formats to the user. That’s why, whenever the SET signal is received, you should present different formats to the user.
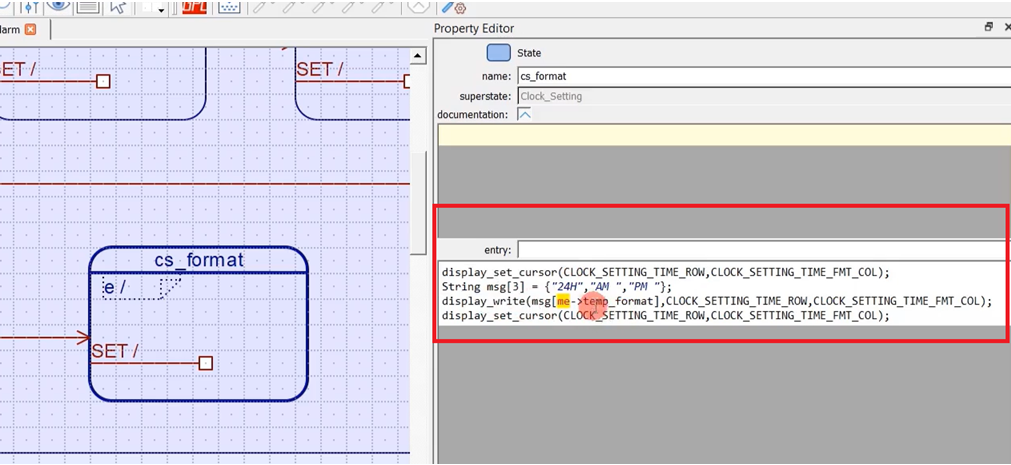
First of all, in the entry state, I just set the cursor – display_set_cursor();
And print the current time format using the variable temp_format. display_write(msg(me-> temp_format), CLOCK_SETTING_TIME_ROW, CLOCK_SETTING_TIME_FMT_COL);. Because the temp_format holds what exactly is the current format. The format could be 24H, AM, or PM.
I use that to decode this string. String msg[3] = (“24H”, “AM,” “PM”); This a local variable; this is a local array, a local string array and I get the message and just use the display_write function to print that at the CLOCK_SETTING_TIME_FMT_COL location. The column number to display is 11. And then, set the cursor back to that position. That’s the entry action.
Whenever the SET signal is received, you have to show different messages: “AM”, “PM”, “24H”, like that.
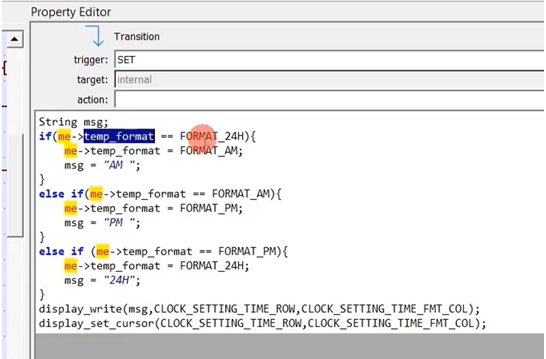
For example, if the current time format is 24H, you should show the next format to the user, let’s say, AM. You keep changing the temporary format variable to different values for each SET signal. ‘msg’ is just a local variable, and then you display it using display_write. display_set_cursor pushes the cursor back to the correct position. Just take a look at these code snippets.
I think you know the purpose of this temporary format variable. This is used to hold the user selection for the time_format. Whatever format the user has selected will be in the temporary format variable.
When the user sends an OK signal, then it’s over. I mean, everything is over; our Clock_Setting is almost over. But, the user may enter some invalid time; we have to verify the user enter details. If the user enters the correct details, we exit this clock setting composite state. If the user entered details are incorrect, we should not exit this and move to the error state. Where we should display some error message to the user saying something is not correct. That’s why now we have to use a guard condition here to transit from format to error.
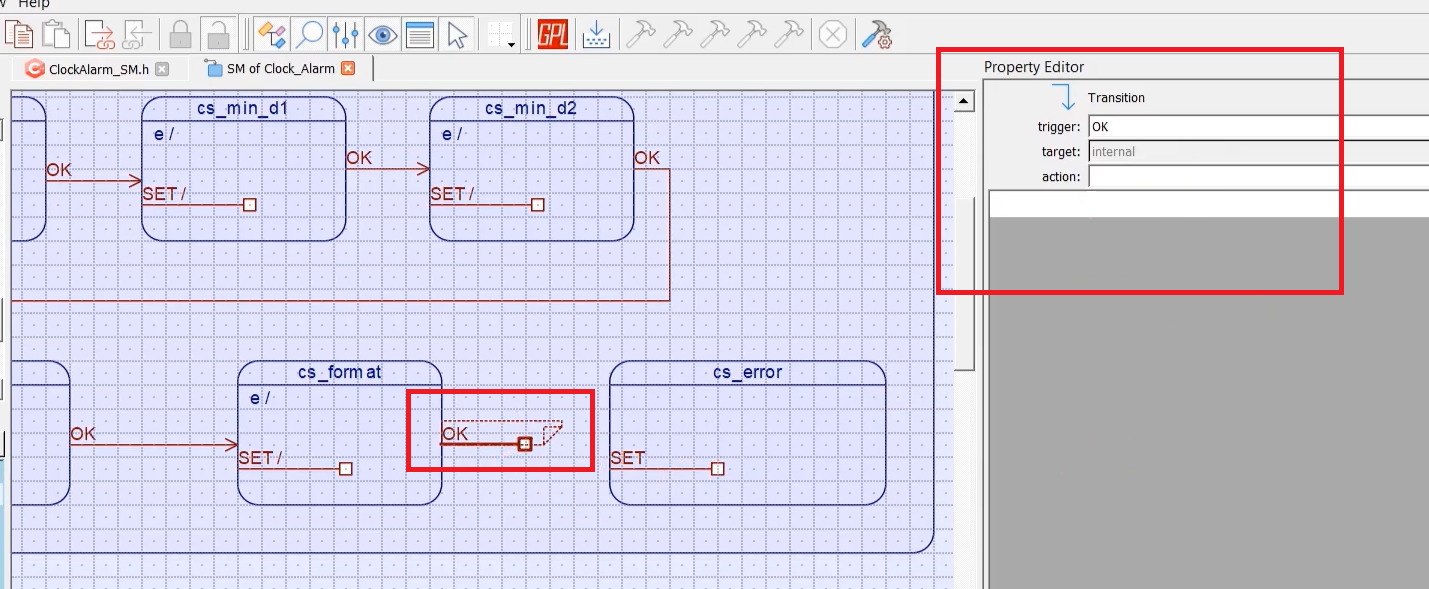
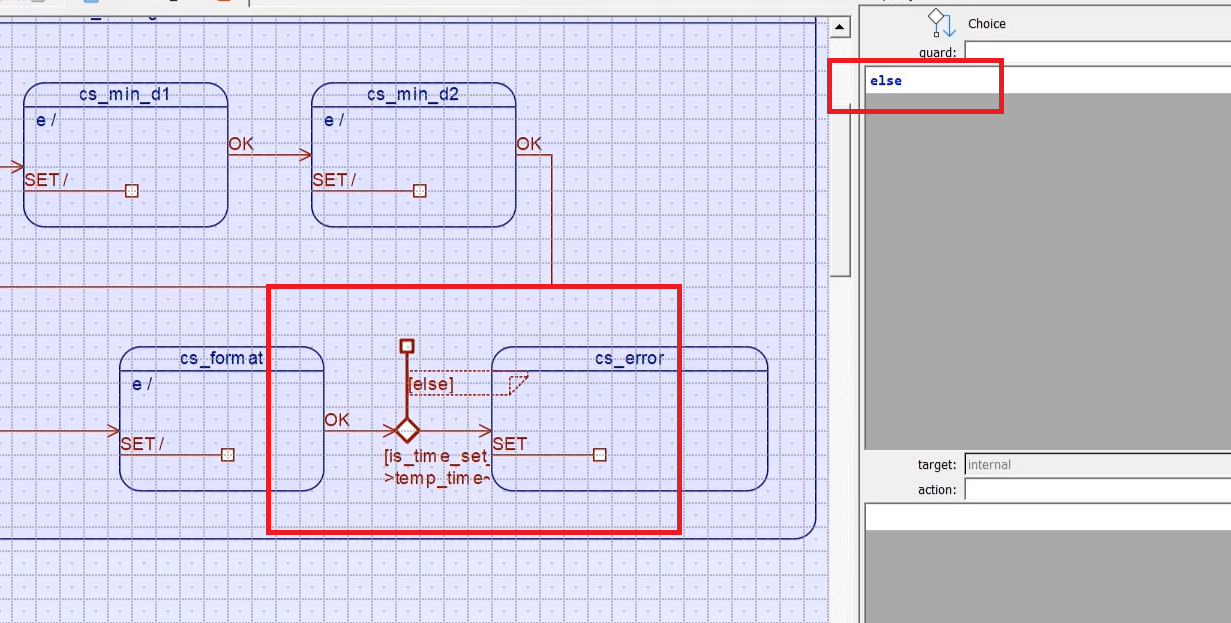
Let’s first draw the transition. The trigger is ‘OK.’ Now you have to assign some Guard condition to this. But, there is no place to assign the Guard condition for the transition in this tool (Figure 4). There is no guard section.
In this software, the guard condition is provided using the choice pseudo state. You have to attach this choice pseudo state to the one end of the transition.
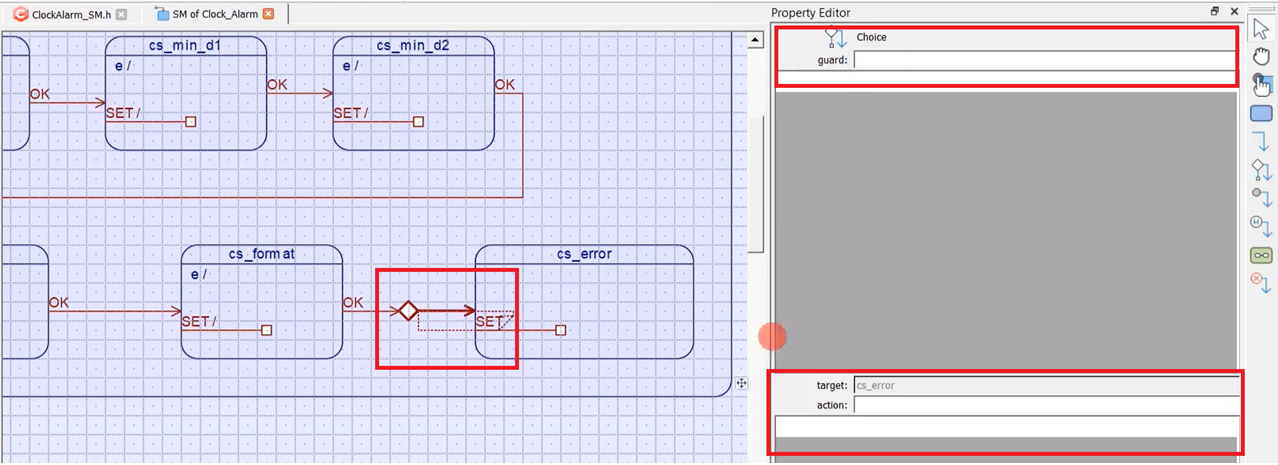
Just select the Choice pseudo state component. You can only attach that choice pseudo state to one end of the transition; you cannot put it anywhere else.
Now, you have attached one guard via this choice state to this transition. When you click on that, you select the choice state or choice segment, and for the choice segment, you can mention the guard and action. If the guard is true, then only the action is taken. It’s like that.
Collectively, what can you say here? When you are in cs_format state, when the signal ‘OK’ is received, there will be a successful transition to an error state, only if this guard condition becomes true and this action is taken. Suppose, if this guard condition fails, then this ‘OK’ signal is considered unhandled, then it propagates to its parent state or superstate.
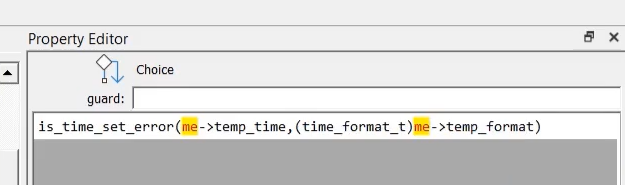
The guard for this choice pseudo-state is to use one function to detect whether the given time, I mean the user enter time, is an error. I will call this function is_time_set_error. This is a function that returns a Boolean value. This function returns true if time_set is an error. If there is any error, it returns true. You have to provide two details: One is temp_time and temp_format. This needs to be type casted to time_format_t.
bool is_time_set_error(uint32_t time_,time_format_t format){
    uint8_t h = GET_HOUR(time_);
    return ((h > 23) || ((h > 12 || (h == 0))&& format != FORMAT_24H) );
}
is_time_set_error function
For example, we first get the hour field in this function. If the hour field is greater than 23, then that’s an error. So, it returns true.
Suppose, if ‘h’ is less than 23, then you have to check for some more conditions. For example, if the hour field is greater than 12 or the hour field = 0, the format should be = 24H. If the format is not equal to 24H, when ‘h’ is greater than 12, or h =0, that is also an error.
We take a look at the above code, you will understand that. Let’s define this function. This is just a helper function. Go to IDE, and at the end, paste that code, and give the function prototype at the top.
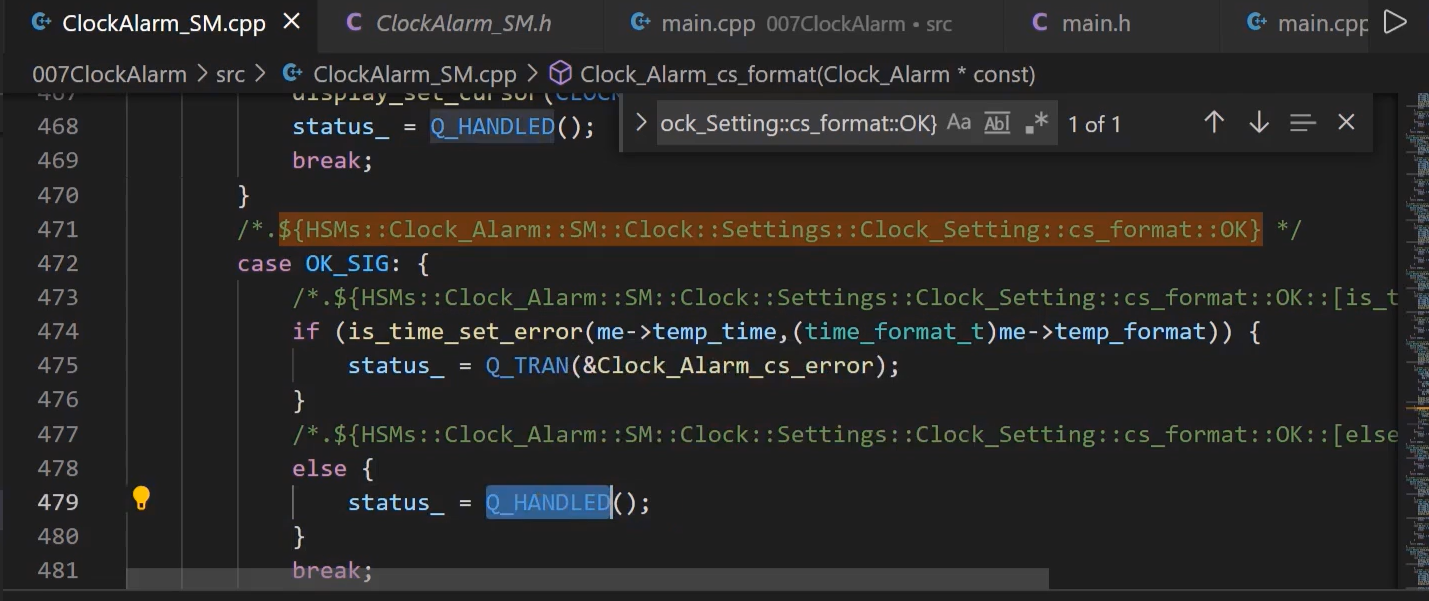
 /*.${HSMs::Clock_Alarm::SM::Clock::Settings::Clock_Setting::cs_format::OK} */
case OK_SIG: {
      /*.${HSMs::Clock_Alarm::SM::Clock::Settings::Clock_Setting::cs_format::OK::[is_time_set_error(me->temp_time~} */
      if (is_time_set_error(me->temp_time,(time_format_t)me->temp_format)) {
          status_ = Q_TRAN(&Clock_Alarm_cs_error);
      }
      else {
          status_ = Q_UNHANDLED();
      }
      break;
 }
OK_SIG
Here you can see that, when the ‘OK’ signal is received, if is_time_set_error is true, then the transition is taken to the Error state. That’s correct. But, if is_time_set_error is false, then the ‘OK’ signal is considered unhandled, then the event is propagated to the superstate. If you don’t want this event to be propagated to the superstate when the is_time_set_error condition fails, then what you have to do in this tool is, you have to give one dummy transition here.
What you do is select a choice state and draw another dummy transition. And in the guard, you write ‘else.’ That means, if is_time_set fails, then this (else) path is taken, but it is like ignored.
Let’s generate the code. And you see here, now it becomes handled. If this condition fails, then ‘OK’ is considered as Handled, as shown in Figure 8. That means the event is not propagated to its superstate.
If you don’t want the OK signal to be propagated to the superstate, then you should do this. But, in our case, the event should be propagated to the superstate. Then, everything is over; we have to exit this Clock_Setting. That’s why the event has to be propagated to the superstate because ‘OK’ is handled at the superstate level here to EXIT.
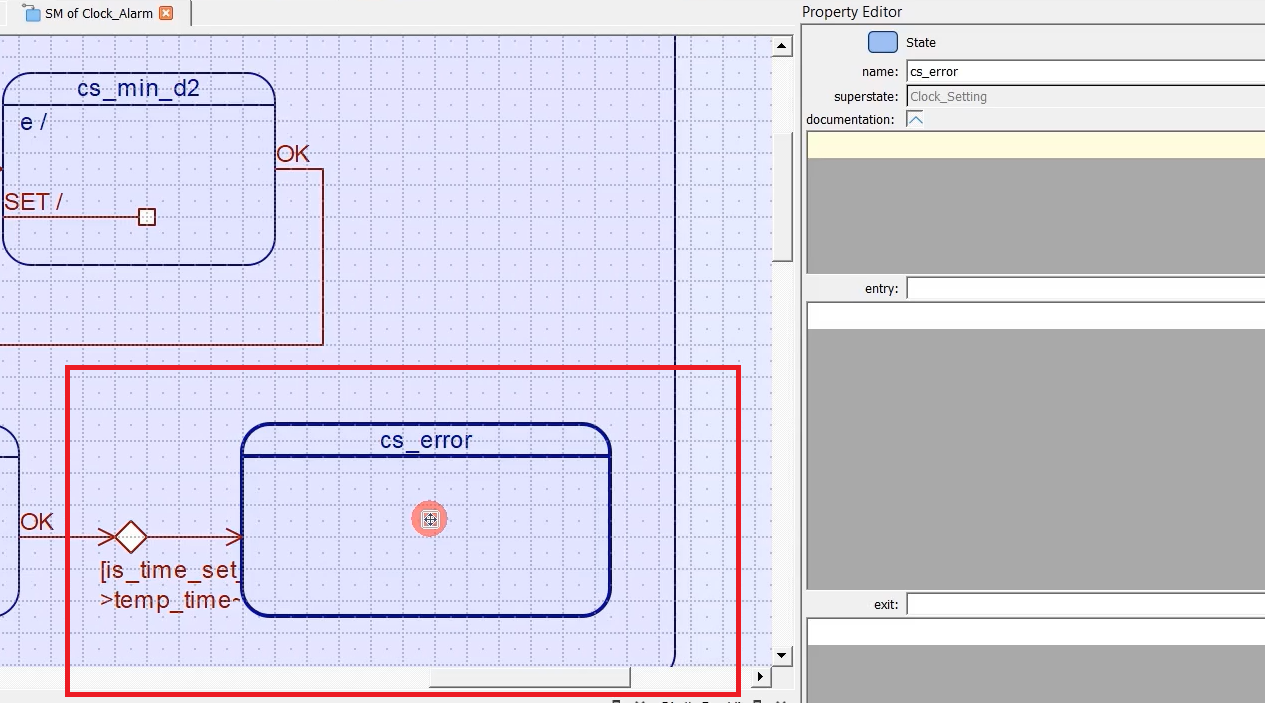
Let’s take care of this error state. In the Error state, you should display some message to the user that “It’s an error.”
As you saw in the demo, I blink some messages. You can blink multiple messages; you can do anything you want. But I blink the message “Errors.”
I create two states here. I’ll call this state as an error on, or error message 1, or error message 2, like that. I blink different messages. I’ll call this as err_on and err_off.
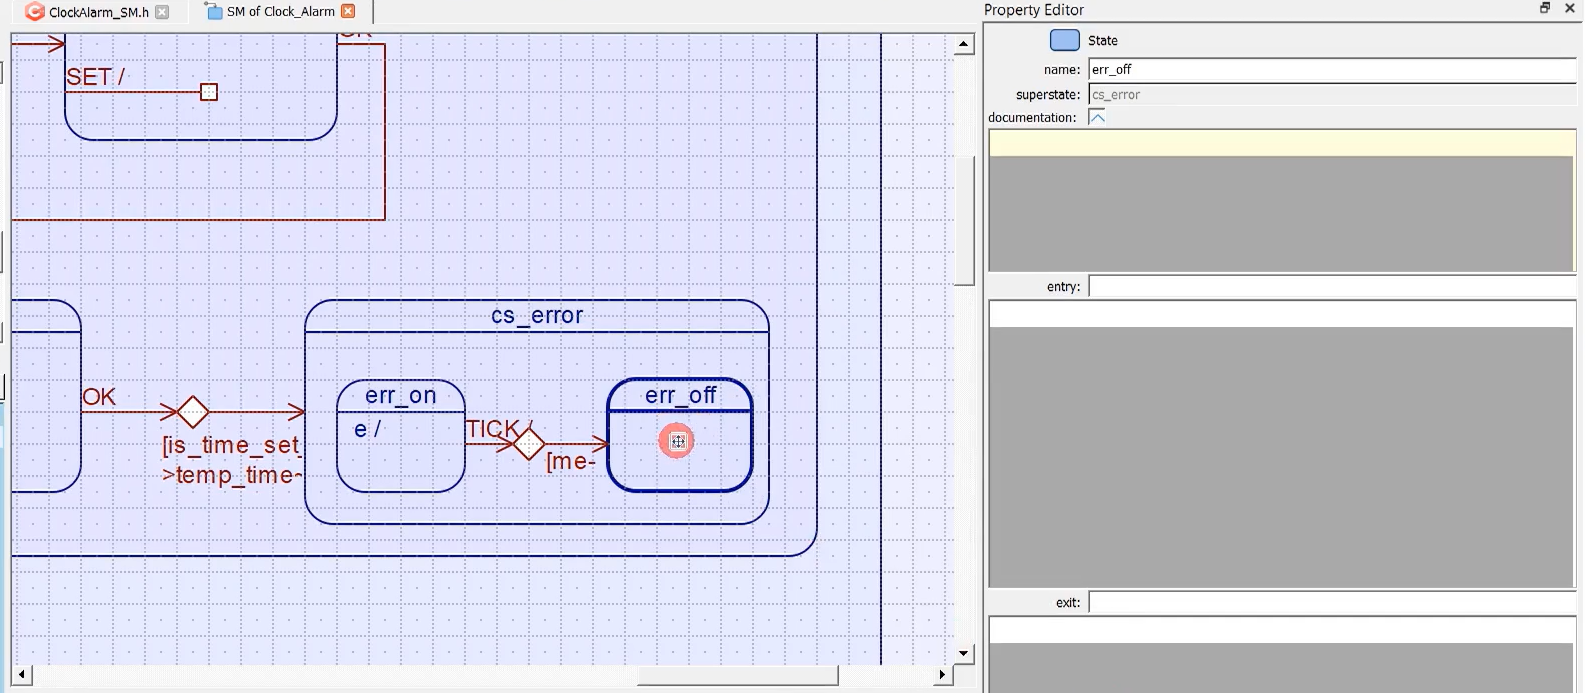
I’ll just create some macros here.
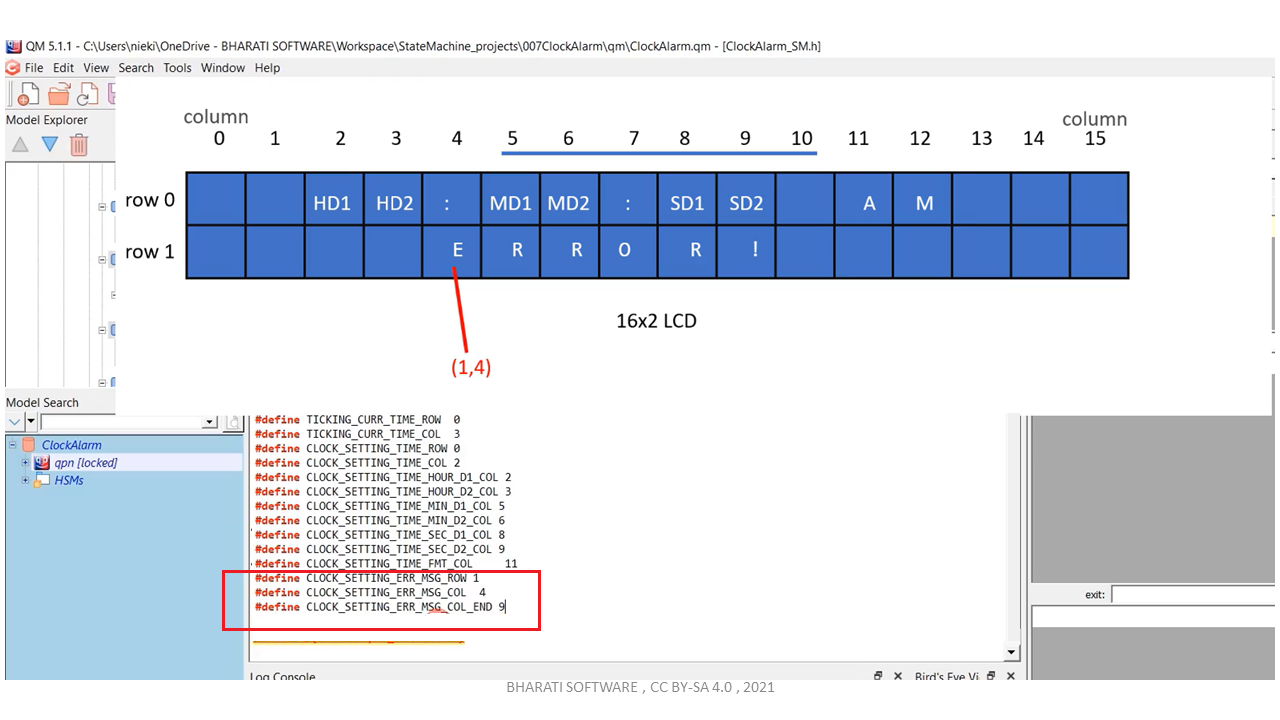
# define CLOCK_SETTING_ERR_MSG_ROW 1
#define CLOCK_SETTING_ERR_MSG_COL 4
#define CLOCK_SETTING_ERR_MSG_COL_END 9 → length of the message.
Let’s add the Entry action for this, display_write(“Error!”, CLOCK_SETTING_ERR_MSG_ROW, CLOCK_SETTING_ERR_MSG_COL);
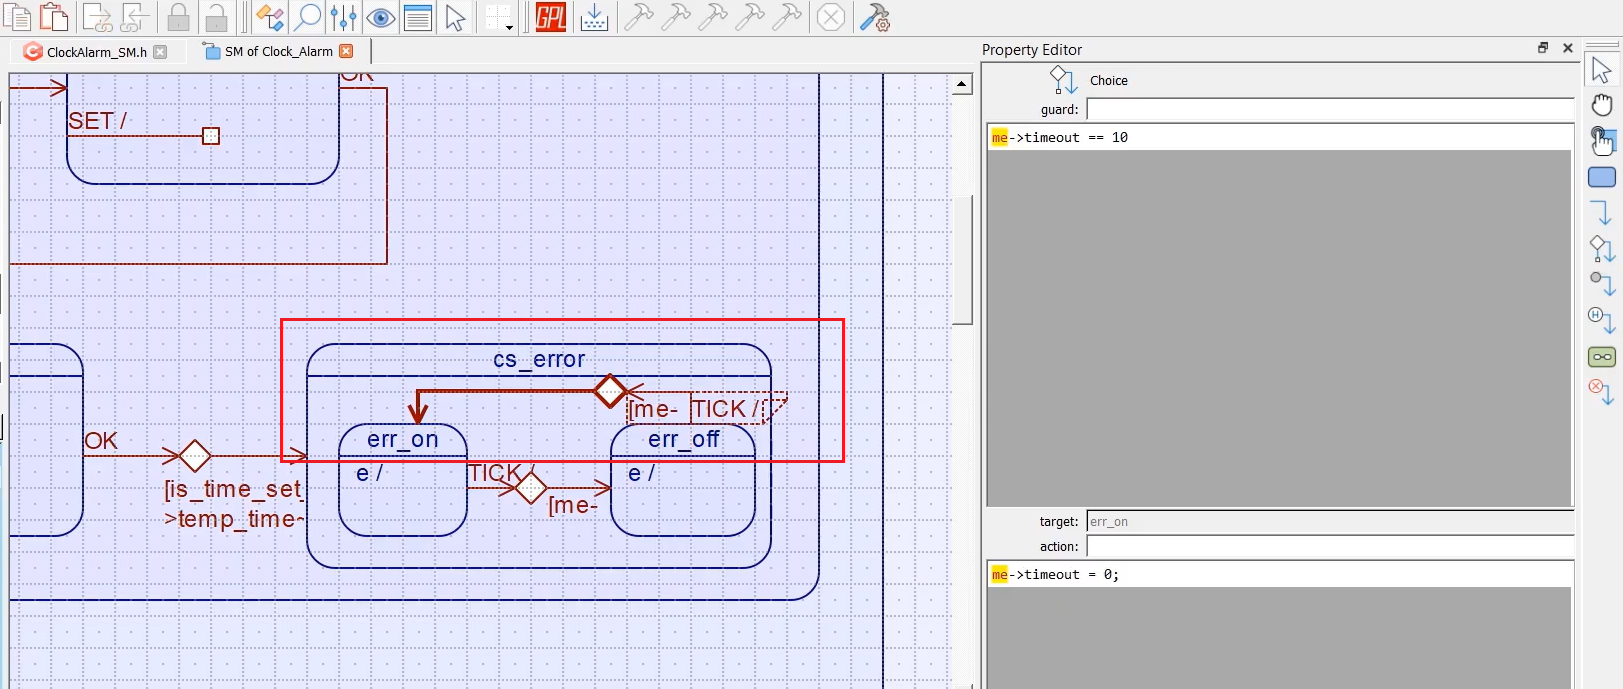
And I will stay here for 500 milliseconds, which means I will handle the TICK event here. We know that the TICK is received for every 50 milliseconds. What I do is I handle the TICK event here, and I’ll use one guard like this. Whenever the TICK happens, I’ll take some action; I will just increment a variable called timeout, increment that variable ‘timeout’ variable, let me create that later.
And the guard condition is me-> timeout == 10. That’s a guard condition. If the timeout = 10, then it goes to err_off state.
And for this choice segment, the action will be me->timeout =0.
If timeout = 10, then I clear the timeout. That means my error message will be shown to the user for 500 milliseconds, and then it goes to err_off state, and here, I will clear the display. And here I will make the err_off. Or you can print any other messages like “check your settings” or something. Here, I will clear that message that I printed in this state.
For this to clear a message on the LCD, I take the help of another helper function called display_erase_block.
void display_erase_block(uint8_t row,uint8_t col_start,uint8_t col_stop)
{
    uint8_t len = col_stop - col_start;
    do{
         lcd_set_cursor(col_start++,row);
         lcd_print_char(' ');
    }while(len--);
}
display_erase_block
It just erases a display block. A block is nothing but the number of characters between column start and column end or column stop. So, you have to provide col_start and col_stop and the row number. Erasing means it is nothing but just replacing a character with a whitespace character; that is like erasing. On LCD, you cannot delete a character. You can only display a whitespace character on that; that is like erasing for these many lengths.
You can take a look at this function. It just goes through different columns of this row, and it just displays a whitespace character. That’s it.
I will use the display_erase_block function in the err_off state entry action.
display_erase_block(CLOCK_SETTING_ERR_MSG_ROW, CLOCK_SETTING_ERR_MSG_COL, CLOCK_SETTING_ERR_MSG_COL_END);
And you should come out of this block after 500 milliseconds. It’s like blinking. That’s why I’ll again use the TICK signal and use one guard. This is again the TICK. The action for this TICK is, you have to increment the timeout variable, ++me-> timeout;
And the guard is me->timeout == 10. The action is me-> timeout = 0; you have to reset that.
Now it will be toggling.
The state machine is in cs_error state, and ‘OK’ is received. ‘OK’ is not handled here; the user cannot press ‘OK’ here, ‘OK’ is ignored.
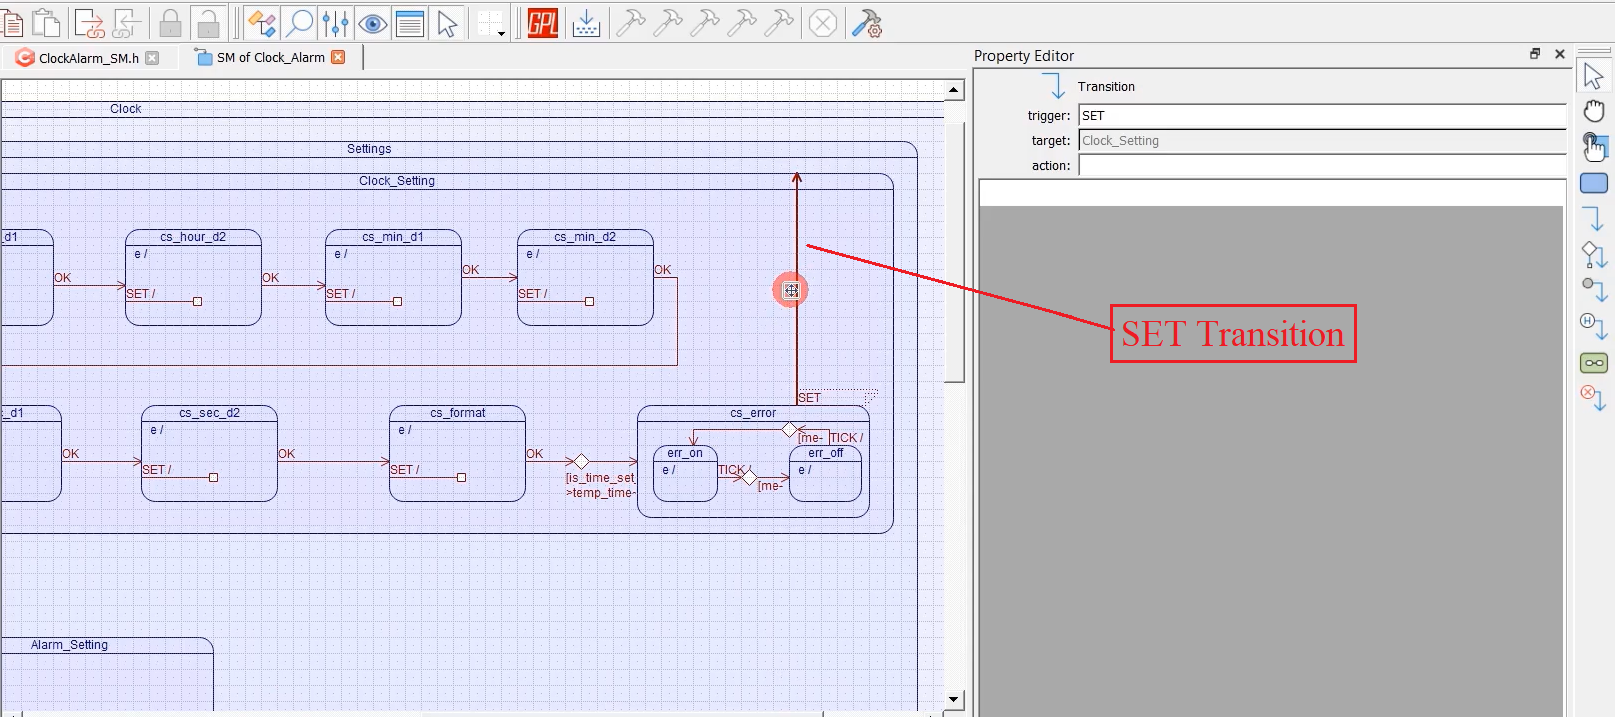
What if the user presses SET?
That means the user wants to change the setting. You should take the user back to this cs_hour_d1 setting. That’s why I will give one transition from cs_error to Clock_Setting. This is for SET. Whenever SET is received, it will transit to Clock_Setting superstate, and everything starts from the beginning.
Does that make sense?
Yes, because when the SET is received here, the user has the chance to start over again.
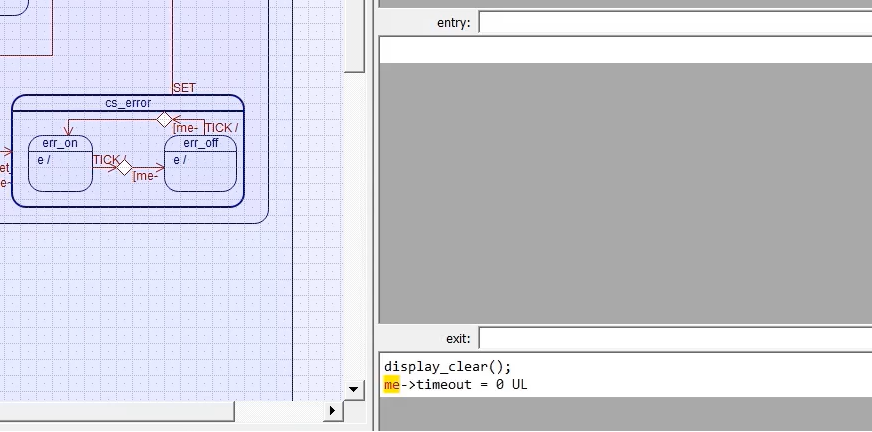
When exiting the cs_error state, you should also clean the display. That’s why I’ll add display_clear, and also, the timeout should be set to 0 (Figure 15).
Add display_erase_block code to the ClockAlarm_SM.c at the end.
FastBit Embedded Brain Academy Courses
Click here: https://fastbitlab.com/course1