Adding LVGL source to the project
In the previous article, we created a project, but it is not an LVGL project yet because we haven’t added any LVGL-related files. Currently, it is just a STM32Cube project.
Adding lvgl to STM32 Project
We will do the following,
- Add lvgl source files and lvgl.h
- Add lvgl example source files
- Add the tft and touchscreen controller drivers
- Add lvgl_conf.h
- Add include path settings in the IDE
- Turn off DMA2D and SDRAM configuration code (We don’t use these peripherals in this project)
- Call lvgl_init() function before you call any the lvgl apis
- Register display driver and input device driver(touchscreen) with lvgl
- Call lv_tick_inc(x) every x milliseconds in an interrupt to report the elapsed time to LVGL
- Call lv_timer_handler() every few milliseconds to handle LVGL related tasks
Add the main LVGL file to the Library
First, we will do below two steps.
- Add lvgl source files and lvgl.h
- Add lvgl example source files
To add the LVGL files, follow these steps:
- Create a project directory: In your project directory, create a new folder to hold the LVGL source code. Right-click on the project, go to “New,” and select “Folder.” You can name it ‘lvgl’ or any other suitable name.
- Locate the LVGL files: Navigate to the folder where you cloned the LVGL project.
[Download LVGL: Visit the LVGL GitHub repository (https://github.com/lvgl/lvgl) and download the source code. You can either download the entire repository as a ZIP file or clone it using Git.
Extract the LVGL source code: If you downloaded the ZIP file, extract its contents to a suitable location on your computer.
Shown in the previous article.]
In this example, it is the ‘lvgl_downloads’ folder. Enter the ‘lvgl’ folder, and find the ‘src’ folder. This contains the main LVGL source file.
- Add the LVGL files to your project: Drag and drop the ‘src’ folder into the ‘lvgl’ folder within your project. Select ‘Copy files and folders’ when prompted to copy all the LVGL source files into your project’s workspace. Click OK to proceed.
- Copy lvgl.h and the license: Copy the ‘lvgl.h’ file and the license file into the ‘lvgl’ folder (not the ‘src’ folder). Paste them in the ‘lvgl’ folder to complete the process.
- Add the ‘examples’ folder: Drag and drop the ‘examples’ folder into the ‘lvgl’ folder.
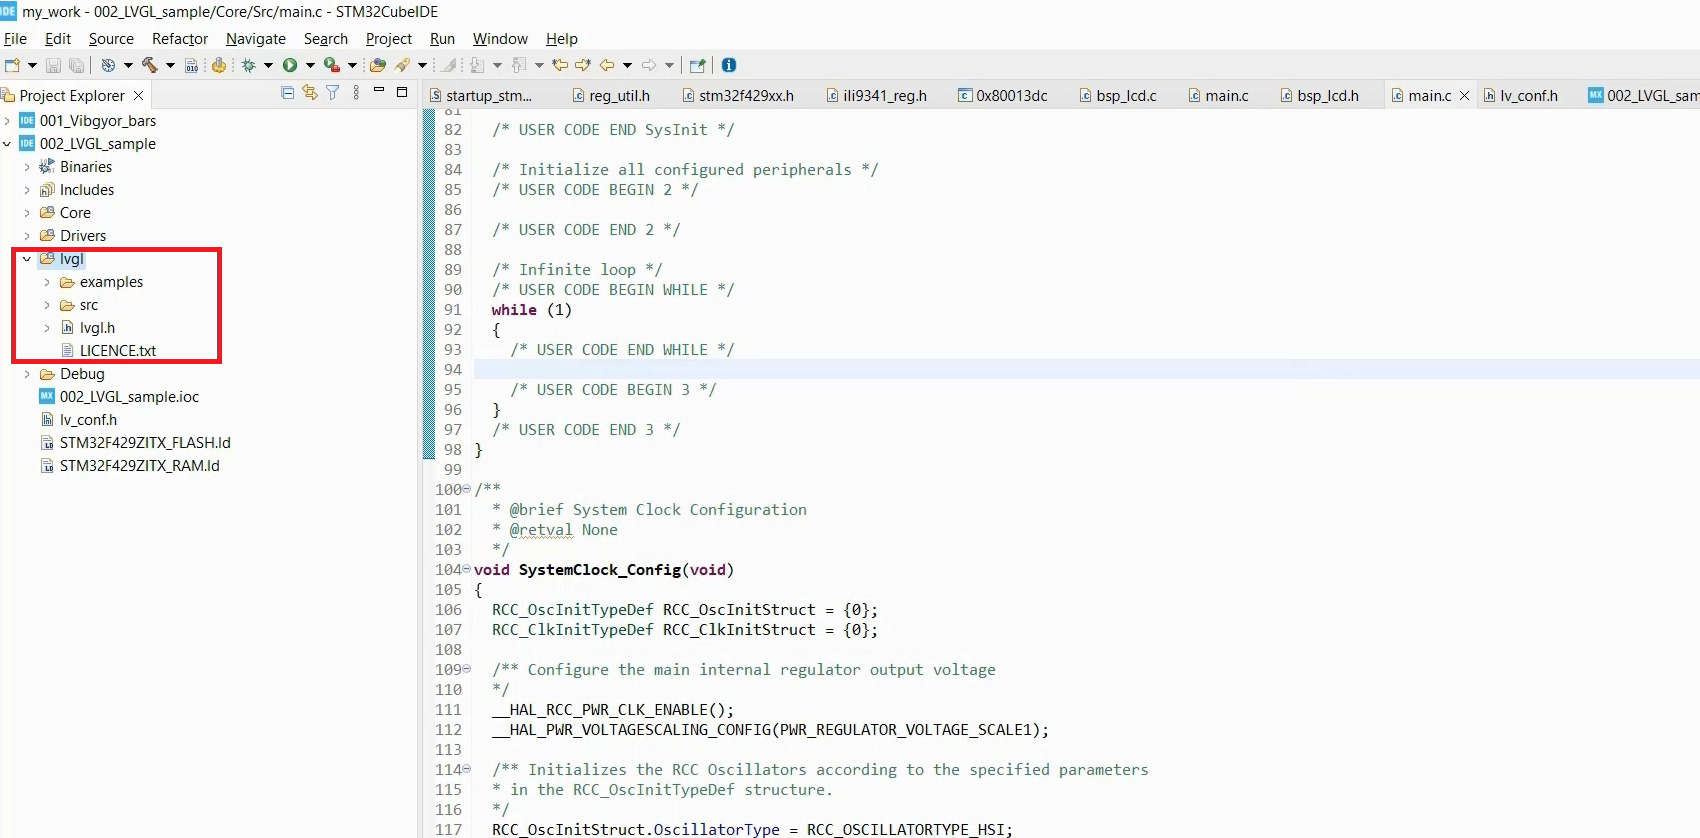
By following these steps, you will have successfully added the necessary LVGL files to your project, as shown in Figure 1.
Add the tft and touchscreen controller drivers
To add TFT and touchscreen controller drivers to your LVGL project, follow these steps:
- Obtain the driver code: Locate the TFT and touchscreen controller drivers from a reliable source, such as the LVGL repository.
- Add the driver code to your project: Copy the driver files into your project directory.
For example, if you downloaded the stm32f429_disco_no_os_sw4stm32 project from the lvgl_downloads folder, add the hal_stm_lvgl folder to your main project directory (not the lvgl folder). Drag and drop the folder into the main folder, select “Copy files and folders,” and click OK to complete the operation.
- Include LVGL configuration files: Add the lvgl conf.h file and the license file to your main project directory. Drag and drop these files into the main project folder to ensure they are included.
- Configure build settings: By default, newly added files and folders in an Eclipse project may be excluded from the build. To include them, right-click on the newly added project (for example, hal_stm_lvgl folder), go to Properties, navigate to the C/C++ Build tab, and uncheck the “Exclude resource from build” option. Click Apply, then Apply and Close to save the changes.
Repeat this process for the lvgl folder if necessary.
The hal_stm_lvgl folder (and the lvgl folder, if applicable) will be included in the build process.
Following these steps will add the TFT and touchscreen controller drivers to your LVGL project. Consult any documentation or instructions provided with the drivers to configure them properly within your LVGL project.
Let’s examine how the touchscreen is connected to our board by referring to the schematic.
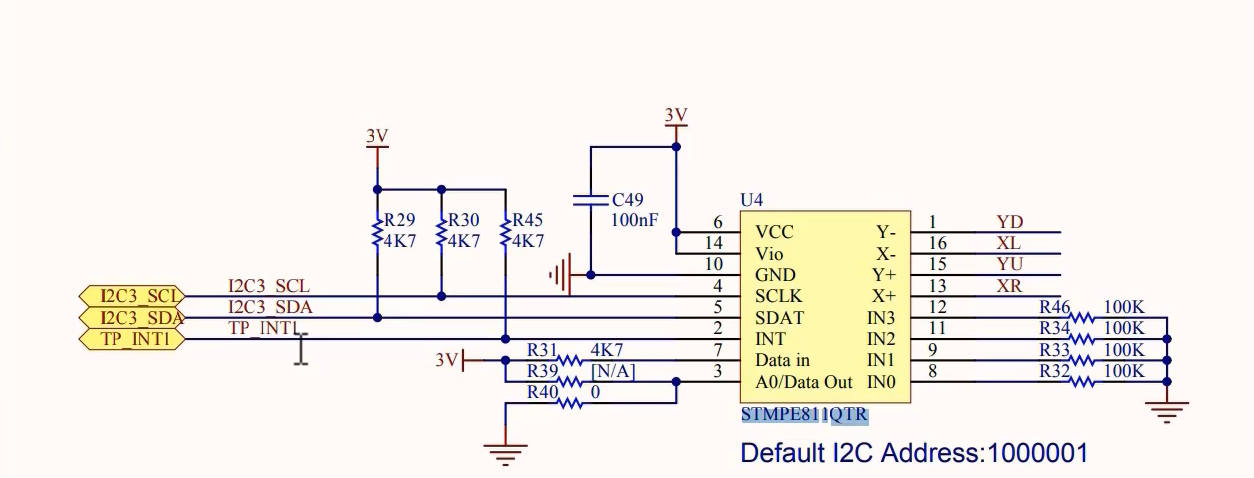
We need to check the board’s schematics to determine the touchscreen controller’s interface. If we navigate to the last page of the schematics, we can see that the STMPE811QTR is the touchscreen controller, and it is connected to the microcontroller via the I2C peripheral (specifically I2C3)(Figure 2). However, we haven’t yet added support for the I2C peripheral in our project, so we need to do that.
By following these steps, you will have enabled support for the I2C peripheral and configured the necessary settings to interface with the touchscreen controller.
To enable support for the I2C peripheral, follow these steps:
- Open the project and locate the ‘ioc’ file.
- In the ‘ioc’ file, navigate to the Connectivity section and select I2C3.
- Enable the I2C mode for I2C3.
- It’s not necessary to make any additional configuration changes because the files in the hal_stm_lvgl folder will handle the required configurations. Simply ensure that you provide low-level driver support, specifically for the I2C driver.
- Save the changes and generate the code.
Before generating the code, it’s important to disable the option to generate code for I2C3 initialization. To do this:
- Go to Project Manager.
- Access the Advanced Settings.
- Uncheck the “Generate code (I2C3_MX_Init)” option.
- Save the settings.
Now you can generate the code without the I2C3 initialization code being automatically generated by CubeIDE.
Add include path settings in the IDE
To ensure the IDE can properly locate the header files, we need to add include path settings. Follow these steps to configure the include paths in your IDE:
- Click on the Project and right-click to access the Properties menu.
- Navigate to C/C++ Build and select Settings.
- Under GCC Compiler, find the Include paths option.
- Click the Add button and choose the workspace option.
- Select the main Project and click OK.
- Verify that the include path has been added correctly.
- Click OK, then Apply, and finally Apply and Close to save the changes.
The IDE can locate the necessary header files by adding the include paths while building your code.
Turn off DMA2D and SDRAM configuration code (We don’t use these peripherals in this project).
To disable the DMA2D and SDRAM configuration code in your project, follow these steps:
- DMA2D:
- Open the tft.h file located in the hal_stm_lvgl folder.
- Locate the line that defines TFT_EXT_FB 1 and set it to 0 to disable the external frame buffer 1.
- Also, set TFT_USB_GPU to 0 to disable the USB GPU.
- Save the changes.
- SDRAM:
- Open the lv_conf.h file in your project.
- Look for the option related to DMA2D.
- Set the DMA2D option to “off” or “0” to disable it.
- Save the changes.
By turning off these peripherals, you are indicating that you will not be using them in your project. Instead, you plan to utilize the on-chip RAM.
Call lvgl_init() function before you call any the lvgl apis
To utilize LVGL effectively, it is crucial to call the lvgl_init() function before any other LVGL APIs. This initialization step is explicitly mentioned in the documentation.
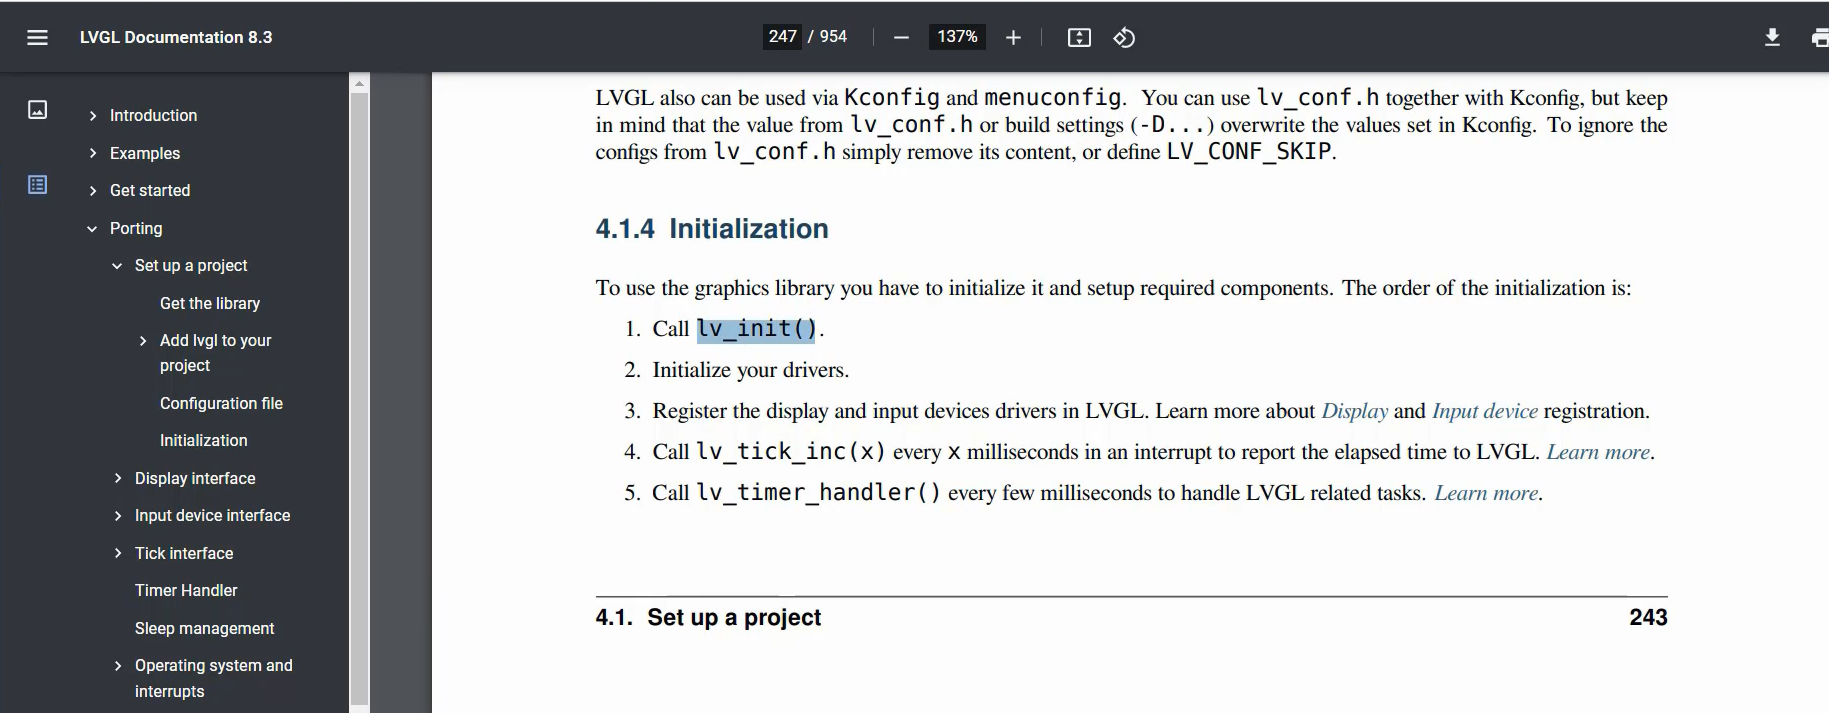
To better understand this process, refer to the documentation’s Porting section, specifically the project setup instructions that outline the initialization steps. The first function to call in this sequence is lv_init(). (Shown in Figure 3)
To call the lvgl_init() function before using any other APIs in LVGL (Light and Versatile Graphics Library), you need to follow these steps:
- Include the LVGL header file in your code. Typically, the header file is named lvgl.h or lvgl/lvgl.h. Include it at the beginning of your source file.
Assuming the lvgl.h file is located in the lvgl directory, and you would include it with the following directive:
#include “lvgl/lvgl.h”.
- After the clock initialization, initialize the LVGL library by calling the lv_init() function. This function initializes the library’s internal data structures.
Call the lvgl_init() function to perform additional initialization specific to your platform or application. This function sets up the necessary memory manager, display driver, input device driver, and other platform-specific configurations.
After calling lvgl_init(), you can use other LVGL APIs to create and manage graphical objects, handle input events, etc.
- Next, proceed with initializing the required drivers and registering the display and input device drivers. You can accomplish this by calling the tft_init() function provided in tft.h.
Examine the tft_init() function, which internally invokes LCD_config. This configuration includes sending various LCD commands and configuring the LTDC (Low-Temperature Differential Calorimetry). Consequently, calling a single function, tft_init(), handles all the necessary setup.
Therefore, call tft_init() from your main.c file. Remember to include the tft.h header file. Assuming the file is located in the hal_stm_lvgl/tft directory, use the following directive: #include “hal_stm_lvgl/tft/tft.h”
For touchpad functionality, the documentation suggests using touchpad.h and calling the touchpad_init() function. Include the touchpad.h header file in your code.
Register display driver and input device driver with lvgl
In the case of the tft_init() function, this registration is already taken care of.
Create a display driver implementation: Depending on your platform, you may have different display hardware and communication protocols (e.g., SPI, I2C, parallel interface). You’ll need to implement the necessary functions to communicate with your display driver. The required functions typically include initialization, flushing the display buffer, and optionally reading touchpad coordinates. Refer to the LVGL documentation or examples specific to your platform for more details.
Register the display driver: After implementing the display driver, you must register it with LVGL using the lv_disp_drv_t structure and the lv_disp_drv_register() function. This allows LVGL to use your driver for rendering.
#if TFT_EXT_FB != 0
    SDRAM_Init();
#endif
    LCD_Config();
    DMA_Config();
    disp_drv.draw_buf = &buf;
    disp_drv.flush_cb = tft_flush;
    disp_drv.monitor_cb = monitor_cb;
    disp_drv.hor_res = 240;
    disp_drv.ver_res = 320;
    lv_disp_drv_register(&disp_drv);
Register the display driver
This global variable(lv_disp_drv_t) represents a structure that the driver needs to fill with specific details. These details include the display resolution, horizontal and vertical resolution, and other relevant options, as shown below.
typedef struct _lv_disp_drv_t {

    lv_coord_t hor_res; /**< Horizontal resolution.*/
    lv_coord_t ver_res; /**< Vertical resolution.*/

    lv_coord_t
    physical_hor_res; /**< Horizontal resolution of the full / physical display. Set to -1 for fullscreen mode.*/
    lv_coord_t
    physical_ver_res; /**< Vertical resolution of the full / physical display. Set to -1 for fullscreen mode.*/
    lv_coord_t
    offset_x; /**< Horizontal offset from the full / physical display. Set to 0 for fullscreen mode.*/
    lv_coord_t offset_y; /**< Vertical offset from the full / physical display. Set to 0 for fullscreen mode.*/
lv_disp_drv_t structure
The’ flush‘ function is one important function that the driver must implement. Whenever LVGL
needs to send graphic elements to the display, it calls this function, which is a function pointer within the driver. The driver must appropriately fill this function pointer.
static void tft_flush(lv_disp_drv_t * drv, const lv_area_t * area, lv_color_t * color_p)
{
/*Return if the area is out the screen*/
if(area->x2 < 0) return;
if(area->y2 < 0) return;
if(area->x1 > TFT_HOR_RES - 1) return;
if(area->y1 > TFT_VER_RES - 1) return;

/*Truncate the area to the screen*/
int32_t act_x1 = area->x1 < 0 ? 0 : area->x1;
int32_t act_y1 = area->y1 < 0 ? 0 : area->y1;
int32_t act_x2 = area->x2 > TFT_HOR_RES - 1 ? TFT_HOR_RES - 1 : area->x2;
int32_t act_y2 = area->y2 > TFT_VER_RES - 1 ? TFT_VER_RES - 1 : area->y2;

x1_flush = act_x1;
y1_flush = act_y1;
x2_flush = act_x2;
y2_fill = act_y2;
y_fill_act = act_y1;
buf_to_flush = color_p;
Flush function
By registering the driver through tft_init(), LVGL becomes aware of your driver and its capabilities. The code shows that the flush callback is configured to the tft_flush() function. When LVGL needs to send graphic elements to the display, it calls this function and provides the necessary pointer.
In the tft_flush() function, the code performs a DMA transfer using the provided pointer representing the frame buffer. The driver manages this frame buffer, as evident from the variable my_fb, which is set to the specified resolution.
In summary, the tft_init() function takes care of registering the display driver with LVGL, ensuring that LVGL recognizes your driver’s capabilities. The function configures the appropriate flush callback, allowing LVGL to send graphic elements to the display by calling the designated driver function.
After that, you have to do the two steps mentioned below in the documentation(Figure 3).
- Call lv_tick_inc(x) every x milliseconds in an interrupt to report the elapsed time to LVGL.
One important step is to call lv_tick_inc(x) every x milliseconds in an interrupt. This allows LVGL to track the elapsed time accurately since the library relies on various timers. By reporting the elapsed time through this function, LVGL can perform time-related tasks correctly.
To accomplish this, you can utilize the systick interrupt handler already present in your project. Typically, the systick interrupt is configured to occur every 1 millisecond. However, if your configuration sets it to occur every 10 milliseconds, for example, you should call lv_tick_inc(10) within the systick interrupt handler, providing the appropriate argument.
By incorporating this function call within the systick interrupt handler, you ensure that LVGL is regularly informed about the elapsed time.
Remember to adjust the frequency of the function call (x milliseconds) according to your specific systick interrupt configuration.
- Call lv_timer_handler() every few milliseconds to handle LVGL related tasks
The next step is to call lv_timer_handler() every few milliseconds to handle LVGL-related tasks. This function allows the LVGL engine to check its timers, including the elapsed timers, and execute the associated timer handlers.
To ensure proper execution of these tasks, you need to call lv_timer_handler() repeatedly. It is recommended to incorporate this function call within a loop.
In your main.c file, within the main program loop (the infinite loop), place the call to lv_timer_handler() along with a delay of your desired interval (e.g., 5 milliseconds). Use the appropriate delay function according to your platform or implementation.
By including this loop structure, you allow LVGL to handle its internal timers and tasks continuously.
Fastbit Embedded Brain Academy Courses
https://fastbitlab.com/course1


