Exercise-003 Implementing event producer code
In this article, first, we will provide a couple of macros for the pins; we haven’t given that.
Let’s do that at the top in main.h as shown below.
#define PIN_BUTTON1, which is 2. #define PIN_BUTTON2, which is 3, like that. PIN_BUTTON3 to Arduino PIN 4, PIN_BUZZER is 12.
And for LCD connections, #define PIN_LCD RS. First, let’s give the macro for RS (RS stands for register select). Then #define PIN_LCD_RW is 6, like that, you can do.
#ifndef MAIN_H
#define MAIN_H

#include<Arduino.h>

#define PIN_BUTTON1 2
#define PIN_BUTTON2 3
#define PIN_BUTTON3 4
#define PIN_BUZZER 12

//lcd connections
#define PIN_LCD_RS 5
#define PIN_LCD_RW 6
#define PIN_LCD_EN 7
#define PIN_LCD_D4 8
#define PIN_LCD_D5 9
#define PIN_LCD_D6 10
#define PIN_LCD_D7 11

#define BTN_PAD_VALUE_INC_TIME 4
#define BTN_PAD_VALUE_DEC_TIME 2
#define BTN_PAD_VALUE_ABRT 6
#define BTN_PAD_VALUE_SP 1
Define macros for the pins

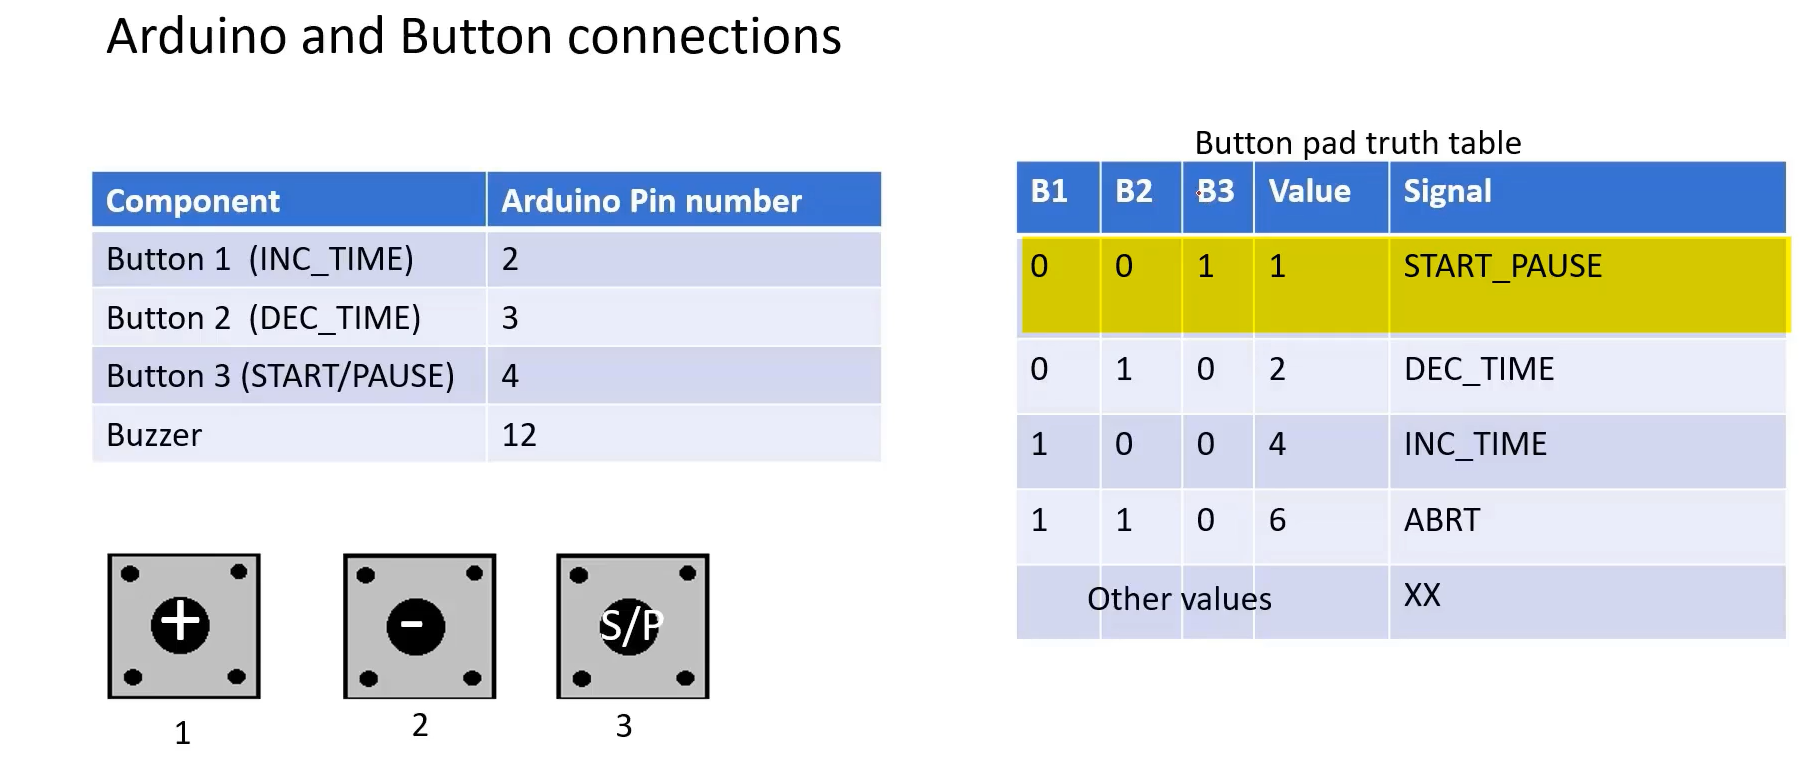
And the truth table of the button pad is shown in Figure 1.
When the button is pressed, the button is connected to the Vcc. That means when the button is pressed, the pin status will be high. When the button is not pressed, the pin is grounded.
Suppose B3 is high, which means that the START_PAUSE button is pressed. That means, if the button pad status is 1, then that is START_PAUSE. If the button pad status is 2, then that is Decrement time. If the button pad status is 4 (binary 4), then it is Increment time. If it is 6, then it is Abort. So, other values are don’t care.
Let’s define those values in main.h. #define BTN_PAD_VALUE_INC_TIME is 4, then #define BTN_PAD_VALUE_DEC_TIME is 2, like that as shown in above.
Now let’s implement the loop function. Let’s implement the first task: read the button pad status. For this, we create a couple of variables, uint8_t b1, b2, b3, and btn_pad_value. b1, b2, b3 variables hold the individual button status.
How to read the button status?
b1=digitalRead(). Because the button is connected to the digital pin of the Arduino, there is no Analog thing involved here. So, it’s just a digitalRead.
b1= digitalRead(PIN_BUTTON1). Let’s read the status of Button1 in b1. After that, b2 = digitalRead(PIN_BUTTON2), read the Button2 status to b2, likewise for Button3.
Now, btn_pad_value= (b1<<2)|(b2<<1)|b3; So, you have to merge all these status to form a value. You use Bitwise OR for that.
After that, we got the button pad value. But that needs to be processed against the button bouncing.
For the time being, let’s give one function for that, which I would call process_button_pad_value. You have to process means, it has to be processed for a button bouncing. We will do that in the function process_button_pad_value. You send the btn_pad_value here—software button debouncing code as shown below.
The second task is to make an event. You have to compare that value.
If btn_pad_value, the process_button_pad_value function returns a non-zero value if something is present on the button pad. So, let this function return a non-zero value if the button pad has been pressed or if any buttons of the button pad have been pressed. If the process_button_pad_value function returns 0, that means there is no activity on the button pad. So, no button has been pressed.
If no button is pressed, then the value is 0. That’s why we will process the btn_pad_value only if it is non-zero.
Here, if(btn_pad_value = BTN_PAD_VALUE_INC_TIME). That means we have to send the Increment time event now. We will create one event variable in the loop function, Protimer_user_event_t ue; (ue– user event).
Here, ue.super.sig = INC_TIME; else if( btn_pad_value == BTN_PAD_VALUE_DEC_TIME), then you have to populate this signal variable with decrement time enumerator value. Like that you have to do. That’s how you make the event.
And then here you send that event to the dispatcher. Send it to the event dispatcher → this is the third task. Protimer_event_dispatcher we have. We have to send the address of the main application object ‘protimer’ and the address of the user event. Protimer_event_dispatcher(&protimer, &ue.super);
And let’s implement process_button_pad_value function now. uint8_t process_button_pad_value(uint8_t btn_pad_value). And let’s give the prototype; let’s return 0 for the time being. This also, you can keep it static. We completed sending the user event.
Again, we have to implement some code to send the TICK event. So, we haven’t implemented the code to dispatch the TICK event. We will see that in an upcoming article.
void setup() {
  // put your setup code here, to run once:
  protimer_init(&protimer);
}

void loop() {

  uint8_t b1,b2,b3,btn_pad_value;
  protimer_user_event_t ue;
  static uint32_t current_time = millis();
  static protimer_tick_event_t te;

  //1. read the button pad status
  b1 = digitalRead(PIN_BUTTON1);
  b2 = digitalRead(PIN_BUTTON2);
  b3 = digitalRead(PIN_BUTTON3);

  btn_pad_value = (b1<<2)|(b2<<1)|b3;

  //software button de-bouncing
  btn_pad_value = process_button_pad_value(btn_pad_value);

  //2. make an event
  if(btn_pad_value){
  if(btn_pad_value == BTN_PAD_VALUE_INC_TIME){
    ue.super.sig = INC_TIME;
  }else if(btn_pad_value == BTN_PAD_VALUE_DEC_TIME){
    ue.super.sig = DEC_TIME;
  }else if(btn_pad_value == BTN_PAD_VALUE_SP){
    ue.super.sig = START_PAUSE;
  }else if(btn_pad_value == BTN_PAD_VALUE_ABRT){
    ue.super.sig = ABRT;
  }

  //3. send it to event dispatcher
  protimer_event_dispatcher(&protimer,&ue.super);
Event producer code
FastBit Embedded Brain Academy Courses
Click here: https://fastbitlab.com/course1


