Exercise-007 Implementing CLOCK_SETTING state part-1
In the previous article, I completed drawing these sub-states inside this Clock_Setting, as shown in Figure 1. I have used a separate state to configure each digit of different fields.
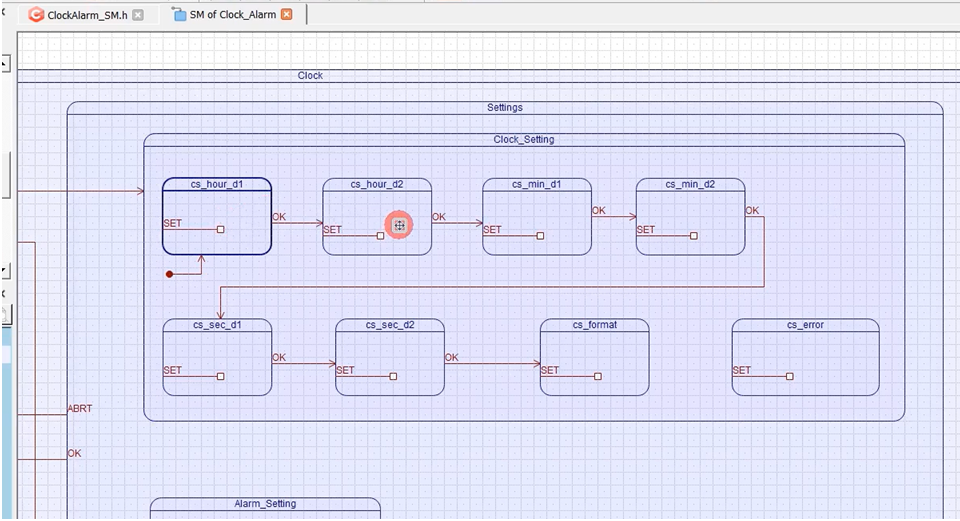
You need not use two separate states to configure two separate digits of the hour field. You can even use one state, but you can use one variable to distinguish between digit1 and digit2. That also you can do. Because when you use more variables, you should also take care of initializing them and deinitializing them. Sometimes it’s better to use one more state rather than using a variable. Sometimes it makes sense to use a variable.
Now let’s talk about some pseudocode. I’ll be just briefing what we’ll be doing to handle the SET signal.
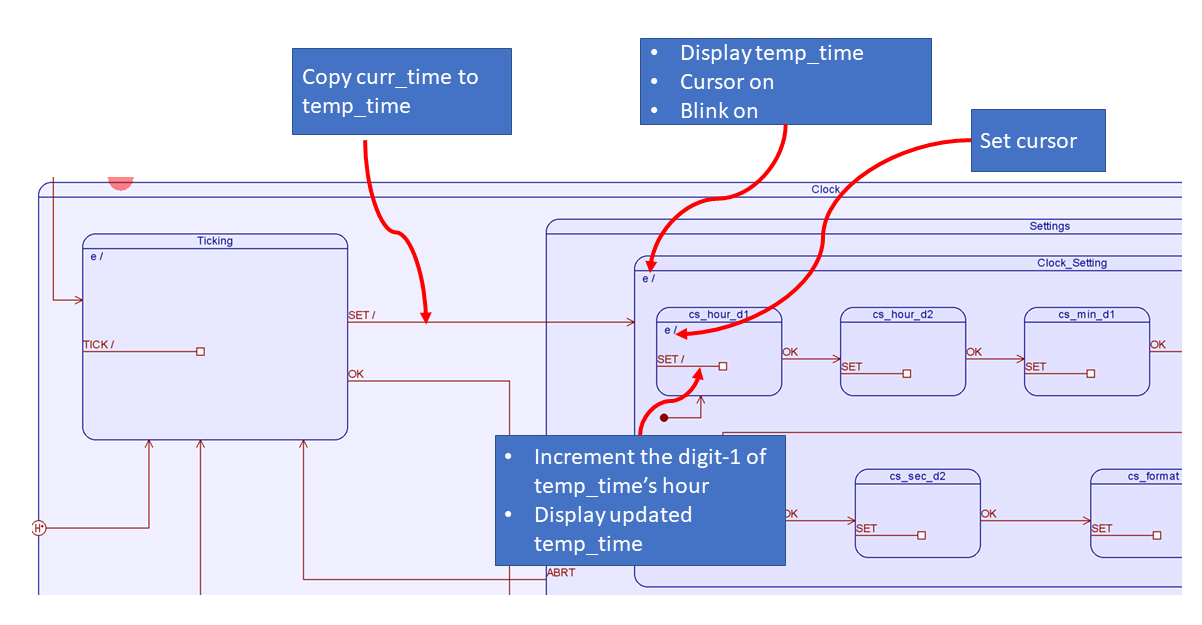
You are in a Ticking state, and the current time is being displayed to the user, and let’s say the ‘SET’ signal arrives. That is an indication that we should go to Clock_Setting mode.
Let’s define one action for the SET signal, a transition action. Here we will copy the current time to the temporary time variable, and then this enters the Clock_Setting state. The Entry action of the Setting state will be executed, followed by Clock_Setting state, followed by the cs_hour_d1 state. But we don’t have any Entry action in the Setting state.
The Entry action of Clock_Setting will display the temporary time we captured here (Copy curr_time to temp_time). We will display that and make the Cursor on and Blink on. Because, as you saw in the demo, we should blink the Cursor. That will do in Clock_Setting.
And then, cs_hour_d1 is an initial state of a Clock_Setting super state. The state machine enters the initial state. Here, in this Entry action, we will Set the cursor at the appropriate digit. We will set the cursor.
When the state machine is in cs_hour_d1 state, whenever the SET signal is received, we have to change the digit d1. We will increment the digit-1 of temp_time’s hour field. We have to update the display with a new temp_time then; that will do here.
And then, when the state machine is in cs_hour_d1 state and when the ‘OK’ signal is received, there will be a transition to the next state (cs_hour_d2).
Here again, cs_hour_d2 will have one Entry action, and you have to Set the cursor to this digit on display. And whenever the ‘SET’ signal is received, increment the digit-2 of the temp_time’s hour field, the same thing you have to do here. And then ‘OK,’ it moves next state.
And again, you have to Set the cursor here (cs_min_d3). Increment the digit-1 of temp_time’s a minute field. I hope you can do that. This is just my logic, and you are free to implement your own logic.
 /*.${HSMs::Clock_Alarm::SM::Clock::Ticking::SET} */
me->temp_time = Clock_Alarm_get_curr_time()/10;
if(me->time_mode == MODE_12H){
     if(get_am_or_pm(me->temp_time).equals("AM")){
          me->temp_format = FORMAT_AM;
      }
      else{
         me->temp_format = FORMAT_PM;
      }
       me->temp_time = convert_24hformat_to_12h(me->temp_time);
}
else
        me->temp_format = FORMAT_24H;
TODO File code
For example, let’s code for Ticking state’s SET transition action. You can see the code above.
${HSMs::Clock_Alarm::SM::Clock::Ticking::SET}
me->temp_time = Clock_Alarm_get_curr_time()/10; Here you can see that, I am copying the current time into the temporary time.
If the mode is 12H, then the temporary time should be updated with a 12 hour format. That I do here. me->temp_time = convert_24hformat_to_12h(me->temp_time);
And then, I use one more variable called temp_format. This variable will be used to capture users format selection later. Just create one class attribute called temp_format, where I capture what exactly is a time_format, whether it is an AM, PM, or 24H. temp_format is required later when we have to display the time format.
Copy the code, and I’m going to the SET transition, and in action, paste that code.
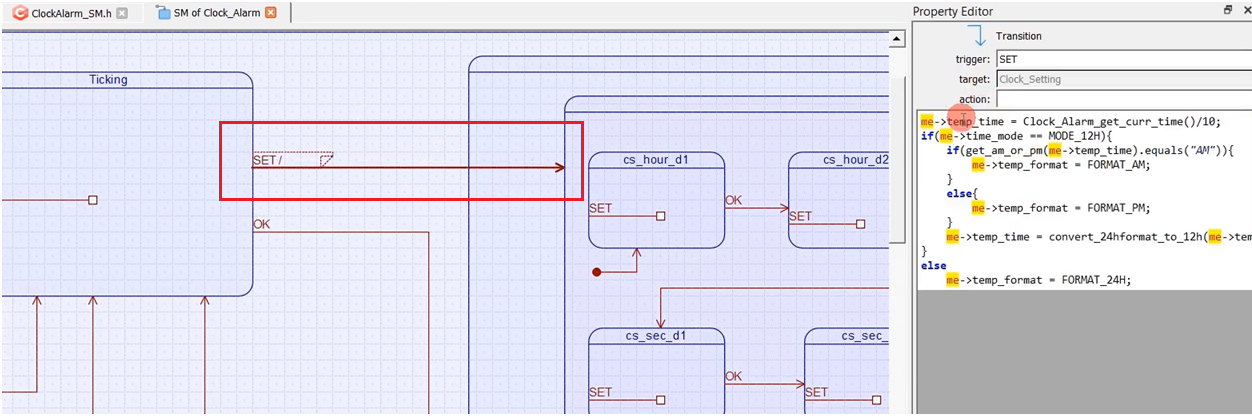
This code actually needs a temp_format variable. Let’s create that.
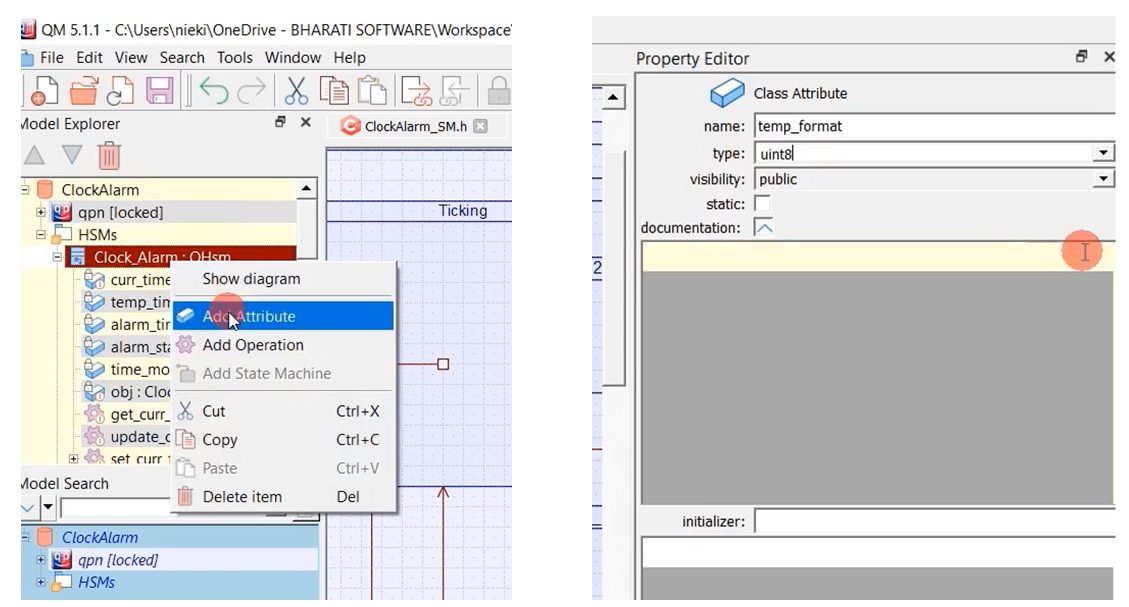
Select Clock_Alarm: QHsm, Add attribute. I’ll call this temp_format, type is uin8_t, and I’ll keep it private. Save that.
After that, when we reach Clock_Setting state, we should display that captured temporary time. For that, we will be using one function called display_clock_setting_time. It displays the clock setting time.
void display_clock_setting_time(Clock_Alarm * me, uint8_t row, uint8_t col) {
         String time_as_string;

         time_as_string = integertime_to_string(me->temp_time); //hh:mm:ss

         /*concatenate am/pm information */
         if(me->temp_format != FORMAT_24H){
            time_as_string.concat(' ');
            if(me->temp_format == FORMAT_AM)
                time_as_string.concat("AM");
             else
                 time_as_string.concat("PM");
            }

         display_write(time_as_string,row,col);
     }
display_clock_setting_time
display_clock_setting_time converts that temporary time that you had saved in the earlier step; it just converts that into a string. And then, it concatenates the AM or PM information if required; It writes to the display.
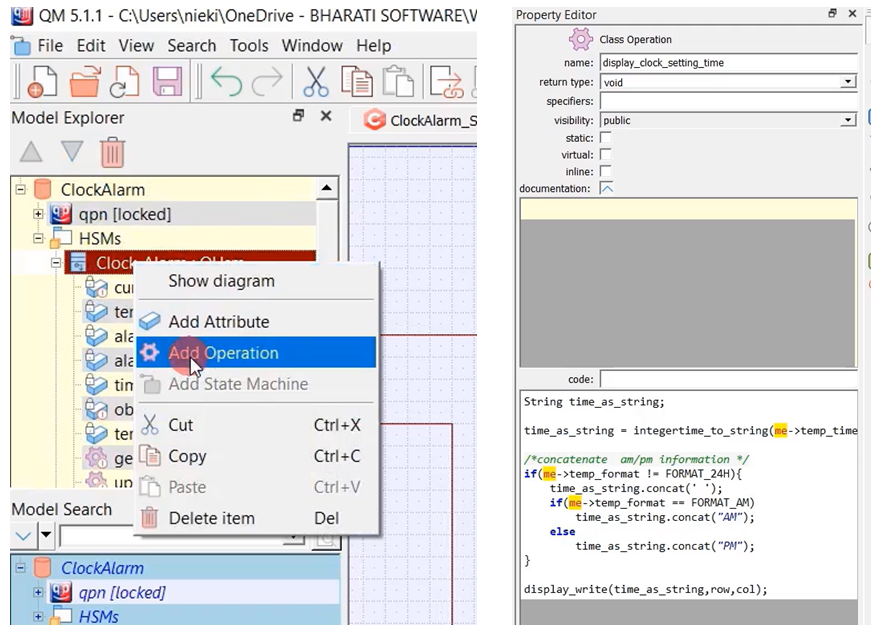
Let’s create one class operation. Name it as display_clock_setting_time; return type is ‘void’; visibility ‘public’, no problem.
And this has access to the ‘me’ pointers; I will consider display_clock_setting_time a non-static function. And copy all these display_clock_setting_time codes, paste that into the code section. Save, as shown in Figure 5. Display_clock_setting_time we are going to call from Clock_Setting.
Whenever the Clock_Setting state is entered as a part of the entry action, we are going to display that clock setting time.
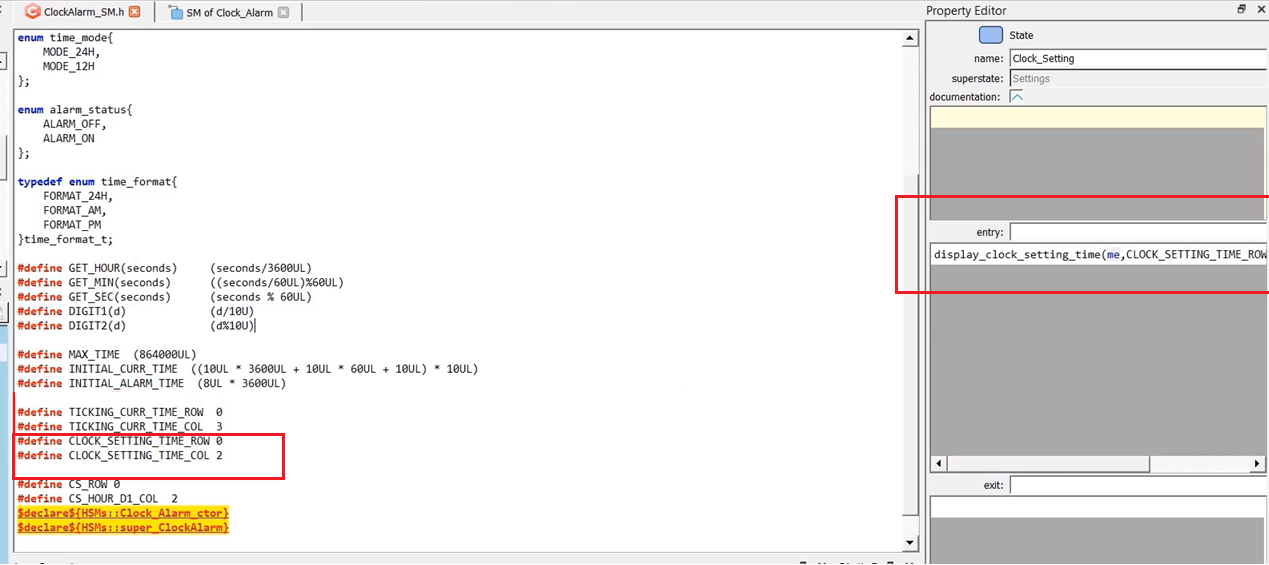
You have to supply the ‘me’ pointer and the location where you want to print that.
I’ll provide the macro. #define CLOCK_SETTING_TIME_ROW, which is 0.
#define CLOCK_SETTING_TIME_COL, I’ll select 2 here. And I’ll use these macros in entry action, as shown in Figure 6.
Let’s go back to the state machine, and you should also turn on the cursor and turn on the blink of the LCD.
void display_cursor_on_blinkon() {
    lcd_cursor_show();
    lcd_cursor_blink();
}
display_cursor_on_blinkon()
For that, I have given one helper function you can use that. And its name is display_cursor_on_blinkon() it does nothing actually. It just calls the lcd.cpp’s functions. lcd_cursor_show and lcd_cursor_blink. So, call this function in the Clock_setting → Entry action.
After that, the state machine enters cs_hour_d1, and we will set the cursor at d1’s position. We should call set_cursor. I will use display_set_cursor, which calls lcd_set_cursor.
void display_set_cursor(uint8_t r, uint8_t c) {
     lcd_set_cursor(c,r);
}
display_set_cursor
What’s a position?
Where coordinates do you have to mention?
Row and column number. I’ll just use the macros, as shown in Figure 7.
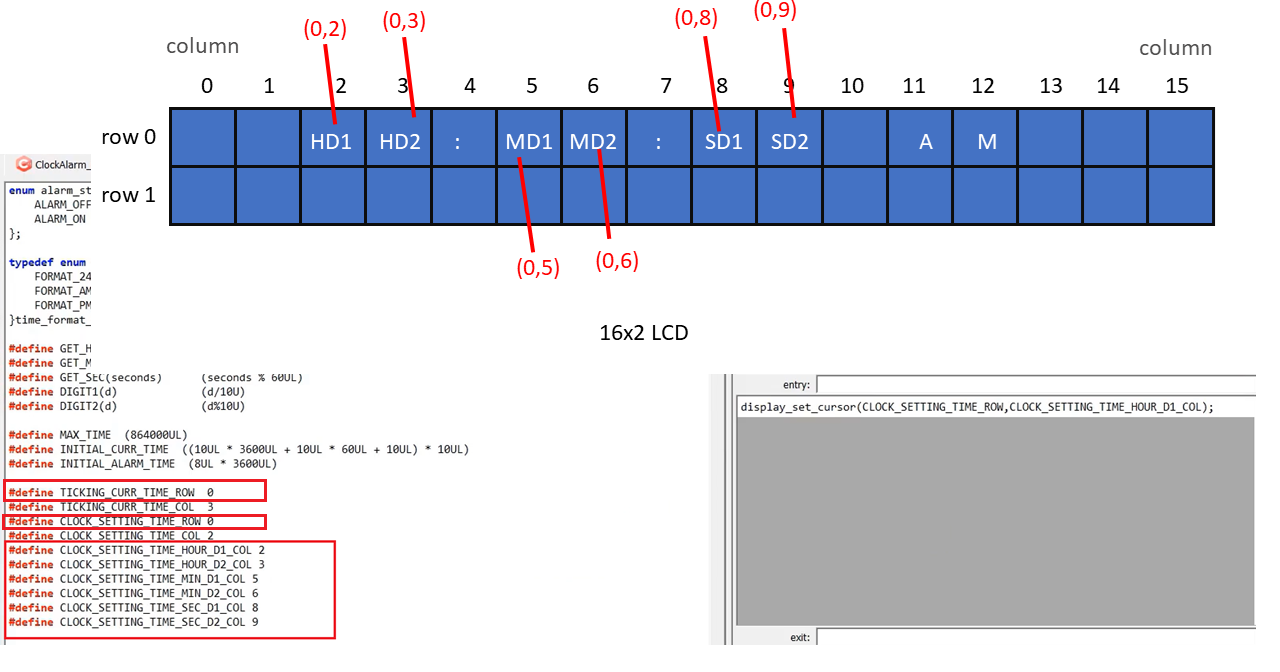
Row will be the same. That is 0.
Now let’s get back to the state machine. In cs_hour_d1, here we set the cursor. And whenever the user sends the SET signal, we should increment the d1 digit.
What I’ll do here is I will use another variable to hold the digit. I’ll create one more attribute, name it temp_digit; we will use uint8_t, private.
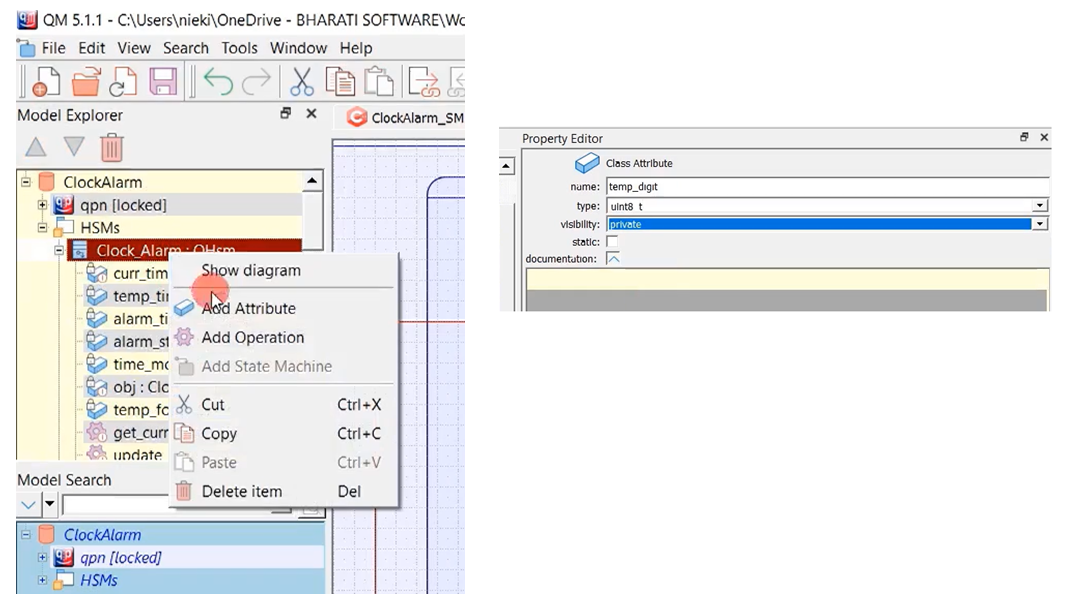
Here, whenever the state machine enters cs_hour_d1 state, me->temp_digit will hold the first digit of the temporary times hour field. For that, I’ll use the macro that I introduced earlier, which is DIGIT1 macro. It just returns the unit field and 10th field. DIGIT1 returns the 10th field, and DIGIT2 returns the unit field.

Use DIGIT1 of GET_HOUR. I’ll extract the DIGIT1 of GET_HOUR of temp_time. That’s it. I capture the first digit of the hour field of the temp_time.
After that, whenever the ‘SET’ is received, I’m just going to increment that. me->temp_digit ++. For digit-1, the allowed values are 0, 1, 2. That’s why, I’ll just do me->temp_digit % = 3. Because the digit value can vary between 0, 1, and 2. It can’t be 3.
You have just changed this temp_digit; you did a ‘++’ whenever you received the SET signal.
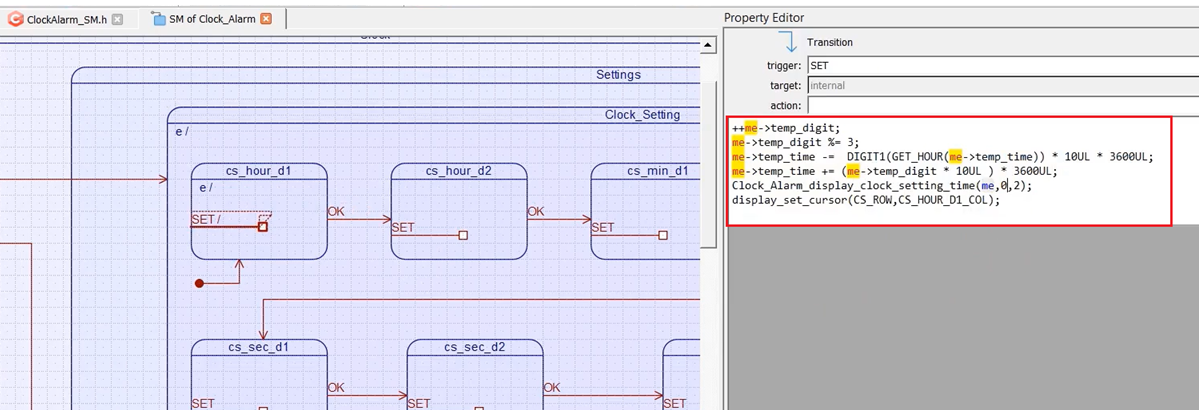
Now, we have to update that information in the temporary time variable. You would first delete the earlier value and feed the new value.
I’m going to do this. me->temp_time -= DIGIT1 (GET_HOUR(me-> temp_time)) * 10UL * 3600UL;
And then, I am compensating with temp_digit value. I’m taking the digit value multiplied by 10 because it’s the 10th place. Because temp_digit should go at the 10th place and multiply by a number of seconds in one hour. First, subtract the old seconds, introduce the new second.
And then, you already have created this function display_clock_setting_time. We display the modified temporary time. And the cursor must stay at D1’s position. Once you do this, the cursor will move to somewhere else. You have to bring back the cursor at D1’s position. The code is shown in Figure 10.
Please note that this is not the logic you have to implement; you are free to implement anything you want. I mean, there could be some other approaches. You are free to think of your own logic.
And whenever ‘OK’ is received here, there is an external transition; we come to cs_hour_d2. Again we have to repeat that. Whatever we have done here, we have repeated here. Copy the code of this cs_hour_d1, go to cs_hour_d2, and paste that here. Instead of DIGIT1, this is DIGIT2, and display_set_cursor D2 column.
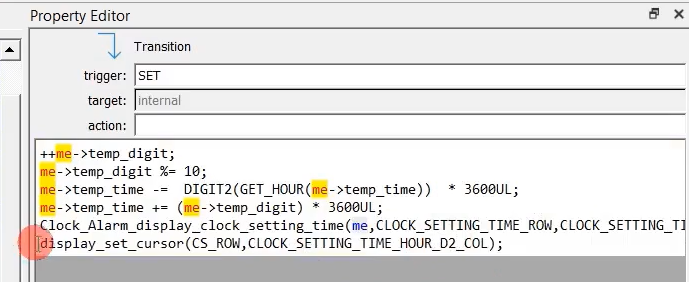
And ‘SET,’ almost the same code you have to copy and paste here. The value of D2 can vary from 0 to 9. That’s why you have to use 10 here. And this is DIGIT2, and DIGIT2 is actually at the unit place. That’s why multiplying by 10 is not required. (Figure 11) Likewise, you have to modify.
FastBit Embedded Brain Academy Courses
Click here: https://fastbitlab.com/course1

