Error handling
In this article, let’s understand an error handling, especially in our module’s initialization function.
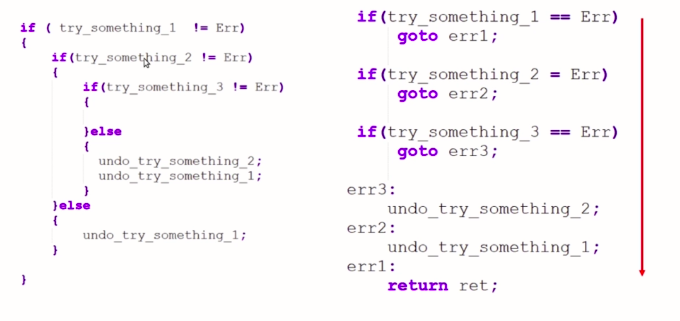
In kernel module programming, so the kernel coding a standard or kernel coding document recommends using the goto statement of C programming language to error handling as shown in Figure 1.
This is just a recommendation, you may use it, or you may not use it because some people they do not recommend using goto statements in any program. But with a linux kernel programming, it is allowed. You can use this. But, it is also recommended that you use it only for error handling.
How a goto statement is useful in error handling?
Here is an example. In most of the kernels initialization function, the kernel initialization codes will execute whenever you insert a module. If there is something that goes wrong or if any kernel function returns an error code or null pointer or something like that, then you cannot insert the module. The module insertion fails.
In that case, you should detect the errors, and you should undo some operations. That means you should a destroy some data structures, or you should free some memory.
Let’s say, in the modules initialization function, you are trying something, let’s say try_something_1. If that is not an error, then you try_something_2. And if that is not an error, then you try_something_3. While trying something 3, if something goes wrong. That means, if try_something_3 gives you an error, then you should go to the else part.
And now you cannot insert your module. There is a problem in try_something_3. You should undo the successful executions of try_something_1 and try_something_2. Because they might have a utilized some data structures of the kernel, or they may be holding some kernels memory, something like that. You should undo that.
Such scenarios are very much common in kernel module programming or device driver programming. That means you try something, and if something goes wrong, then you undo the previous successful operations, and you exit.
For that purpose, you can, of course, use nested if and else statement, something which is shown here as shown in Figure 2.
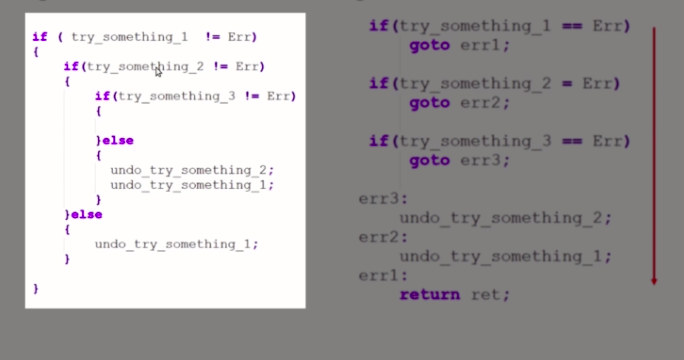
This looks bit complicated, and the code doesn’t look good. The same thing you can implement by using a combination of if and goto statements, something which is shown in Figure 3.
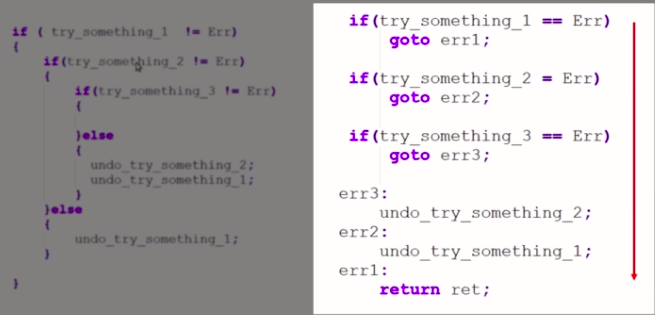
You can see that this code looks very much clean than this one. Here what you do is you try_something_1, if there is no error, then you try_something_2. And if try_something_2 is equal to error, then you don’t go to try_something_3. So, you branch out from there.
You take the help of goto statement to exit that code block, and you goto the error handling code block of error two. There you do the undoing operation of the previous one. That is undo of try_something_1. And then you return. This looks clean, and this looks simple. And it is very much straightforward.
In our driver’s module initialization function, we need to introduce this error handling now, and we’ll be using a combination of if and goto statements.
Let’s see how to implement error handling in the module initialization function practically. Let me open pcd.c, and let’s goto our module init.
static int __init pcd_driver_init(void)
{
     int ret;

    /*1. Dynamically allocate a device number */
    ret = alloc_chrdev_region(&device_number,0,1,"pcd_devices");
    if(ret < 0){
            goto out;
    pr_info("Device number <major>:<minor> = %d:%d\n",MAJOR(device_number),MINOR(device_number));

    /*2. Initialize the cdev structure with fops*/
    cdev_init(&pcd_cdev,&pcd_fops);

    /* 3. Register a device (cdev structure) with VFS */
    pcd_cdev.owner = THIS_MODULE;
    cdev_add(&pcd_cdev,device_number,1);

    /*4. create device class under /sys/class/ */
    class_pcd = class_create(THIS_MODULE,"pcd_class");

   /*5. populate the sysfs with device information */
   device_pcd = device_create(class_pcd,NULL,device_number,NULL,"pcd");


   pr_info("Module init was successful\n");

    return 0;
out:
    return ret;
}
Implement error handling in module initialization
First of all, alloc_chrdev_region. This is a kernel function, which may fail remember that. alloc_chrdev_region return 0 or it returns a negative error code.
If it returns a negative error code, then you cannot insert your module. Because you couldn’t allocate the device number, so you cannot proceed. Let’s take care of this condition.
Let me create a variable called error or ret, return value. Just ret. So, let’s catch what alloc_chrdev_region returns. If a return is less than 0, then let’s use goto statement. Let me use a tag name out. This is a tag out.
Now, let me implement that out code block, as shown above.
It branches out here to this label out, so the control comes all the way to this label out, and here it returns the error code.
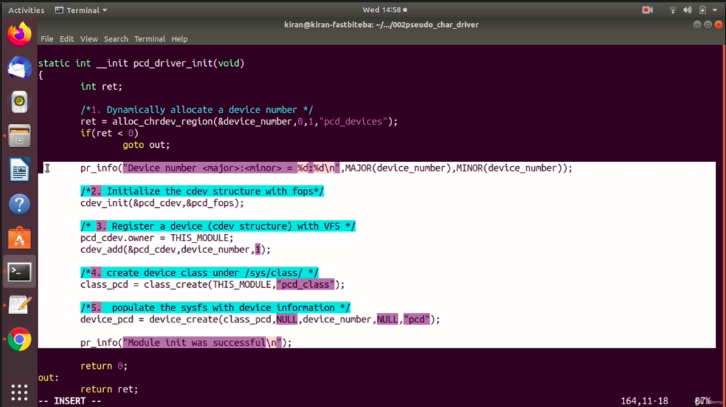
All these code blocks will be skipped (shown in Figure 4). That’s what we wanted.
Let’s go for cdev_init. First, let’s check cdev_init.
what it returns?
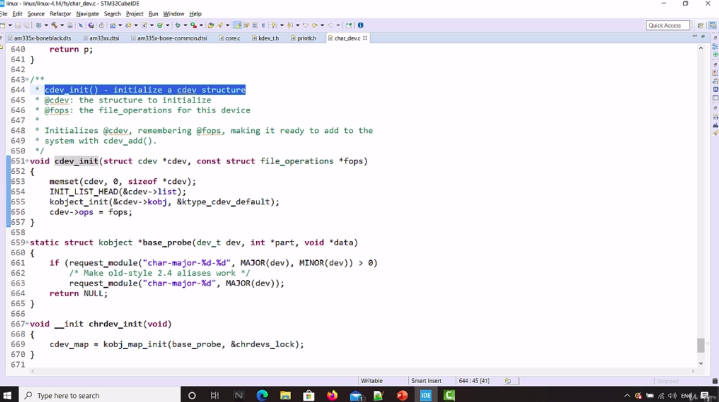
cdev_init it is void. It doesn’t return anything, as shown in Figure 5, so need not to check that.
Let’s proceed to cdev_add. cdev_add it also returns a negative error code on failure, as shown in Figure 6.
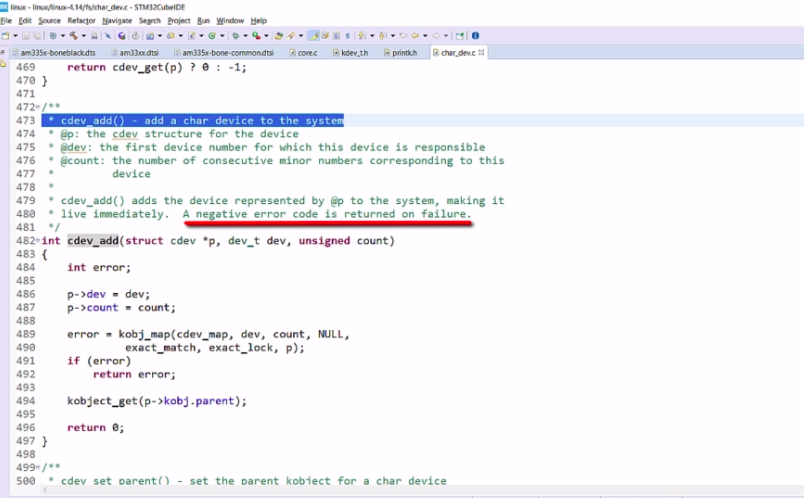
We have to check that. So, ret is equal to. Let’s catch that error value if (ret<0), goto let’s give one label. I would call this label as unreg_chrdev, as shown in Figure 7.
     /* 3. Register a device (cdev structure) with VFS */
    pcd_cdev.owner = THIS_MODULE;
    ret = cdev_add(&pcd_cdev,device_number,1);
    if(ret < 0){
                 goto unreg_chrdev;
Figure 7. Error handling in c_dev add
   /*5. populate the sysfs with device information */
   device_pcd = device_create(class_pcd,NULL,device_number,NULL,"pcd");

   pr_info("Module init was successful\n");
   return 0;

unreg_chrdev:
       unregister_chrdev_region(device_number,1);
out:
       return ret;
}
Figure 8. unreg_chrdev
This label you have to implement before this out, as shown in Figure 8. This is out, this is a last one.
You have to write that label ‘unreg_chrdev’. Here, you should undo the previous operation, that is, this (alloc_chrdev_region) operation.
What is undoing of this(alloc_chrdev_region) one?
You have to use unregister_chrdev_region.
Let’s see what happens here(in Figure 7). When ret is less than 0, goto unreg_chrdev. It comes to unreg_chrdev. It unregisters the device number here, and it returns.
Now, let’s check this one class_create.
What class_create does?
Let’s check that. Here it is class_create, as shown in Figure 9.
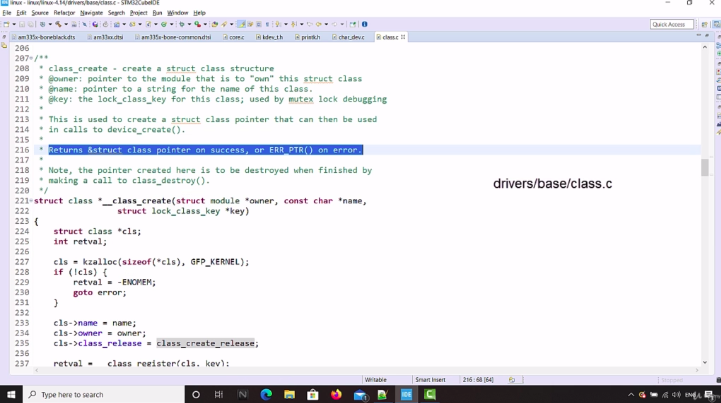
class_create returns a pointer. It returns address of struct class pointer on success. If there is any failure, then it returns error code. So, while doing kernel programming, you should be careful with those kernel function, which return pointer to some structure.
For example, in this case, class_create is returning a pointer to struct class. If class_create is successful, then a valid pointer is returned.
If class_create is not successful, then null is not return. You may be having a habit of checking for null. But, in this case, you cannot check for null. Null is not returned. If there is any failure in class _create, pointer to error code is return.
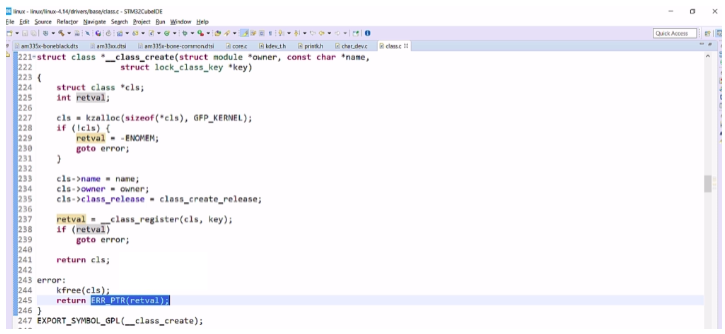
You can see what it returns here(shown in Figure 10).
What is retval here?
Return val was a integer. This integer is converted into a pointer using this macro ERR_PTR. Error code is converted as a pointer. This function should return a pointer. That’s why it cannot simply return this retval. Because that is int. So, that’s why this int is converted into a pointer type.
This ERR_PTR is there in err.h, as show in Figure 11.
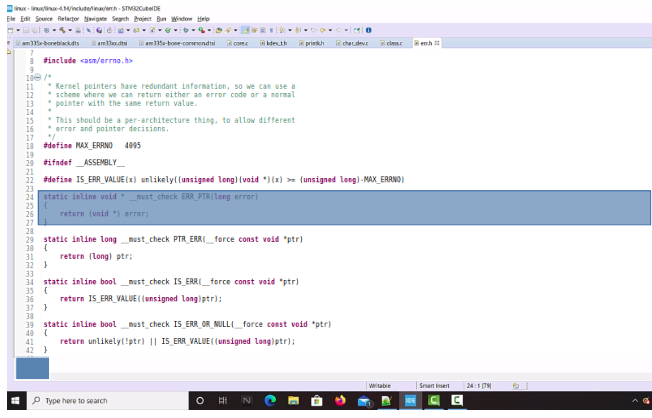
This is ERR_PTR. It just converts this value into a pointer.
How do you handle such things in your code?
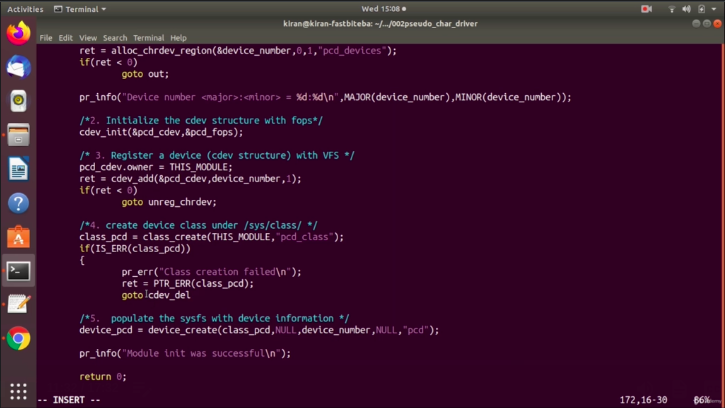
Here, what you should do is, if there is a successful invocation of class_create, a valid pointer is returned. But, if this function fails, then null is not returned remember, it returns a pointer to an error code. That’s why we should check this pointer.
To understand whether it is a valid pointer or whether it is a pointer to an error code. That’s a reason why we should use a macro called IS_ERR.
Just pass that pointer class_pcd. If IS_ERR is true, that means class_create has failed. And this pointer variable holds pointer to an error code. Here, you can print pr_info pr_err.
What’s a error code?
So, now we can extract the error code by using a macro pointer to error, PTR_ERR. Just pass this pointer class_pcd. And then you should goto undoing of all things. I would call this as goto a cdev_del.
Because if this is failure, then you should undo this cdev_add. That’s why I would give a label cdev_del. class_pcd is a pointer. This pointer(class_pcd) I cannot equate to ret. This class_pcd is a pointer, ret is a int value.
I cannot equate that. What I did was, I converted pointer to error code. So, that’s why we have to use PTR_ERR macro, which is there in err.h.
So, here it is Error handling of pointers during kernel function return as shown in Figure 13.
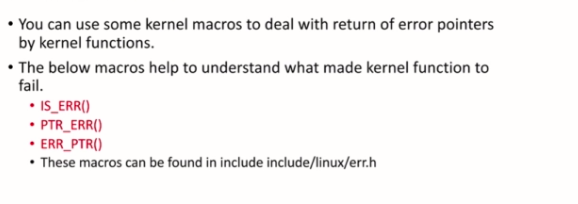
Whenever you are using any kernel function, and then you should go to the source code of that, and you should check the return value. That is no trick to understand what exactly a kernel function returns, you have to check the source code.
If the kernel function is returning a pointer, then most probably you should be using these macros in order to handle that a return pointer. These macro’s you can use to deal with a return of error pointers by kernel functions.
The below macros help to understand what made kernel function to fail. If any kernel function fails, and if it returns null, then you don’t have any idea why did it fail. That’s why most of the kernel functions they don’t return null rather, they return pointer to a error code.
That’s why, most probably, we will be dealing with these three macros IS_ERR(), which will test whether that pointer what is return by the kernel function is a valid pointer or whether it is a pointer to an error code. And PTR_ERR() converts pointer to error code. That is pointer value to int value. And ERR_PTR converts error to pointer. That means, int value to pointer value.
Let’s go back to our code, as shown in Figure 14.
    /*4. create device class under /sys/class/ */
   class_pcd = class_create(THIS_MODULE,"pcd_class");
   if(IS_ERR(class_pcd)){
       pr_err("Class creation failed\n");
       ret = PTR_ERR(class_pcd);
       goto cdev_del;
    }
Figure 14. Error handling
Here, we are detecting whether the class_create was successful or not. If IS_ERR is true, then class_create was failure. That’s why, we print class creation failed, and we convert the pointer to error code, and we store that here in the ret variable, and we exit from here. Go to cdev_del.
Let’s implement goto cdev_del here, as shown in Figure 15. cdev_del this is a label where you should do cdev_del.
cdev_del:
     cdev_del(&pcd_cdev);
unreg_chrdev:
     unregister_chrdev_region(device_number,1);
out:
     return ret;
}
Figure 15. Cdev_del code
This you must be doing here, as shown in Figure 15. It first does cdev_del and after that unregister_chrdev_region and then return.
Let’s check device_create, as shown in Figure 16.
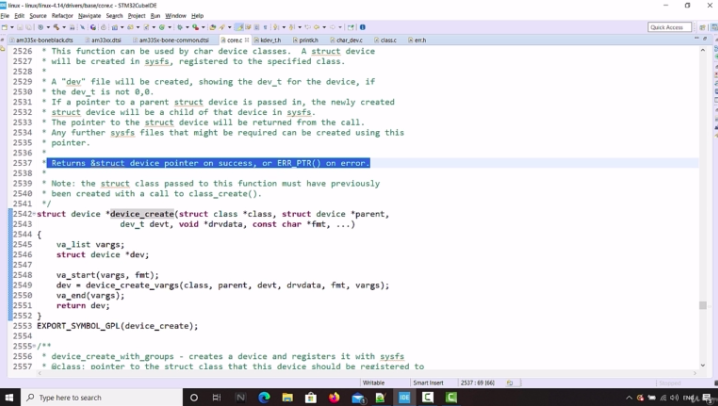
Again, you can see that it returns struct device pointer on success or ERR_PTR() on error. So, we have to again handle this. The same way as you handle for class_creates.
Now, let’s handle this return value if IS_ERR. Let’s check that pointer. device_pcd. If this is error, then I would say pr_err. “Device create failed”. PTR_ERR of Device_pcd. Goto class_destroy.
What is that?
You should do class_destroy. I would say class delete, something like that. Any label you can give. Let’s implement sorry, this is class_del. Class Delete.
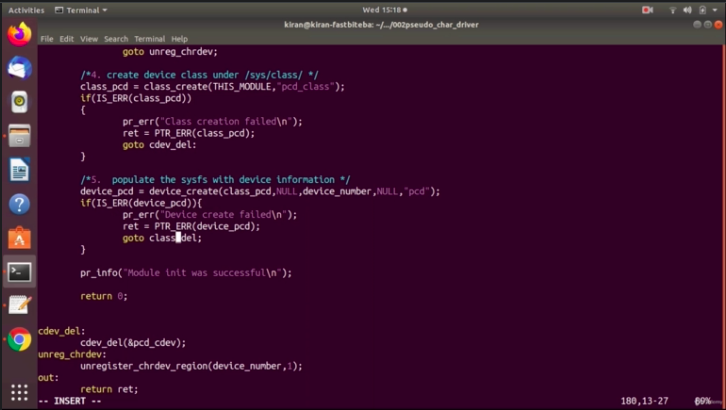
Let’s implement that class_del here. And let’s call class_destroy. If device_create fails, then the class will be destroyed, cdev will be deleted, unregister_chrdev_ region, and then return. This is how you should handle the various error scenarios in your driver_init function. Let’s save this and exit.
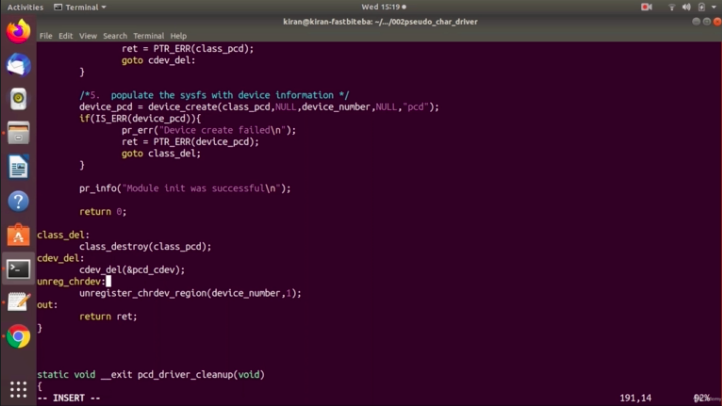
And let’s compile this, there is a problem at 172. Here, I should give a semicolon.
We can also add some error messages here. Let me add one more error message here “chardev failed”. So, you can also add one more error message here. And you can also add one more error message here. “Module insertion failed”. Let’s save and exit.
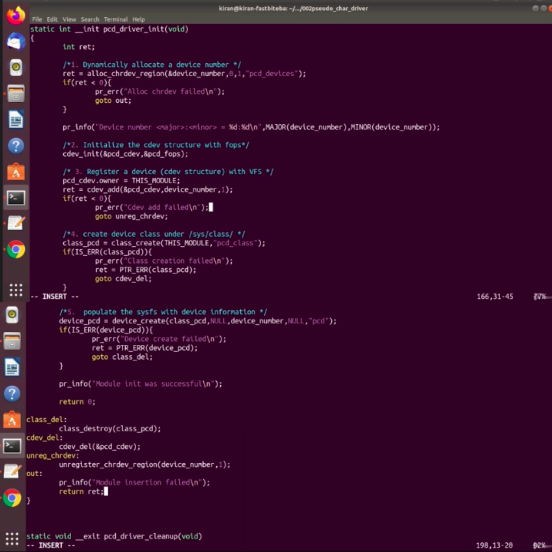
Now, let’s do make the host, and the build is successful. That’s it for this article, and I will see you in the next article.
FastBit Embedded Brain Academy Courses
Click here: https://fastbitlab.com/course1

