Creating Device files
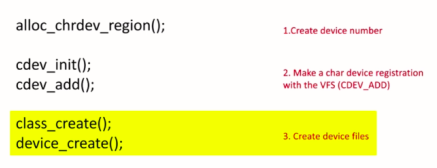
In a previous couple of articles, we did these two things. Creating a device number and making a character device registration with the VFS using cdev_init() and cdev_add() as shown in Figure 1. And we also a defined our driver’s file operation methods.
In this article, we delve into a critical aspect: creating device files. To achieve this, we’ll explore the class_create() and device_create() APIs. But before we proceed, let’s grasp the concept of dynamic device file creation in Linux.
In Linux, you can create device files dynamically; that is, you need not to manually create the device files under /dev directory to access your hardware.
Manually means by running some commands. You need not to run some commands to create them. You can create on-demand automatically by your kernel module itself. User-level programs such as udevd can populate /dev directory with device files dynamically.
Udev is a user level daemon, a which runs in the background, and it scans for uevents which are generated by the kernel, and by analyzing the uevents, it can populate the /dev directory.
Udev program actually a listens to the uevents generated by hotplug events or from kernel modules. When udev receives the uevents, it scans the subdirectories of /sys/class, looking for the ‘dev’ files to create device files.
Basically, whenever the udev receives uevents, it checks the /sys/class path to read a special file called ‘dev’ file. By reading ‘dev’ file, it creates device file. So, we’ll explore that as we make a progress.
For each such ‘dev’ file, which represents a combination of major and minor number for a device, the udev program creates a corresponding device file in /dev directory.
Basically, you should remember that udev relies on device information being exported to user space through sysfs. That means, your kernel module now should export your device information to sysfs. And udev takes that information from the sysfs, and it creates the dev file.
Uevents are generated when device driver takes the help of kernel APIs to trigger the dynamic creation of device files or when a hot-pluggable device such as a USB peripheral is plugged into the system. In those cases, the uevents will be generated, and it goes to the udev, then udev looks for the information in the /sys/class directory to create the device files.
All that a device driver needs to do for udev to work properly with it is ensure that any major and minor numbers assigned to a device controlled by the driver are exported to user space through sysfs. That’s all you need to do.
In your driver, you have created major and minor number, that’s what you call as a device number. You have to export that information to the sysfs, and rest will be taken care of by the udev.
The driver exports all the information regarding the device, such as device fie name, major, minor number to sysfs by calling the function device_create. We will be using this API now device_create. As I said, udev looks for a file called ‘dev’ in the /sys/class/ tree of sysfs to determine what the major and minor number is assigned to a specific device. You’ll see that when we use that APIs.
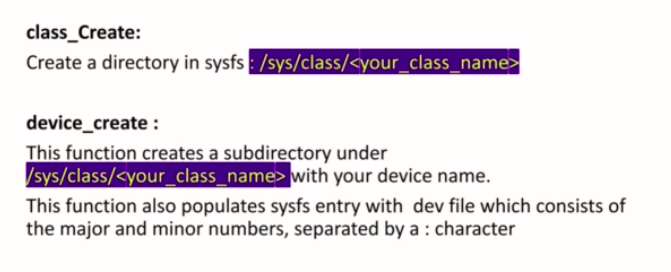
Now, we should be using two APIs, class_create and device_create.
First, you should do this. Create a directory in sysfs for your device. You should give one class_name. Let’s say ours is sudo character device driver. Let’s give a name, let’s say, a pcd_class or something like that.
And after that, call device_create. This function creates a subdirectory under /sys/class/ your_ class_name with your device name. This function also populates sysfs entry with dev file, which consists of the major and minor numbers, separated by a colon character.
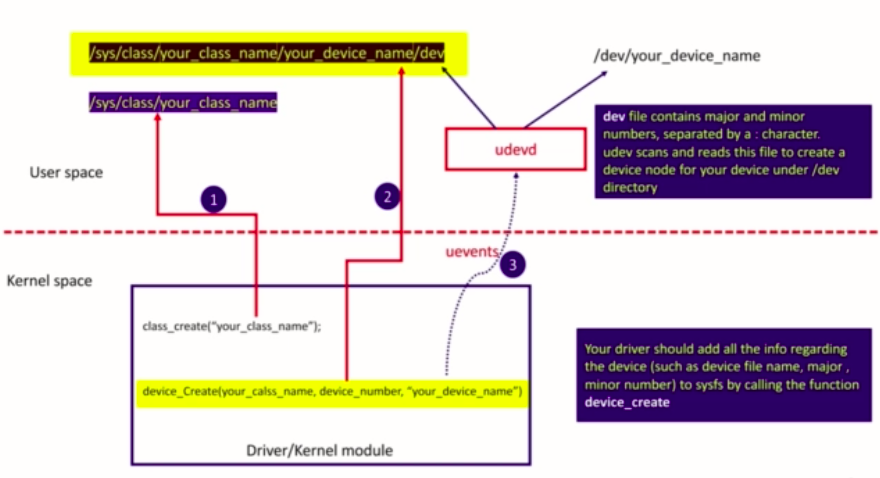
This is a summary, as shown in Figure 3.
First, you have to call class_create by giving a class_name. That creates a folder or a directory under this /sys/class. That is a first thing what you’re going to do.
And after that, call device_create. For the device_create, you give the reference to your class_name what you created in the previous step. You mention the device number, and you give a name for your device. Here you should mention the device name, that is, or device file name. When you use this function, what happens is, under your class_name your, another directory will be created by using your device_name what you mentioned here.
And under that directory, a special file is created called dev. And this dev file stores major and minor number combination along with the device file name. The uevents will be generated from the kernel. And when it reaches the user space, the udevd scans for that uevents, and udevd reads this dev file and understands what is a device filename, and what’s a major number, and what’s a minor number. Then it creates a device file under /dev directory. That’s how the dynamic device creation happens.

Before using these two APIs, let’s explore the syntax. First, you have to use class_create. All you need to do is just mention the class_name here. This function returns a pointer to struct class.

Let’s see one example, how to a use this class_create API as shown in Figure 5.
Now, first, you have to create a pointer variable for struct class. This is to catch what class_create returns.
You just have to use class_create with this module and a class_name. In our case, let’s use pcd_class, something like that. And after that, you have to call device_create shown in Figure 6. device_create populates the sysfs class you created in the previous step with device numbers and device names.
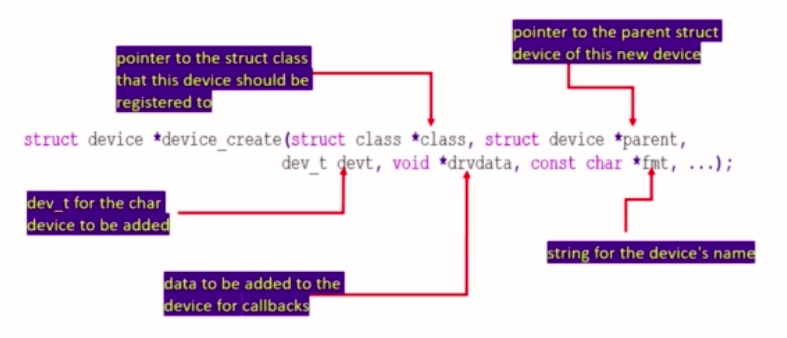
For device_create, you should give a pointer to the struct class that this device should be register to. The class pointer what you created in the previous step that needs to be given here. The pointer to parents device structure. You should use this field when this device is a child of some parent device, when you have parent and child hierarchy, then you may use this field. Like a parent could be some sort of bus or host controller.
After that, in this dev_t devt field, you have to mention the device number, what you obtained by using alloc chrdev region. And after that, this(void *drvdata) is a driver data. In this field, you can pass the private data of the driver. A some private data structure pointer you can mention here, that is the data of the driver.
In the pseudo character device driver what you are writing here, we don’t have any parent device, so this(void *drvdata) field will be null, and also, we don’t have any private data for the driver. This(struct device *parent) field will also be null so that both these fields will be null.
After that, this(const char *fmt) is a place where you mention the device name. This device name will appear in /dev directory.
In summary, you should use a two APIs, class_create and device create. Let’s get back to the code, and let’s include these two function calls as shown in Figure 7.
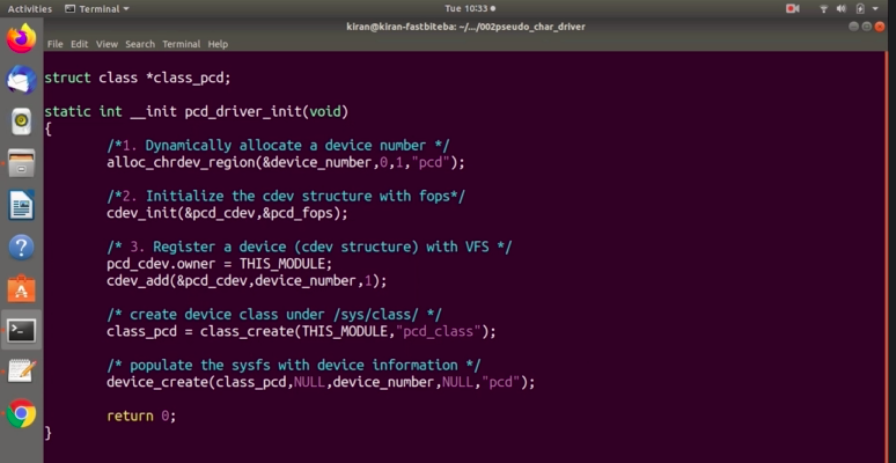
Use class_create and device_create to trigger the dynamic device file creation. First, let’s add the header file, the required header file is linux/device.h. And after that, our fourth stop is create device class under /sys/class.
For that, we are going to use class_create. class_create, the first argument is THIS_MODULE. This is a pointer to a module which owns this class structure. Here, the class_name, I would call “pcd_class”. So, this returns pointer to struct class. Let’s call it as class_pcd =. class_pcd let’s create here. The global variable, it should be a pointer. Struct class *class_pcd; This actually returns a pointer. That pointer could be a valid pointer, or it could be error. We have to check this pointer.
As I said, will take care of error handling later. For a time being, so let it be.
The next step is device file creation or populate the sysfs with device information. For that, we should create device_create.
What is the first argument?
The first argument is you have to mention the class_pointer, class_pcd. The second argument is a parent NULL, the third argument is device_number, the fourth argument is driver data NULL, let’s use NULL. Because we don’t have any parent device for this device. That’s why I’m using NULL.
So, use this only if there is any a parent and child hierarchy in your device hierarchy, otherwise, need not to use this field.
And now you should give here the device file name. I would just call pcd. This name will appear in the /dev directory of the user space. Or you can give any name you want. Let’s close this. device_create returns a pointer.
Let’s check device_create what it returns. So, now, if you check device_create, which is there in drivers/base/core.c shown in Figure 8.
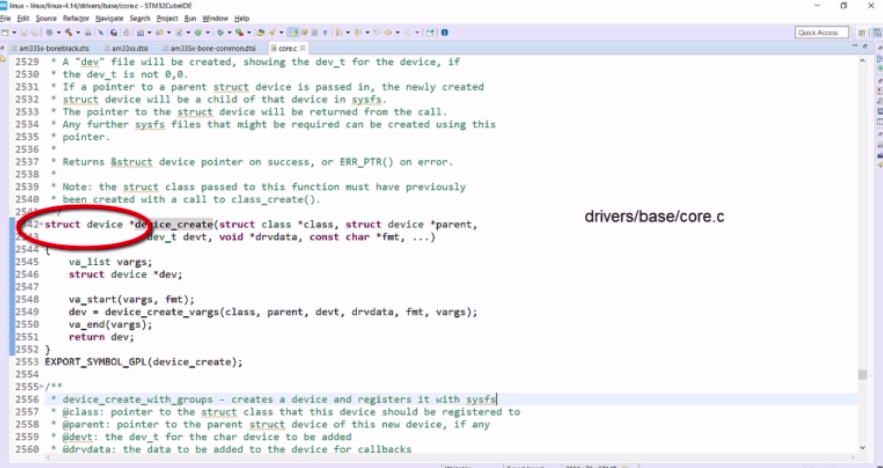
This actually returns a pointer to struct device. We have to catch that pointer. Because, that pointer is required when you want to destroy this device. That’s why, catch this pointer. What I would do is now is, let me create one more variable struct device, a pointer variable.
Let’s create a pointer variable. Let me call device_pcd, and let’s catch that pointer below as in Figure 9 device_pcd=.
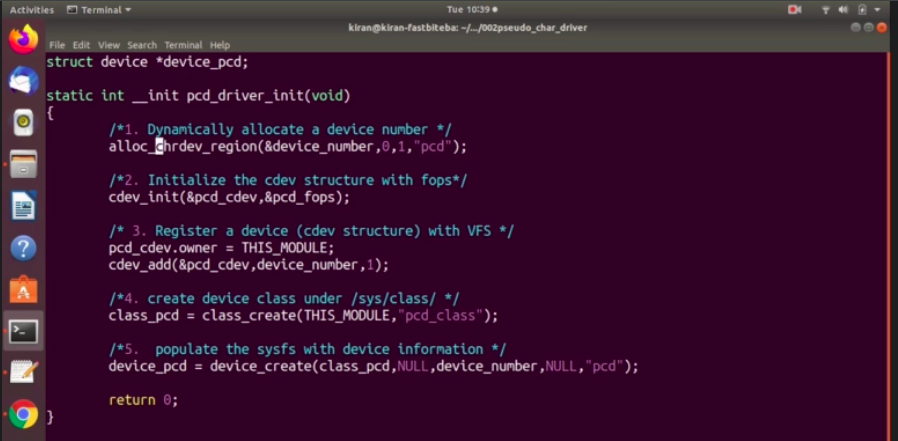
You see here in the alloc chrdev_region also we use than a pcd, now let’s alter this name. At both places it is pcd that may lead to confusion.
At alloc_chrdev_region, this is a name given to the device number or range of device_numbers. Let me give this name as pcd_ devices. And after that, we have completed all the steps now.
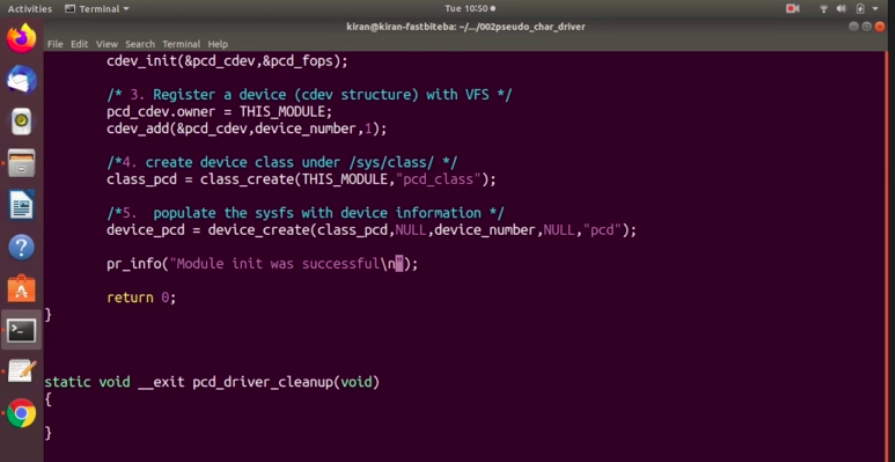
Let’s print Module init was successful, as shown in Figure 10.
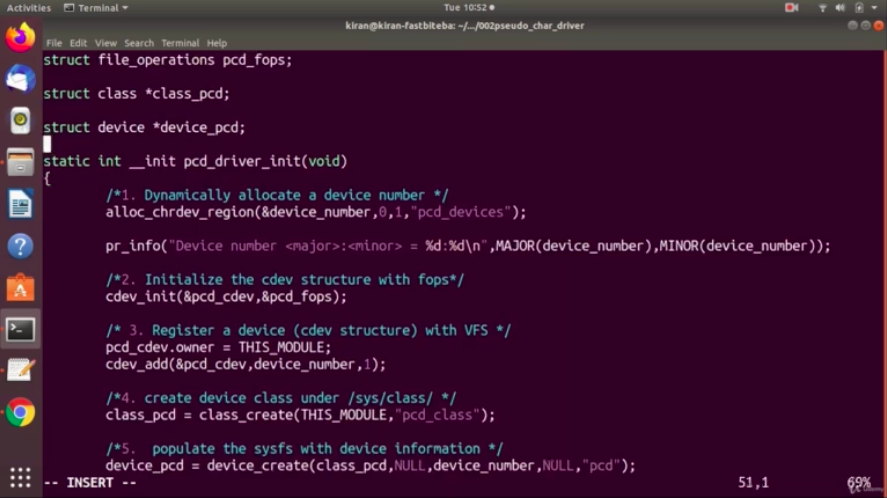
We can also print the allocated minor and major numbers here. What I would do is, I would go above, and I would print here.
pr_info(“Device number <major>:<minor> = %d:%d\n”,MAJOR(device_number),MINOR(device_number)):
You have to extract major and minor number from this device_number. What you can do is, you can use this macros, major and minor. This actually returns unsigned int. These macros are there in kdev_t.h, as shown in Figure 12.
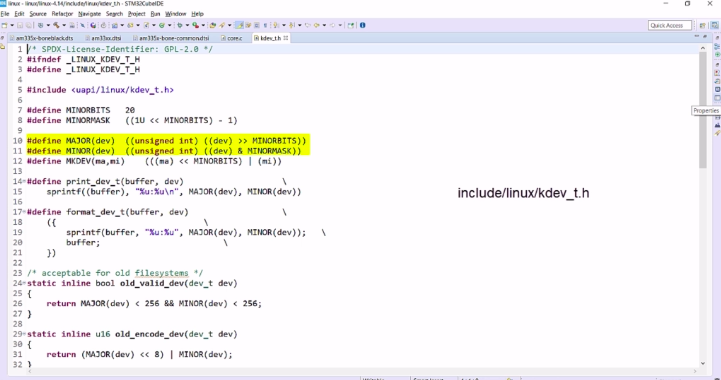
Let’s add that header file. Here you have to add linux/ kdev_t.h.
For this printf, let’s do a small setting. Here, when this message gets printed, we are not sure from which function it got printed. That’s why we can use one function macro here. What you can do is you can just write %s here, colon and replace this %s with the function name, that is this one pcd_driver_init. For that, you can use a macro called __func macro function. %s will be replaced by this current function name. But doing this with every print message would be tedious. Instead of that, we can use one trick.
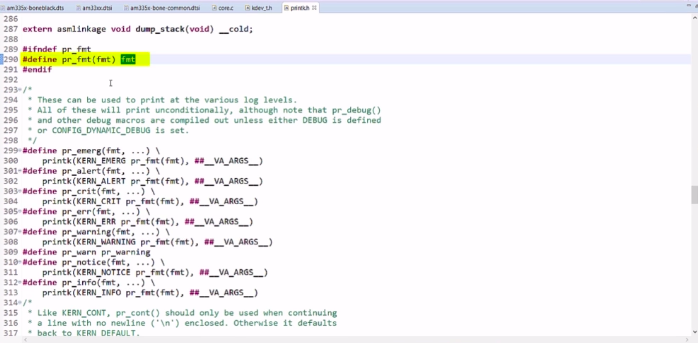
Let’s explore what exactly is this pr_info once again. The pr_info is described in printk.h as shown in Figure 13.
What is pr_info?
That’s a C macro. That means, in your program, pr_info is replaced by printk actually. And inside the printk, there is one more macro pr_fmt. This macro is defined above(Yellow color). This pr_fmt is actually replaced by this fmt.
Now, we can customize the value of this pr_fmt macro in our program. What you should be doing now is just copy this pr_fmt, and go to your program and let’s say I paste here somewhere.
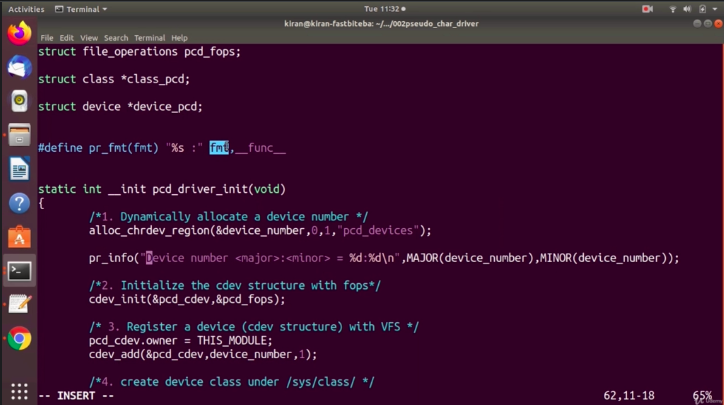
And after that, modify that format argument. To include some more information according to your need. Our goal now is to modify this argument to include the function name. What you can do is, let’s concatenate this %s with this pr_info argument. You can write in double quotes “%s, then give colon and then close the double quote. Now we have concatenated this string with this fmt.
Let me give one space before fmt. After that, give comma and mention this __func__ argument. Now, what happens is, this(“Device number <major>:<minor> = %d:%d\n”) whole string is going to replace this fmt argument. Prior to that we have concatenated this(“%s : “) one %s. And after that, before this(MAJOR(device_number),MINOR(device_number)) argument this(__func) argument appears.
Let’s keep this macro after the header files.
And since we have a modified this pr_fmt macro with this(“%s : “ fmt, __func__) value. Whenever you use print-related kernel APIs in your driver, each message will be a prefixed with current function name.
Let’s save and exit. And let’s try to build it. There seems to be some problem, as shown in Figure 15. Here, it says the pr_fmt is redefined.
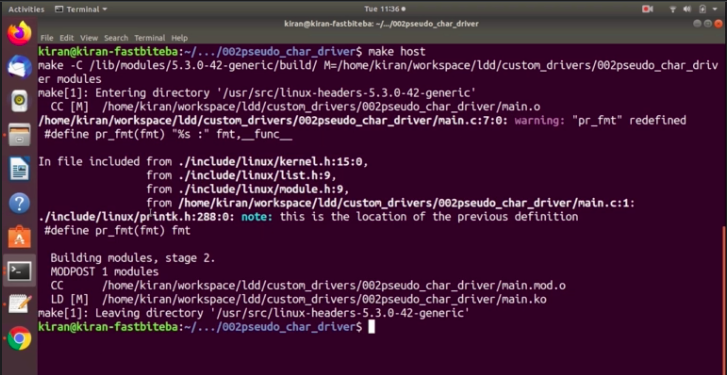
Because it is already defined in printk.h. What we can do is we can overwrite that. So, what you do is you first do undefine pr_fmt, if it is defined, it will be undefined and then define as shown in Figure 16.
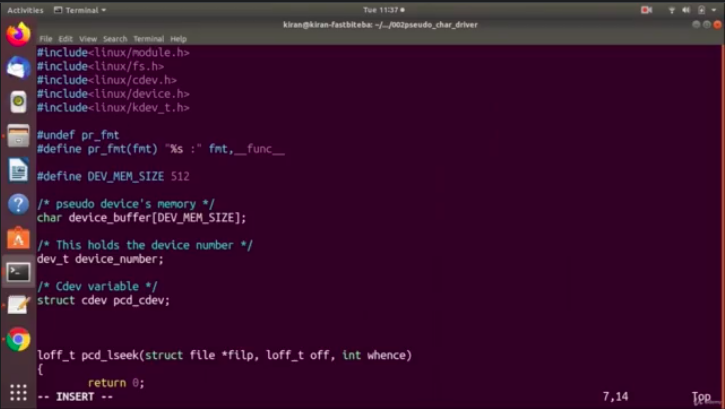
This is(pr_info(“Device number <major> : <minor> = %d:%d\n”,MAJOR(device_number),MINOR(device_number));) our first message, and this is our second message “Module init was successful”, and we can add some more messages to these a driver methods as shown in Figure 17.
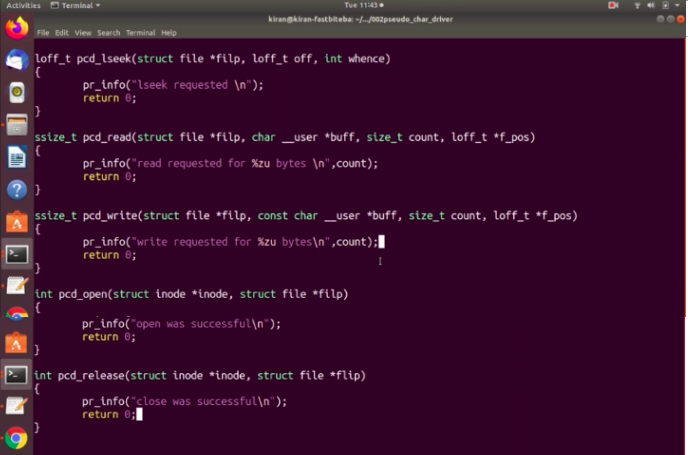
I hope you can finish up to here. In the next lecture, let’s implement pcd_driver_cleanup function, without that we cannot test this driver. Let’s implement this. I will see you in the next article.
Get the Full Course on Linux Device Driver Here.
FastBit Embedded Brain Academy Courses
Click here: https://fastbitlab.com/course1

