Debugging with Printk
In this article, we are going to explore debugging with printk.
printf is one of the best debugging tool we have in user-level applications. When we write user-level applications, we heavily use printf a statement. printf is a C standard library API.
When you work in kernel space, you will not have any access to the C standard library to access functions like printf or scanf. But not to worry because, kernel has its own printf like kernel API called printk, where ‘k’ signifies kernel space printing.
This is very much similar to printf. For example, let’s say if you want to print something in your user-level application, you will use printf something like
printf(“Hello this is user application running \n”);
Usage of printk is also the same way. Just replace your printf with printk that is
printk(“Hello this is user application running\n”);
And if you want to print any variable value, then you would use %d or %x, something like printf(“value of data1= %d data=%d\n”,d1,d2);
Same thing you can also do in printk that is
printk(“value of data1=%d data=%d\n”,d1,d2);
If you have used printf, then I don’t think you will have an issue in using printk. Both are similar. When using printk, the message will go into the kernels ring buffer, simply we call “Kernel log,” and we can print and control the kernels ring buffer using the command dmesg.
Suppose, if you want to check the latest 5 kernel messages, just run dmesg | tail -5.
If you want to check the first 20 kernel messages, then just run dmesg | head -20.
‘dmesg‘ is a command in order to print and control the kernel’s ring buffer. Please note that the printk does not support floating-point formats such as %e or %f.
There is documentation in the Linux source tree. The document name is printk-formats.txt. You should refer to this in order to understand what are the format specifiers you can use with kernels data structure.
Suppose, if you are using an unsigned char or char, then you can use %u or %x, and there are some kernels specific a typedef, such as size_t, a signed size_t. Whenever you deal with a these typedefs, then you may not be knowing which format specifier to use.
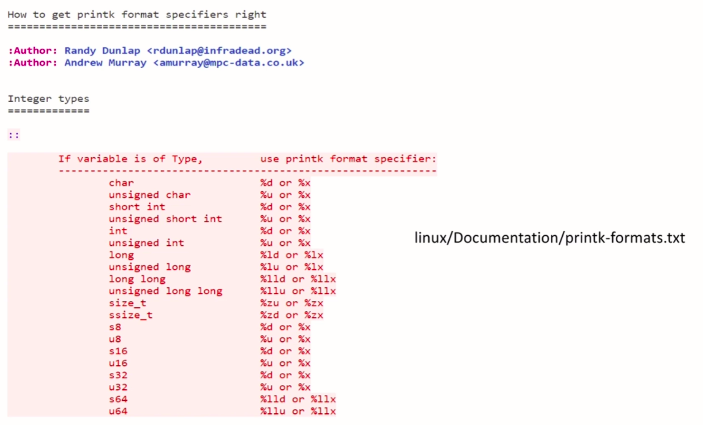
For example, here, size_t is a typedef version of a 32-bit value. Whenever you want to use such data types in your kernel module, then if you want to understand what exactly is a format specifier for that, you have to refer to this documentation (in Figure 1).
Suppose, if you are using a variable of data type long long, then you have to use %lld. This is where printk differs from printf. Printk comes with kernel log levels. Based on the kernel log level, you can control the priority of your printk messages. That means, for your printk messages, you can assign priorities or what we call log levels.
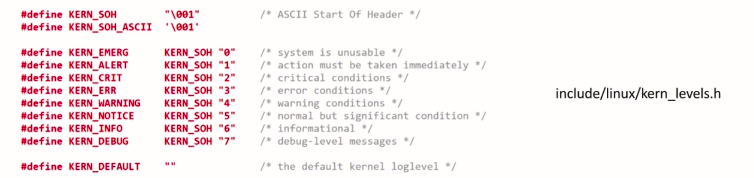
There are eight such log levels. A lower number indicates a higher log level or higher priority. And if you ask me, what is the default?
The default printk log level or priority is 4, that translates into kern warning. All these log levels are C macros, which you can find in this header file kern_levels.h(shown in Figure 2).
What is the use of log level?
The log level will be used by the kernel to understand the priority of the message. Based on the priority, the kernel decides whether the message should be presented to the user immediately by printing directly onto the console.
When we loaded our helloworld kernel module, you saw the message directly got printed on the command line, that has got something to do with this kernel log. We Will experiment more with this in later articles.
All kernel messages will have their own log level. You may have to specify the log level while using printk.
For example, a take a look into this printk statement that is
printk(“Hello this is kernel code running \n”);
Here, there is no log level visible, right? But the kernel will add the default log level set by the kernel config item CONFIG_MESSAGE_LOGLEVEL_DEFAULT, whose value is 4.
So, the above statement is equivalent to printk KERN_WARNING and the message that is printk(KERN_WARNING “Hello this is kernel code running \n”);
The KERN_WARNING is a log level, it is a C macro. And after that, you have to write your message. Printf like message. Note that there is no comma between log level and message.
If you don’t mention the log level, then it defaults to CONFIG_MESSAGE_LOGLEVEL_DEFAULT config item of the kernel. Get into the linux source and run the command make ARCH= arm menuconfig

And here go to kernel hacking.
Here go to printk and dmesg options, and here you see the default message log level. From here, you can configure the default message log level. And it is by default set to 4. So, you can change it while building the kernel. (shown in Figure 4).
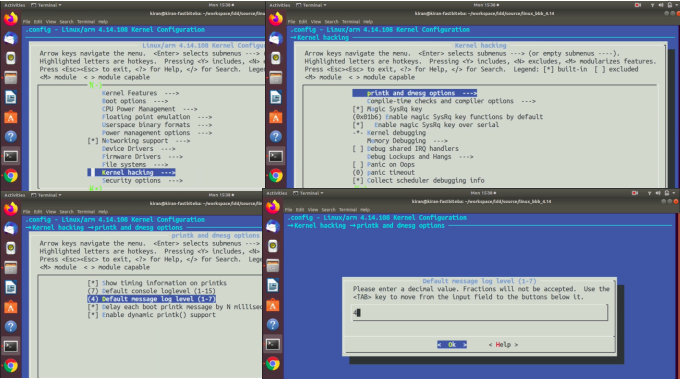
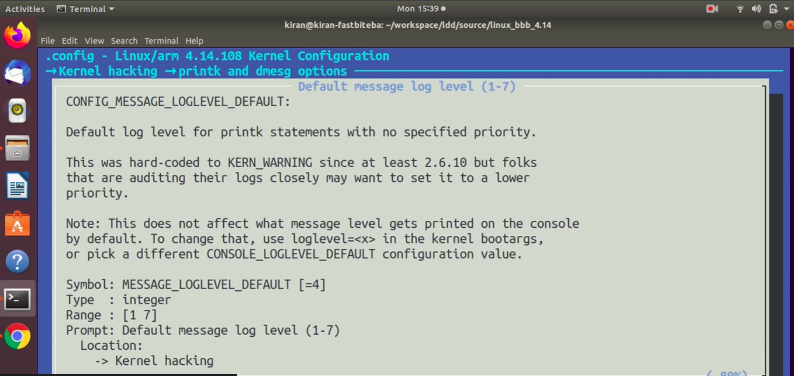
If you check the help option here, you can see that the config item name is CONFIG_MESSAGE_LOGLEVEL_DEFAULT( as shown in Figure 5). Default log level for printk statements with no specified priority. Let’s exit this.
Let’s understand what is the significance of kernel log level?
Let’s say you have two printk statement
- printk(KERN_ALERT” Hello this action should be taken immediately \n”);
- printk(KERN_INFO” Hello this is just for your information\n”);
First one uses kernel log level KERN_ALERT, and the next statement uses the kernel log level KERN_INFO.
What is the difference between these two?
Here, what happens is the kernel message log level will be compared with current console log level. Remember that KERN_ALERT, KERN_INFO is printk kernel log level. Apart from that, there is one more log level, what we call as current console log level.
There are two different types of log levels.
The kernel or printk message log level will be compared with current console log level. If the kernel message log level is lower than the current console log level, then the message will be directly printed on the current console.
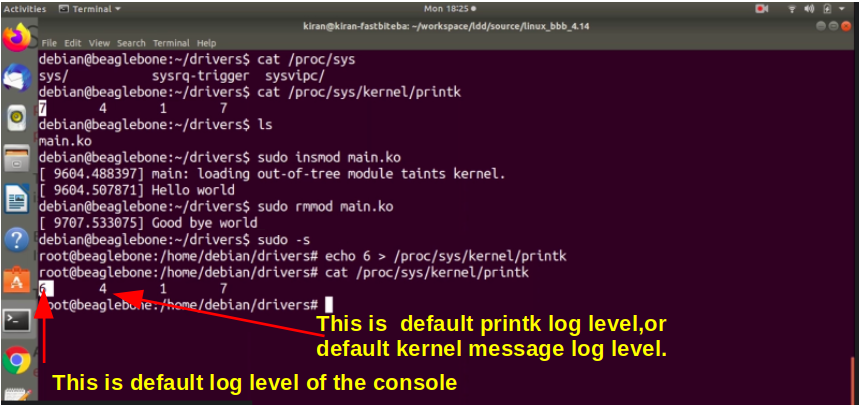
By default, console log level will have the value of CONFIG_CONSOLE_LOGLEVEL_DEFAULT. Its default value is set to 7. You can change it via kernel menu configuration or running the below commands.
To know the current log level status, just run: cat /proc/sys/kernel/printk
At run time you can change the log level values using the below command:
echo 6 > /proc/sys/kernel/printk
By using the echo command, you can change the current log level values.
Now, again let’s check our kernel menu configuration. Go to kernel hacking and the same option printk and dmesg option as shown in Figure 4.
Here you see one more log level, the default console log level, as shown in Figure 6.
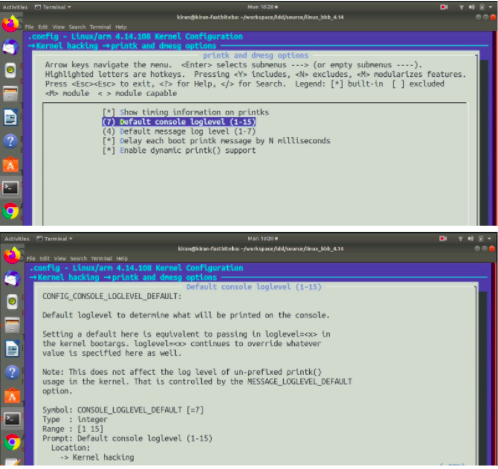
Its value is set to 7 by default. The config item name is CONFIG_CONSOLE_LOGLEVEL_DEFAULT. Default log level is to determine what will be printed on the console. Your printk’s log level will be compared with this value, and if a printk’s log level value is lesser than this value, then the message will be directly printed on the console.
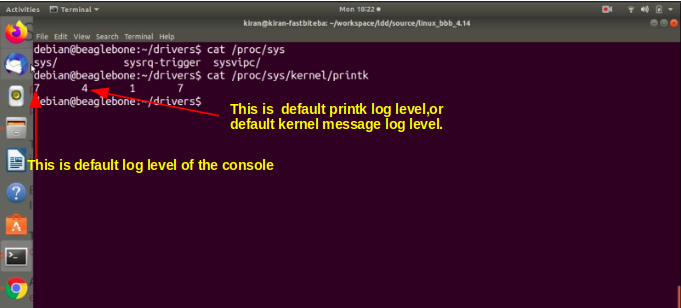
Let’s run few commands to understand that. In order to read the current log level status, you can run the command cat/proc/sys/kernel/printk as shown in Figure 7.
When I load this module main.ko, let’s load that module as shown in Figure 8.
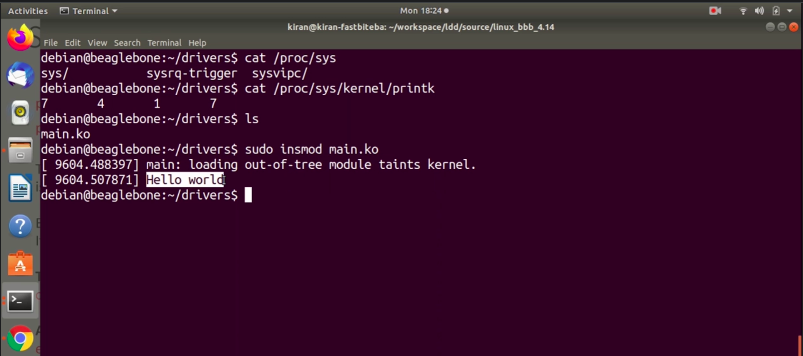
You see, the message “hello world” is directly printed on the console. That happened because we have used KERN_INFO to print this message “hello world.” We actually used PR_INFO, which actually resolves into a printk KERN_INFO. The KERN_INFO macro value is 6. 6 is less than 7. That’s why the message is promoted to the console.
You can change the default console log level to 6(shown in Figure 9). Let’s see what happens.
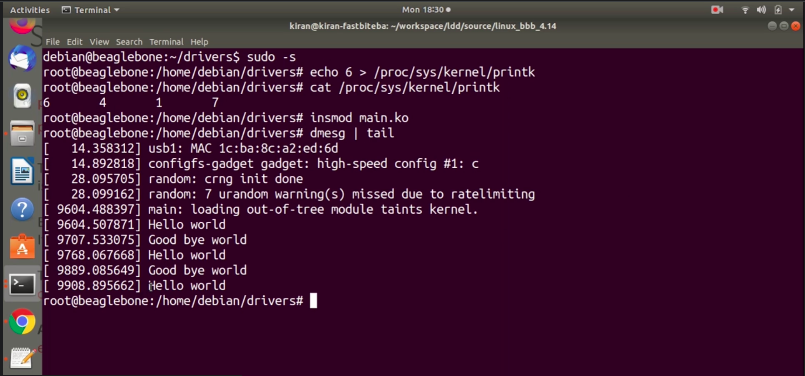
First, let me remove that module’s sudo rmmod main.ko, and now let’s use echo 6 and send it to /proc/sys/kernel/printk.Hit enter.
Try to insert the module. You see, the message is not promoted to the console. Because the current console log level is 6 and our printk’s log level is also 6. That’s why the message is not promoted to the current console. If you want to see that message, you have to run dmesg, as shown in Figure 10.
I hope you get the idea of why kernel log levels are used with printk. The kernel log levels are compared with the current console log level and, based on that kernel takes the decision whether to submit directly into the current console or not.
But in our code, we didn’t use printk API. We actually used wrappers. Instead of writing the log level and the message, you can use a wrapper function(shown in Figure 11).
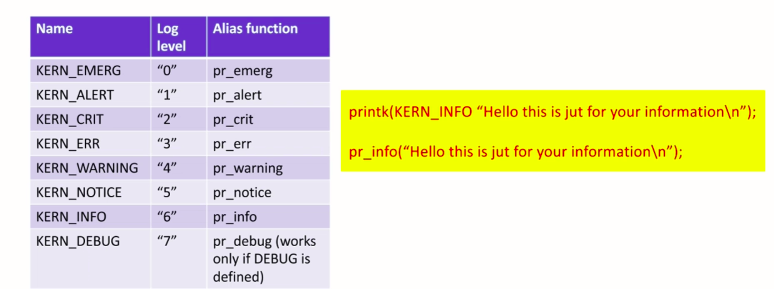
For example, instead of using printk KERN_INFO message, you can use it’s a wrapper macro, that is, pr_info. This is nothing but a macro that wraps this a function. That’s why, for KERN_EMERG, you can use pr_emerg. For KERN_ALERT, you can use the pr_alert.
While writing your kernel module, if you want to report any error, then you can use pr_error. And if you want to send some general information, then you can just use pr_info. And if you want to send any warning, then you can use pr_warning. And if there is any critical problem, then you can use pr-crit or pr_alert.
I hope you remember this, and these wrappers are defined in Include/linux/printk.h. In the next article, let’s get started with writing a simple character driver.
Get the Full Course on Linux Device Driver Here
FastBit Embedded Brain Academy Courses
Click here: https://fastbitlab.com/course1