Testing exercise 001 in landscape mode
Display VIBGYOR color bars in Landscape mode:
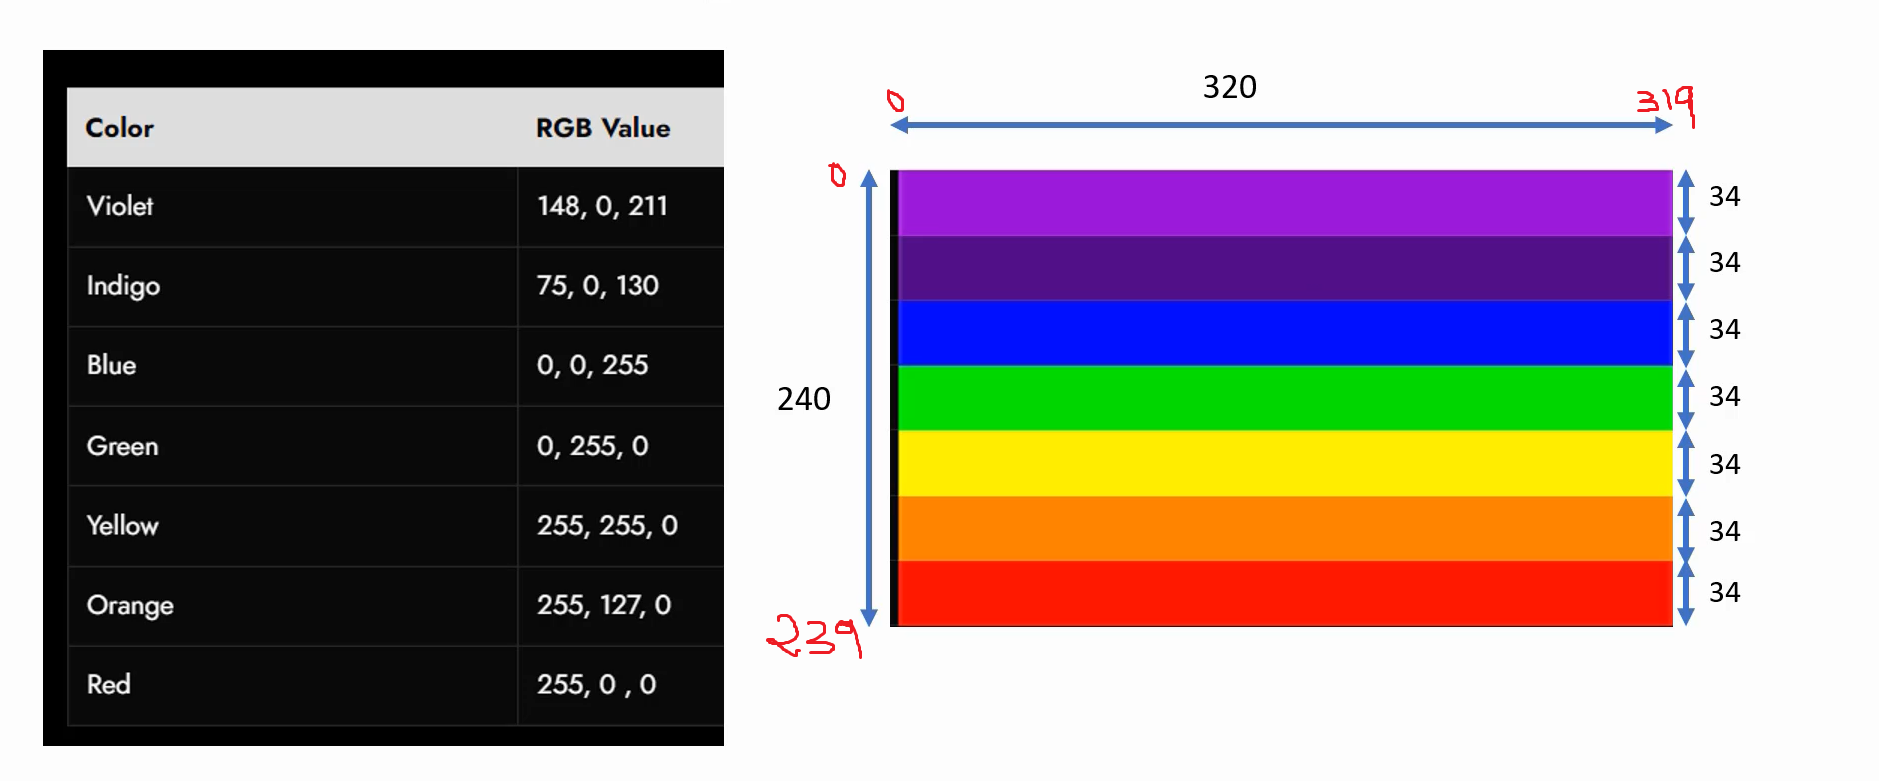
In the landscape mode, we are displaying these seven color bars( as shown in Figure 1).
Look at below code snippet, which shows the function bsp_lcd_fill_rect. You can utilize this function by providing the following parameters: the starting horizontal position and width of the rectangle in pixels, as well as the starting vertical position and height of the rectangle.
For instance, in this scenario, the display has a width of 320 and a height of 240. Hence, the columns are numbered from 0 to 319, where 319 represents the last column, and the first column is denoted by 0. Similarly, there are 240 rows, numbered from 0 (first row) to 239 (last row).
/*
* Disc: Creates a rectangle and fills color
* rgb888: Color value in RGB888 format
* x_start : Horizontal start position of the rectangle ( 0 <= x_start < BSP_FB_WIDTH)
* x_width : Width of the rectangle in number of pixels ( 1 <= x_width <= BSP_FB_WIDTH )
* y_start : Vertical start position of the rectangle ( 0 <= y_start < BSP_FB_HEIGHT)
* y_height : Height of the rectangle in number of pixels ( 1 <= y_height <= BSP_FB_HEIGHT )
*/
void bsp_lcd_fill_rect(uint32_t rgb888, uint32_t x_start, uint32_t x_width,uint32_t y_start,uint32_t y_height)
{
    void *fb_ptr;

   if((x_start+x_width) > BSP_FB_WIDTH) return;
   if((y_start+y_height) > BSP_FB_HEIGHT) return;

   while(y_height--){
#if(BSP_LCD_PIXEL_FMT == BSP_LCD_PIXEL_FMT_RGB565)
         #define BYTES_PER_PIXEL 2
         uint32_t fb_offset = (BSP_FB_WIDTH * BYTES_PER_PIXEL * y_start) + (x_start * BYTES_PER_PIXEL);
         fb_ptr = (uint16_t*)&bsp_fb[fb_offset];
         write_to_fb_rgb565(fb_ptr,x_width,Convert_RGB888_to_RGB565(rgb888));
#endif
y_start++;
}
}
To use this bsp_lcd_fill_rect function, you have to first send the color in the form of RGB888 and the horizontal start position.
Let’s begin with VIOLET; the color should be sent in the RGB888 format. The horizontal start position is 0, and the desired width is the full-screen width of 320 pixels. The vertical start position is also 0, and the vertical height is 34. This will create a rectangle with a violet color.
Next is the Indigo color. Here, we first send the color in the RGB888 format. The horizontal start position is 0, the width is 320 pixels, the vertical start position begins at 34, and the vertical height is also 34. By following this pattern, you can create the remaining rectangles as shown below.
void SystemClock_Setup(void);
void LTDC_Pin_Init(void);
void LTDC_Init(void);
void LTDC_Layer_Init(LTDC_Layer_TypeDef *pLayer);
int main(void)
{
     SystemClock_Setup();
     BSP_LCD_Init();
     BSP_LCD_Set_Orientation(PORTRAIT);
     LTDC_Pin_Init();
     LTDC_Init();
     LTDC_Layer_Init(LTDC_Layer1);
     bsp_lcd_set_fb_background_color(BLACK);
     bsp_lcd_fill_rect(VIOLET, 0, 320, 34*0, 34);
     bsp_lcd_fill_rect(INDIGO, 0, 320, 34*1, 34);
     bsp_lcd_fill_rect(BLUE, 0, 320, 34*2, 34);
     bsp_lcd_fill_rect(GREEN, 0, 320, 34*3, 34);
     bsp_lcd_fill_rect(YELLOW, 0, 320, 34*4, 34);
     bsp_lcd_fill_rect(ORANGE, 0, 320, 34*5, 34);
     bsp_lcd_fill_rect(RED, 0, 320, 34*6, 34);
/*loop forever*/
for(;;);
}
Now, let’s set the fb_background_color as shown below.
#define VIOLET  RGB888(148,0,211)
#define INDIGO  RGB888(75,0,130)
#define BLUE    RGB888(0,0,255)
#define GREEN   RGB888(0,255,0)
#define YELLOW  RGB888(255,255,0)
#define ORANGE  RGB888(255,127,0)
#define RED     RGB888(255,0,0)
#define WHITE   RGB888(255,255,255)
#define BLACK   RGB888(0,0,0)

void SystemClock_Setup(void);
void LTDC_Pin_Init(void);
void LTDC_Init(void);
void LTDC_Layer_Init(LTDC_Layer_TypeDef *pLayer);
int main(void)
{
       SystemClock_Setup();
       BSP_LCD_Init();
       BSP_LCD_Set_Orientation(PORTRAIT);
       LTDC_Pin_Init();
       LTDC_Init();
       LTDC_Layer_Init(LTDC_Layer1);
       bsp_lcd_set_fb_background_color(BLACK);

/*loop forever*/

for(;;);

}
Next, navigate to bsp_lcd.h and set the orientation to landscape mode. Then, set the layer width and height.
/*Select orientation*/
#define PORTRAIT 0
#define LANDSCAPE 1
#define BSP_LCD_ORIENTATION LANDSCAPE

#if(BSP_LCD_ORIENTATION == PORTRAIT)
   #define BSP_LCD_ACTIVE_WIDTH    BSP_LCD_WIDTH
   #define BSP_LCD_ACTIVE_HEIGHT   BSP_LCD_HEIGHT
#elif(BSP_LCD_ORIENTATION == LANDSCAPE)
   #define BSP_LCD_ACTIVE_WIDTH    BSP_LCD_HEIGHT
   #define BSP_LCD_ACTIVE_HEIGHT   BSP_LCD_WIDTH
#endif


/*Set layer width and height */
#define BSP_LTDC_LAYER_WIDTH      BSP_LCD_ACTIVE_WIDTH
#define BSP_LTDC_LAYER_HEIGHT     BSP_LCD_ACTIVE_HEIGHT
#define BSP_LTDC_LAYER_H_START     0
#define BSP_LTDC_LAYER_H_STOP     BSP_LCD_ACTIVE_WIDTH
#define BSP_LTDC_LAYER_V_START     0
#define BSP_LTDC_LAYER_V_STOP     BSP_LCD_ACTIVE_HEIGHT
Afterwards, execute the program and observe the output in Figure 2. You will notice seven color bars being displayed.

In the following article, let’s see how to display these things in portrait mode.
Get the Mastering Microcontroller: STM32-LTDC, LCD-TFT, LVGL(MCU3) Full Course on Here
FastBit Embedded Brain Academy Courses
https://fastbitlab.com/course1